Learn how to make vinyl shirts, tote bags, and much more with iron on vinyl! If you are new to working with vinyl, it can be a bit overwhelming, but this step-by-step guide will teach you exactly how to use heat transfer vinyl, and you will be making custom tees and more in no time!
If you are new to the world of working with heat transfer vinyl, then you are in the right place! This is my complete beginner’s guide to using heat transfer or iron on vinyl, and I am here to show you how to use heat transfer vinyl so you can start making!
Heat transfer vinyl (aka HTV) is hands-down my favorite way to personalize gifts for friends. I mean, who doesn’t love a fun new t-shirt?
With heat transfer vinyl, you can easily customize t-shirts to be something personal that the recipient will love. But iron on vinyl is not only good for t-shirts! You can use it on tote bags, leather notebooks, shoes, and even wood!
Ready to get crafting with heat transfer vinyl? Let’s do this!
How to Use Heat Transfer Vinyl with your Silhouette or Cricut
There are a few basic steps to working with heat transfer vinyl, and I will walk you through each one. The basic steps to working with iron on vinyl are:
- Preparing Your Cut File
- Cutting the Design
- Weeding
- Applying
That’s it!
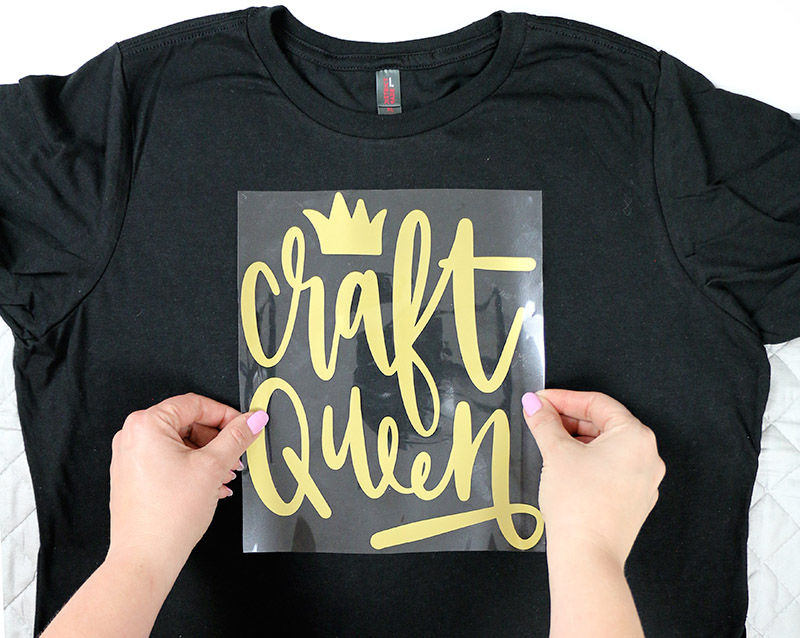
To walk you through the processing of making your own iron on vinyl projects, I am going to make myself a new t-shirt (yay!). using my Craft Queen design.
1. Prepare Cut File
The first step in crafting with heat transfer vinyl is to prepare your design to cut in the cutting machine software you are using. (If you do not have an electronic cutting machine like a Silhouette or Cricut, you can cut heat transfer vinyl by hand. Check out this project I did completely cut by hand for more info on that.)
What’s a Cut File?
When I say “cut file,” I mean the design that you want to cut from vinyl and put on your shirt or other surface.
The most common cut file type is probably SVG, but you might be using a .Studio, .png, .dxf, or .jpg file depending on the software you are using. I personally am a fan of SVG files because they work with most cutting software. (NOTE: You must have at Silhouette Studio Designer Edition or higher to use SVG files, and I definitely recommend that Silhouette users upgrade to Silhouette Studio Designer Edition. You can find more information on using different file types with your Silhouette here.)
Where to Find Cut Files
If you are looking for cut files, then be sure to check out the free cut files I have here on the blog. There are so many great blogs that give away amazing free SVGs. I link to a lot of them in my free cut file posts.
You can also purchase cut files to use in your projects. I have a cut file shop full of cute designs, or you can also find great designs in lots of online marketplaces like So Fontsy and Etsy.
I am also regularly pinning cut files to my Creative Cut File Pinterest Board, so that’s another great resource.
For my sample shirt, I used my Craft Queen design, which is available for purchase in my shop.
Scale Design
Once you have your design and surface picked out, you need to measure your surface to determine how big you will need to cut the design.
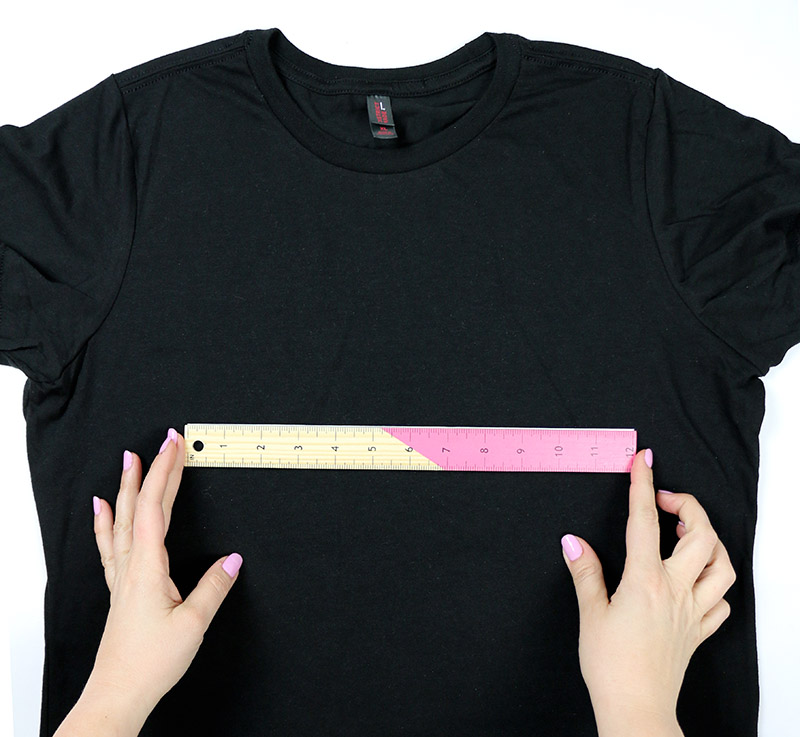
I am using a blank t-shirt that I had just waiting to be vinyl-ed. I recommend that you start by measuring your shirt to give you a general idea of how wide and tall you want to cut your design. I decided to cut mine about 8 inches wide.
(Check out this post for more information on scaling and positioning heat transfer vinyl.)
Once you know how big you want to cut your design, open up the cut file in your cutting software. Next, you will need to scale the image to the right size. Just click on the design and then use the handles in the corners to scale it down to the size you want.
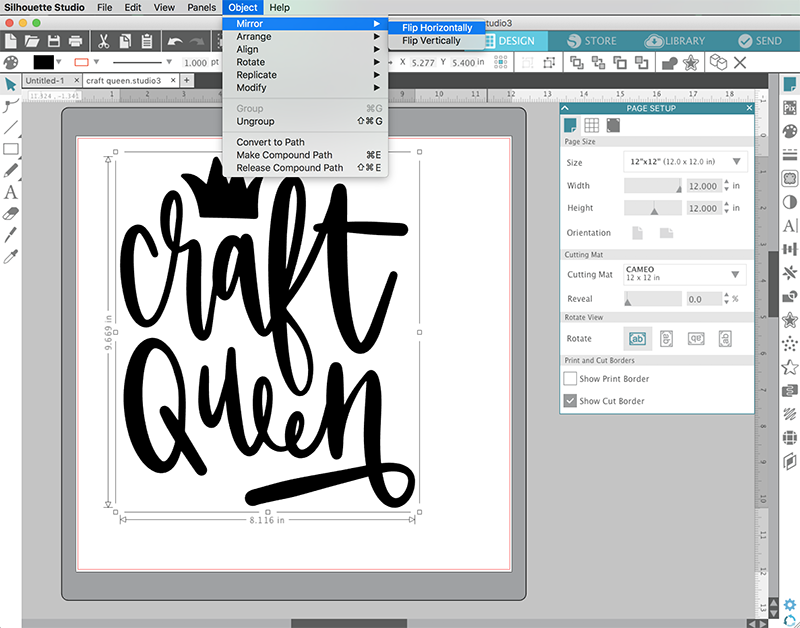
Mirror Design
Next, you need to mirror or flip your design horizontally. The reason that you need to mirror your design when working with heat transfer or iron on vinyl, you cut the design on the back side of the vinyl.
HTV has a clear plastic carrier sheet that covers the top of the vinyl, and the other side is where the heat-sensitive adhesive is (it is not sticky or tacky to the touch). You cut your design on the adhesive side, and then the clear plastic sheet on the other side holds your design in place until it is applied to your shirt or other surface. So, to make sure our design looks right when it is applied to the final surface, we need to first mirror or flip the design before cutting.
This is really simple to do with whatever machine you have. I will show you how to do it both in the Silhouette Studio software and in Cricut Design Space. To mirror the design in Silhouette Studio, click on the object to select it. Then, choose the Mirror option from the Object drop down menu and then select Flip Horizontally (see image below).
The process is really similar in Cricut Design Space. After uploading your design, select it, and then click Flip > Flip Horizontally (see image below).

That’s it! Your design is now scaled and mirrored and all ready to cut.
2. Cut Design from Heat Transfer Vinyl
Now we are ready to load our heat transfer or iron on vinyl into the cutting machine.
Place HTV on Cutting Mat
It is possible to cut vinyl directly from the roll without a mat using your Silhouette and with newer Cricut machines, but for now, let’s just focus on how to cut with a cutting mat. You can get Silhouette Cameo cutting mats in 12″ x 12” and 12″ x 24″. The Cricut cutting mats are really similar, and I have used Cricut mats with my Silhouette
Whatever mat and machine you are using, put your HTV glossy side down onto your mat so you will be cutting on the matte side (see image below). Remember, we are cutting on back side of the vinyl where the heat-sensitive adhesive is. This side will be more matte. The glossy side of the vinyl is the side with the clear plastic backing.
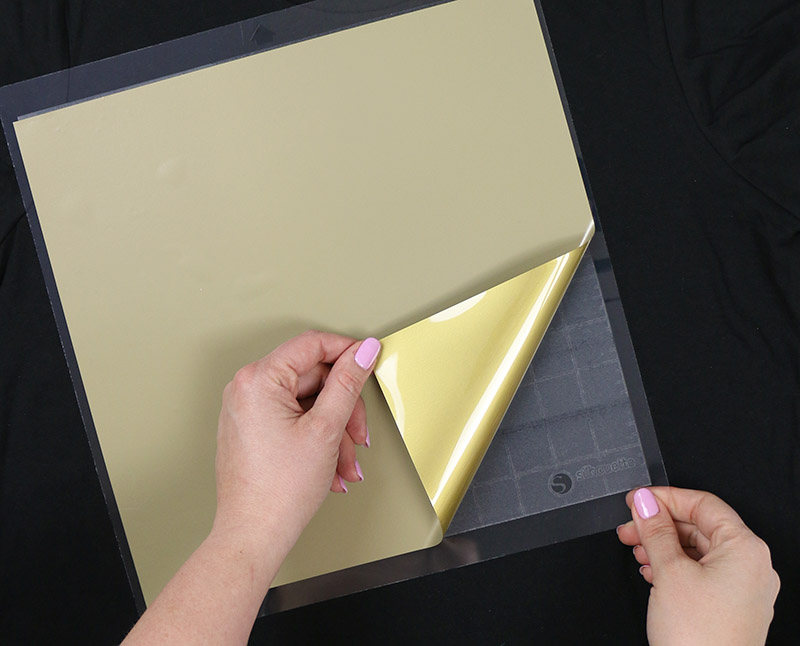
For my Craft Queen shirt I used a smooth gold HTV. If your vinyl came on a roll, you can cut off a piece to fit on your mat.
Adjust Cut Settings and Cut
Finally, adjust your cut settings to work with the material you are using. This process will be a little bit different for every cutting machine, but just make sure to choose the settings for the particular type of heat transfer vinyl you are using (flocked HTV will have very different settings from smooth HTV, for instance). Working with my Silhouette, I selected Heat Transfer Material, Smooth from the Materials menu.
I recommend doing a small test cut, especially when you are working with a new material to make sure the cut settings will work well with the material you are using before attempting to cut the entire design.
When you are happy with your cut settings, load your cutting mat with the vinyl shiny side down into your machine, and cut!

3. Weed out Excess Vinyl
The next step is called “weeding.” Basically, weeding just means removing any excess vinyl from around your design that you do not want to be transferred to your final product.
How to Avoid Wasting Vinyl when Weeding
If your cut design is considerably smaller than the piece of vinyl you cut it from, then before weeding, I recommend trimming off that extra vinyl. You can just use a pair of scissors to cut around your design. This allows you to use the rest of your vinyl piece for another project. (In my weeding images below, I actually cut a rectangle around my design with my Silhouette first and and then trimmed off the extra vinyl with scissors after weeding. Either way works!)
Tips for Weeding Heat Transfer Vinyl
To weed off the excess vinyl, you will need some kind of tool. I personally use, love, and recommend this weeding hook. It is sharp and works great for removing that vinyl. You can also use a Silhouette hook, a Cricut hook, stainless steel dental picks, tweezers, a craft knife, or even a straight pin.
Sometimes it can be a little bit difficult to see cut lines when weeding. Sometimes bending your vinyl a bit can help you see the cut lines like in the image below.

You can also try holding the cut piece of vinyl up to a window or light to help you see the lines. There is also the option of the Cricut bright pad, which is designed to help you see cut lines to make weeding easier.
Once you find your cut lines, use your hook or other weeding tool to grab one of the edges and lift up the excess vinyl or negative space from the carrier sheet. I like to start by removing the vinyl from around my design first and then remove the pieces from inside letters and other parts of the design.

Once you have all the excess vinyl removed from your design, you can flip it over and see how your final design will look through the clear plastic carrier. This is a good time to make sure you have weeded everything you don’t want to transfer to your final project.
4. Iron!
Now we are all ready to transfer our cut and weeded design to our t-shirt! To activate the adhesive on the heat transfer vinyl, you need two things: heat and pressure, both of which we can get using an iron.
If you use a lot of heat transfer vinyl, then you may want to get a heat press or Cricut Easy Press down the road, but for today we will just focus on using an iron. If possible, one that doesn’t have a bunch of big steam holes on the bottom will work best, but you can work with whatever you have at home.
Where to Iron
Because the heat transfer vinyl’s adhesive requires some pressure to activate, I recommend that you do not use a folding ironing board to apply your HTV designs. You don’t want to be pushing down on your ironing board and have it collapse beneath your pressure!
To really get good pressure, I prefer to use an ironing pad like this one on a sturdy table instead of a folding ironing board. You can also try putting a wooden cutting board on your table.
How to Iron
Start by plugging your iron in and putting it on the cotton setting with the steam turned off. Next, position your design on your surface with the clear plastic carrier sheet on top so the design reads correctly.
I prefer to cover the plastic carrier sheet with a piece of parchment paper or thin cotton fabric. I find that this helps to protect my surface and keeps my vinyl from overheating or warping.
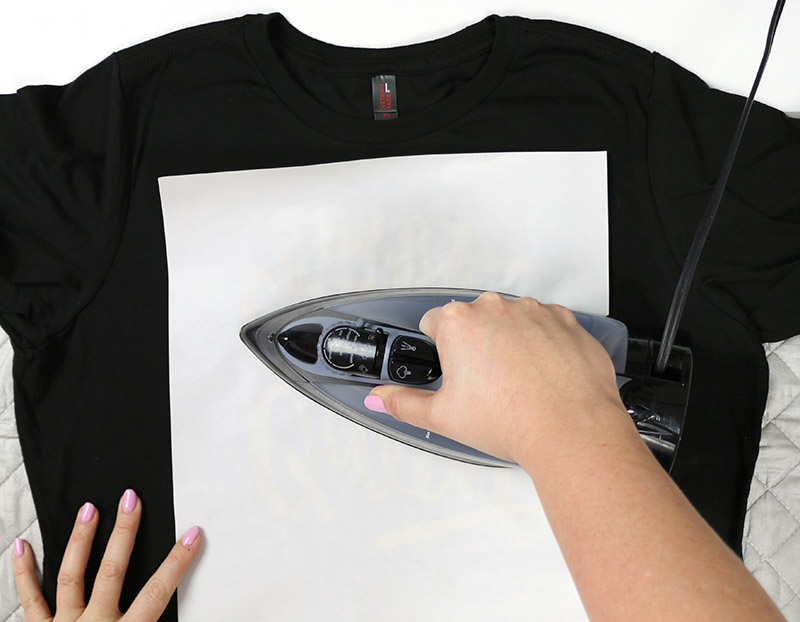
Press down on your iron and apply pressure to each part of the design for around 10-20 seconds. Some types of HTV will require more or less heat and time, so be sure to check the instructions for the material you are using.
I like to do a little bit of time, and then check the design to see how it is going. More time under the iron is not necessarily better as too much heat can melt the vinyl or ruin the adhesive. It’s also good to be aware of holes on the bottom of your iron. If your iron has holes on the bottom, be sure to move it around as you press to make sure each part of the design is getting heat and pressure.
When you you have given heat and pressure to each part of the design, you can slowly start to peel up the carrier sheet. If the vinyl starts to come up with the carrier sheet, then you need to replace the carrier sheet and your cover sheet and give it some more heat and pressure.
Project Notes:
Some types of heat transfer vinyl are “cold peel,” which means you must allow the vinyl to cool completely before removing the clear plastic sheet. Be sure to read the application instructions that came with your vinyl!
After removing the plastic carrier sheet, I like to flip my project upside down or inside out and apply some more heat to the backside to ensure a really good application. With smooth heat transfer vinyl, you can see that you have a good application when you can see the weave of the fabric through the vinyl (see the image below).

Once the iron on vinyl has been properly applied it is ready for wearing, using, and laundering. Allow the adhesive to cure for at least 24 hours before washing. Once it has cured, it can be washed and dried. For best results, wash inside out with cold water and hang to dry or tumble dry on low.
And that’s it! Everything you need to know to make your very first HTV project!
I hope this post was helpful for you. If you have any questions on how to use heat transfer vinyl, go ahead and drop them in the comments below. 🙂
Now that you know how to use heat transfer vinyl to make a simple t-shirt, you might want to try out some more advanced HTV techniques:
- Learn the knockout technique for layering heat transfer vinyl without extra thickness.
- Learn how to apply heat transfer vinyl to wood.
- Learn how to apply heat transfer vinyl to leather.
If you would like to branch out into the world of adhesive vinyl and make your own DIY vinyl decals, be sure to check out my beginner’s guide on using adhesive vinyl right here.
Until next time, Happy Making!

Iron On Vinyl Projects

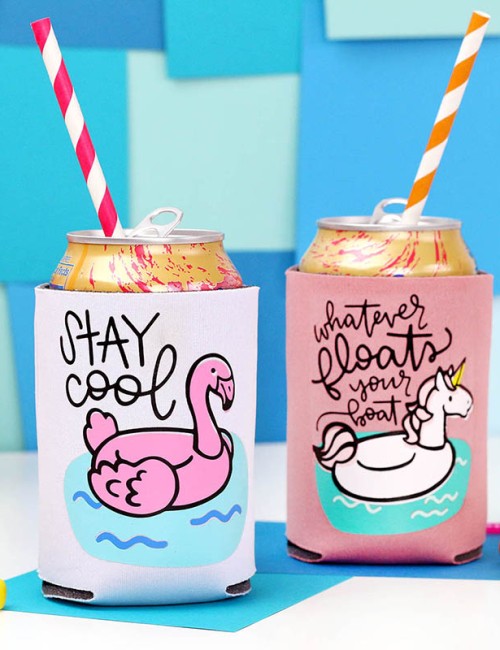
How to Make a DIY Koozie
Learn how to make DIY koozies with adorable pool float designs! It’s easy to personalize your can koozies with heat transfer vinyl,
DIY Christmas Unicorn Jacket
Make your own cute Christmas Unicorn jacket with this adorable hand drawn cut file design. This SVG cut file works with your
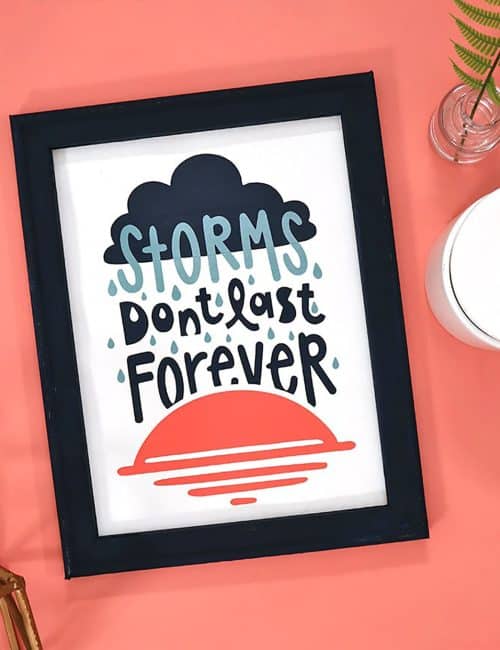
Storms Don’t Last Forever Free Cut File + More Inspirational SVG Cut Files
Download this free “Storms Don’t Last Forever” cut file and make your own inspiring home decor, apparel, and more. Plus, find 11


Comments + Project Love
Boushra says
if you want to cut out vinyl by hand- no machine, do you have to cut a mirrored image for it too?
Alexis says
If you are cutting with a pair of scissors, then you don’t have to mirror as long as you cut with the glossy side (the side with the clear carrier sheet) facing you, or with the design facing the right way when that glossy side is facing up. I hope that helps! I should maybe do a post all about cutting HTV by hand.
Jan says
A post about cutting by hand would be great!
Alexis says
Okay that’s a great idea, thanks! I do have one project where we cut HTV by hand that you can check out here: https://persialou.com/kids-tote-bag-craft/
Stacie says
Hi! Is there anything you can put on the back if you aren’t ironing it on immediately?
Alexis says
I think a piece of parchment paper would work well for that.
LaShonda says
I am new to HTV and have a bunch of removable HTV . Can I get good results using removable HTV on t-shirts or does it need to be permanent HTV?
Mary says
You can use removable, it just wont last nearly as long.
Mary says
HTV removable works fine, it just wont last nearly as long.
Lauren says
Thank you so much for an easy to follow instructions with pictures! I will be trying my first HTV item tonight 🙂
Allie says
Your tutorial is amazing and I appreciate it a lot! Thank you for sharing! You mentioned that you would share how to cut directly on the vinyl roll instead of a mat. I tried to search on your site and couldn’t find anything. Do you have any suggestions or a link that I could follow?
bARBARAANN says
The type is so tiny that I can’t read it on line. Could you send me a PDF to us? I hope this makes sence beccause I can’t see what I have written.
BarbaraAnn
bpsarts@sprintmail.com
ThNK YOU.
Kacey Kuykendall says
The application tape for htv is there a certain one that won’t melt or will all of them work?
Alexis says
I don’t have a lot of experience with application tape and HTV as I really just use the carrier sheet that most HTV comes with to position my designs. Sorry I’m not more help!
Sandy says
I’ve applied the vinyl. It wasn’t sticking so just went over it one more time. What a mistake! Plastic backing started crinkling and the vinyl has now adhered to fabric (mostly) but has a few kinks. Is there anything I can do to make it look better? Help!!!!!!!
Maria says
Thank you so much for such a GREAT post and inspiration. This was super easy to follow. Now off to make some shirts!! <3
Maria
Amanda says
This was super helpful, thank you so much for sharing!
Rhiann says
What about using a heat press instead of a n iron. Do you know what temp and pressure would be good for ?
Mary says
You can definitely use a heat press. Don’t know what settings and temp
Michelle says
Thank you for this post! I’m new to vinyl cutting, and I wanted so much to personalize my Bible bag. My HTV didn’t come with instructions. This was al life saver!
Sharon Lomo says
I ordered a heat press machine which should be arriving in a couple of days. I created counted cross stitch patterns and want to make t-shirts to advertise my designs. I get the concept of lettering however I would like to add my logo in front or at the top of my test and a sampling of my pattern designs which are in a variety of designs and colors in a collage under my text . How can I do that using vinyl?
Chelsea Morgan says
Am I Able to use the easy pass to instead of an iron?
Alexis says
Yes! I have a couple Easy Presses and use them all the time. I particularly like the mini. 🙂
Casey Louis says
Hi there! I’m new to the crafting world and am wanting to try to make a tshirt for my brothers business and a can koozie as well. What type/brand of HTV would you recommend? Something that hold s up in the wash and while at work? And for the koozie, something that won’t peel off. Thank you for any help you can provide!
Charlene says
Hi! This may be a dumb question, but if I were applying HTV to an area on cardstock that I cut out a shape; is it possible to just use heat around the edges to transfer or will the entire vinyl need heat?
Example: I cut out a heart on cardstock, the paper with the actual heart hole is what I’m working with. I want the heart to have a sparkly red middle so I cut out a heart on my vinyl. How do I apply it to the heart hole?
Katie says
Hello, what setting and temperature would you recommend for washing in a washing machine?
Thanks
Mary says
Wash on cold or warm, not hot, setting. Dry on on heat.
Yesenia says
What is a plastic carrier sheet? Is this different from transfer tape? Where can I buy plastic carrier sheet?
Sheila says
Your site does not view correctly when my iPad is horizontal position (required for my protective case). The menu takes up the entire screen and does not display correctly. I don’t have the issue on any other sites so I’m mentioning it as an FYI.
Ralph says
What a well-done walk through!! Now I am just waiting the 24 hours but my first try came out great! Thanks!
Brian says
Question….Can you overlap the clear part of the carrier sheet over another clear part of a different carrier sheet with an image on it. So, it would be carrier sheet layered over carrier sheet but no image on the top overlap. Clear to clear with image under bottom carrier.
Also when using printable HTV and an added carrier sheet, is it ok to have bubbles on the carrier sheet ? Not the vinyl, but between the two?
Alexis Middleton says
Yes. As long as the carrier sheet isn’t between the HTV and the surface you are applying it to, you should be fine! As for bubbles with printable HTV, a few small bubbles shouldn’t cause you much of an issue, but I would try to avoid them as much as possible. Hope that helps!
Mary says
Thank you so much! This was a awesome walk through, very helpful. Can’t wait to do more projects.
Tasha says
I do marketing for my company. My boss asked about buying a cutter so I can brand random items with our 2-tone logo (cups, coolers, shirts, etc). In addition to the cutter itself (looking at the Silhouette because I seriously can’t figure out what I really need), do i just need the two different colors of various types of vinyl? i’m so losst!