Learn how to make your own simple DIY Macrame Plant Hanger. This simple project is a fun way to add more greenery and life to your space. This is a sponsored post written by me on behalf of Miracle-Gro. All opinions are 100% mine. This post also contains affiliate links, which help to support this site without any extra cost to you. Thanks!
We moved into our new home almost a month ago and there are about 7583926560 projects I would like to tackle. Like immediately. You know how that goes, right? Of course, time and money are the unfortunate realities that are currently limiting or at least slowing the realization of my vision. BUT – I am finding ways to incorporate little projects and touches here and there that are helping me to feel more at home in the new place.
One of the things I have been doing is incorporating lots of plants into our new space, and I am LOVING it. Houseplants can be an inexpensive and easy way to instantly bring some color, texture, and life into a space. They are definitely making our new place feel much more homey. So while the kitchen may be halfway demo-ed and many months from being completed (yikes – more on that later), at least I have some new plant friends to brighten my days in the meantime.
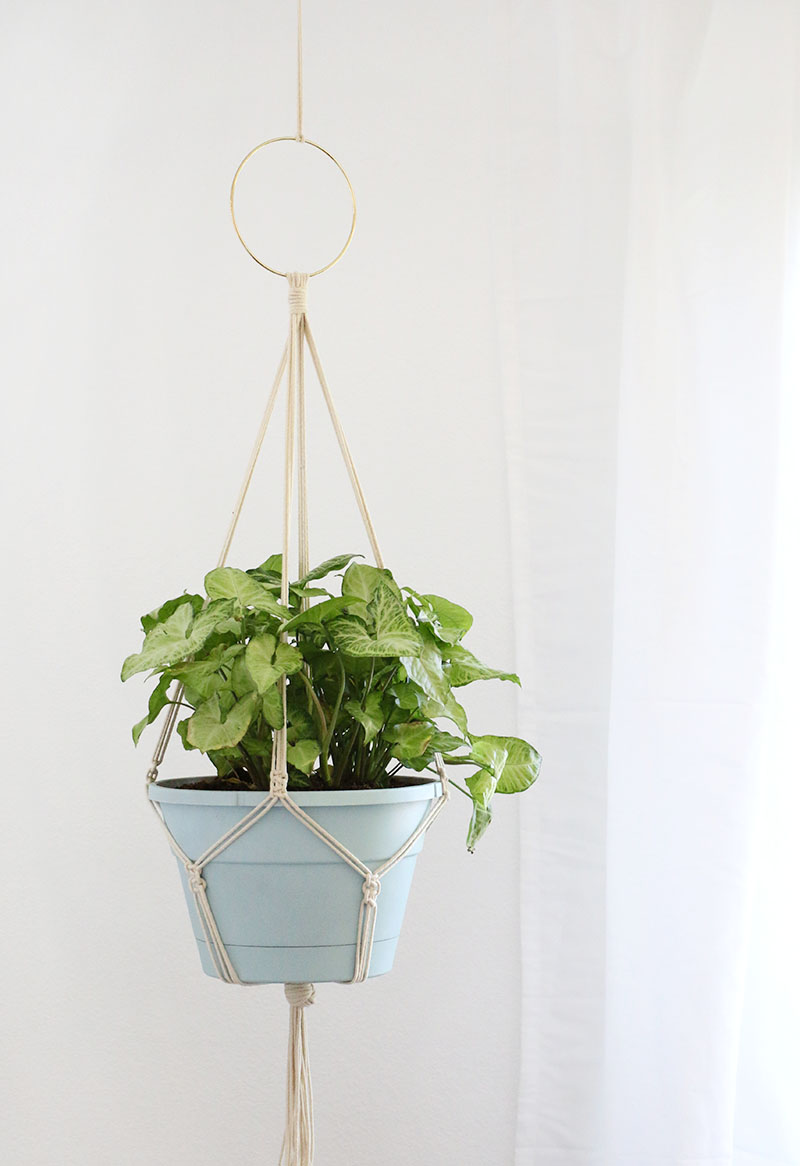
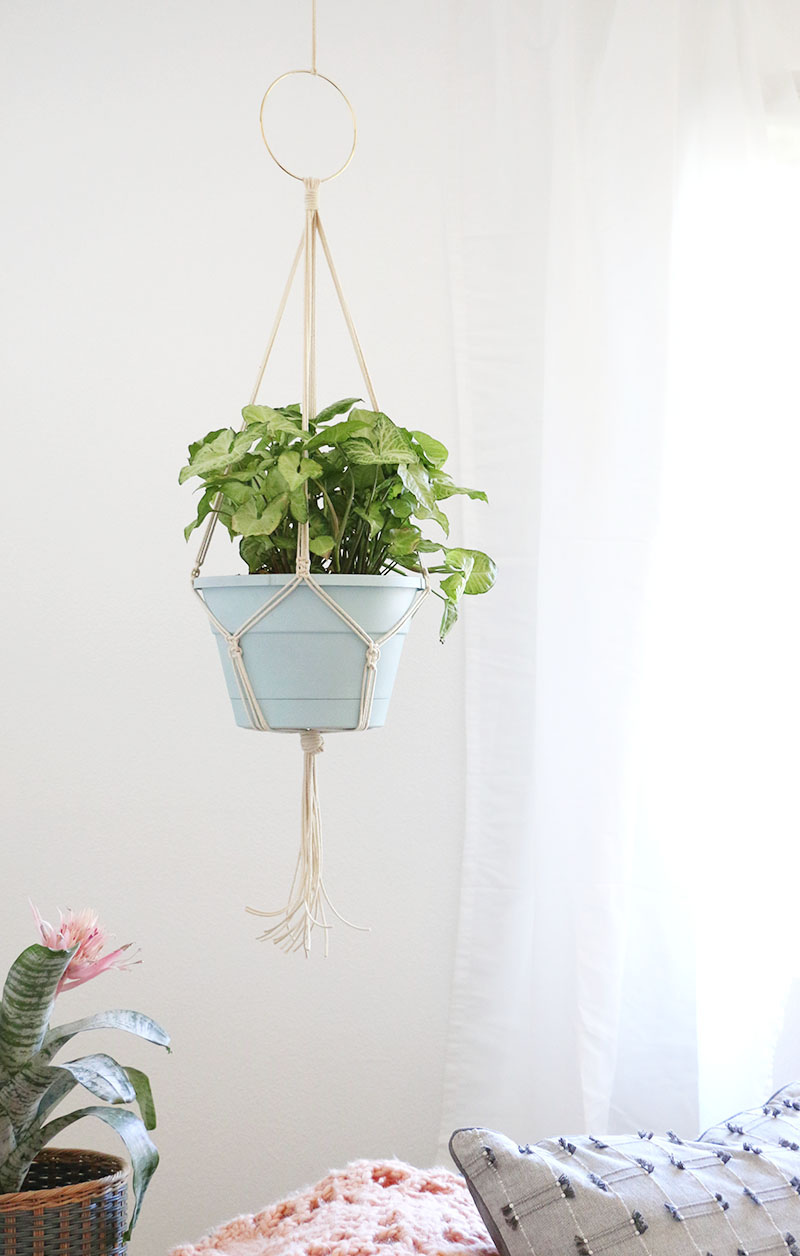
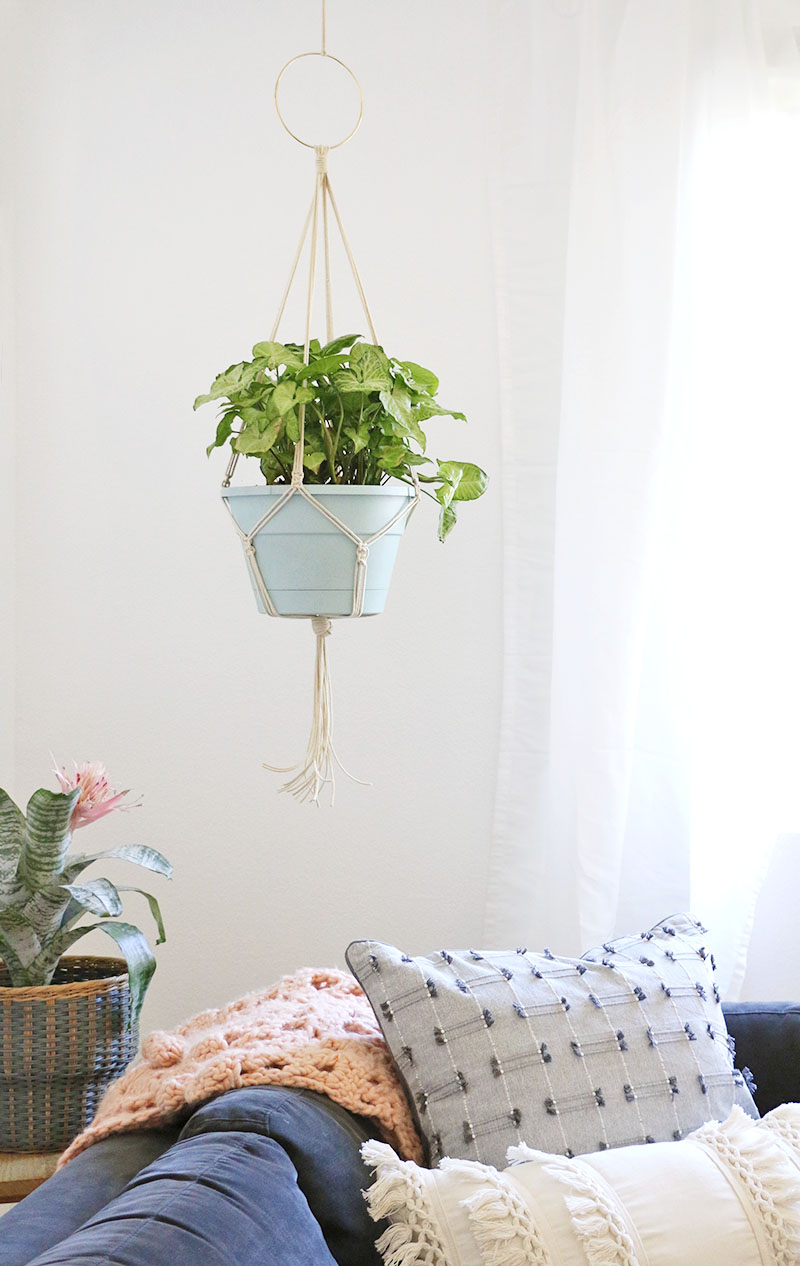
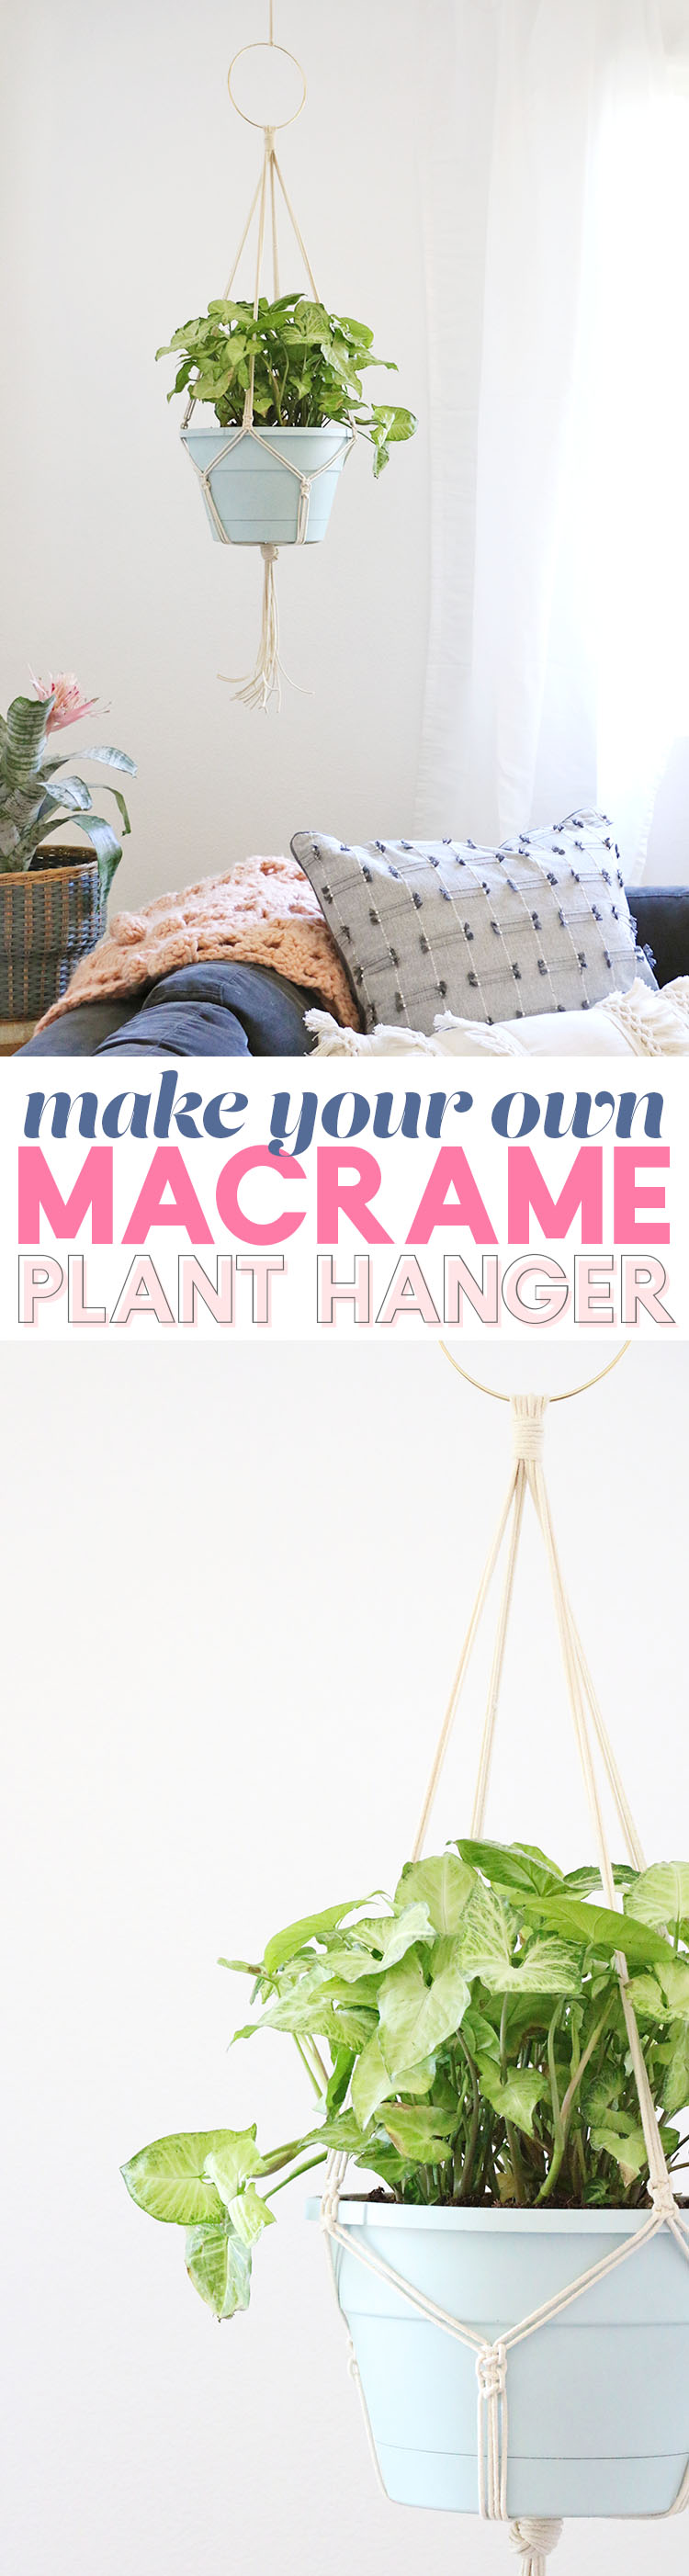
Because of all of this, I’ve been sharing several plant-related posts lately (like this one and this one), and I have another fun plant project to share with you all today – this simple DIY macrame plant hanger! I am loving how it is looking in the corner of our family room:
 What do you think? Have you jumped on the macrame trend yet? Wanting to give it a try? This project is super simple and uses only two basic macrame knots, so it is perfect for macrame beginners. And don’t worry – as always, I will walk you through each step. Ready to try some macrame? Let’s do this!
How to Make a DIY Macrame Plant Hanger
DIY Macrame Plant Hanger Supplies:
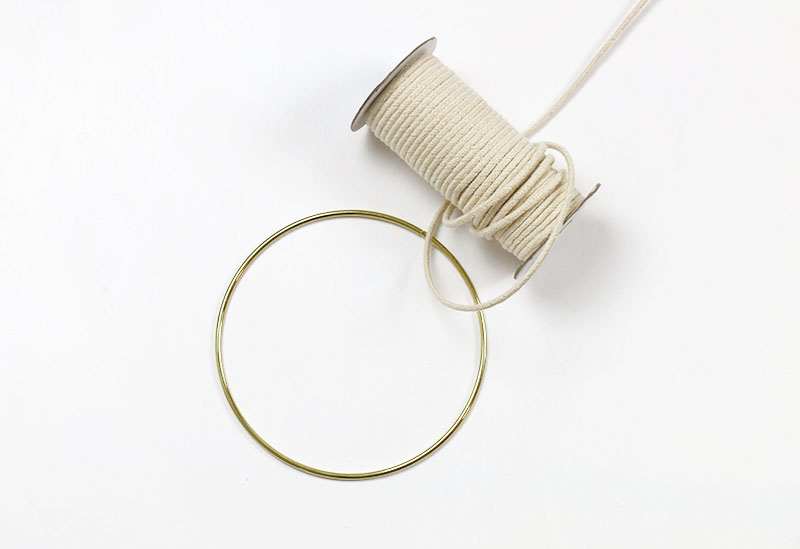
- 3mm Natural Cotton Macrame Cord
- 6 in Gold Metal Ring (or whatever size you like)
- Pot with Tray (I spray painted mine a robin’s egg blue with a matte spray paint designed to work with plastic)
- Scissors
- Miracle Gro Expand ‘N Gro
Step One. Move Plant to New Pot.
Start by getting your plant situated in it’s new pot. I recently wrote a post all about how and when to re-pot houseplants, so you can read all about that process HERE. My fiddle leaf fig, Jasper, that I thought was past the point of no return is even showing signs of new life after being repotted with the new soil. I’m holding out hope! I will keep you guys posted on how things go for Jasper. 
When your plant is happy in it’s new pot you are ready to start your macrame project. I have done a few macrame projects in the past, but I’m certainly no professional, so this little hanger is definitely a project anyone can tackle. I really only used two types of macrame knots to make it, and I really like it’s simple look.
Step Two. Cut Cords.
You will start your DIY macrame plant hanger by cutting 8 long pieces of the cotton macrame cord. For my hanger I cut my pieces to be 10 feet long each. This turned out to be just about the right length. My planter is a bit on the larger size, so if you are working with a smaller pot, your pieces could be shorter. Once you have your 8 long strands, loop them through the gold hoop making sure they fold over the hoop at the mid point. You will now have 16 long pieces of cord hanging down from the hoop.

Step Three. Wrapped Knot.
Next, we will secure them in place using the wrapped knot. This is a simple knot that has a polished, finished look. You will need another piece of cord for this knot. I used one about two feet long.
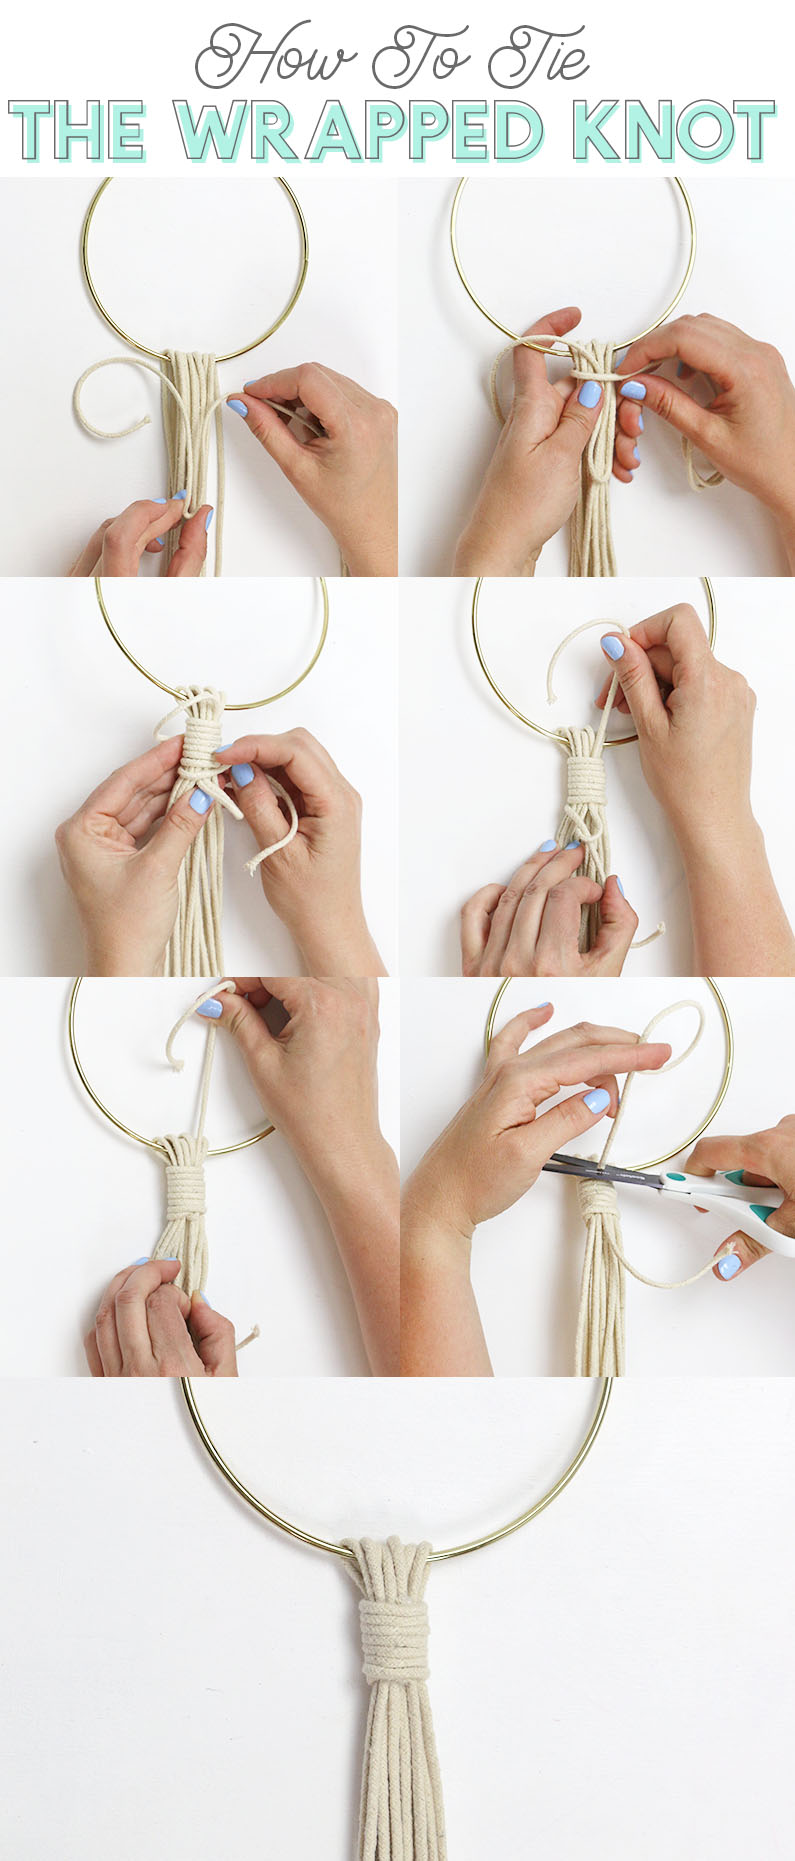
How to Tie the Macrame Wrapped Knot
- Place the short cord over your looped cords with the short tail to the left, a loop pointing down, and the long tail to the right.
- Wrap the long tail around the looped cords and the loop of the short cord.
- Continue wrapping the long tail, pulling tight and leaving the bottom loop of the short cord uncovered.
- When you are happy with the length of your wrapped knot, thread the long tail through the loop at the bottom.
- Pull up on the short tail to tighten the knot and pull it underneath the wraps.
- Clip the tails as close to the knot as possible.
And that’s it! I love how easy this knot is to do and how pretty it looks when finished. I know I will be using this in the future for tassel making.
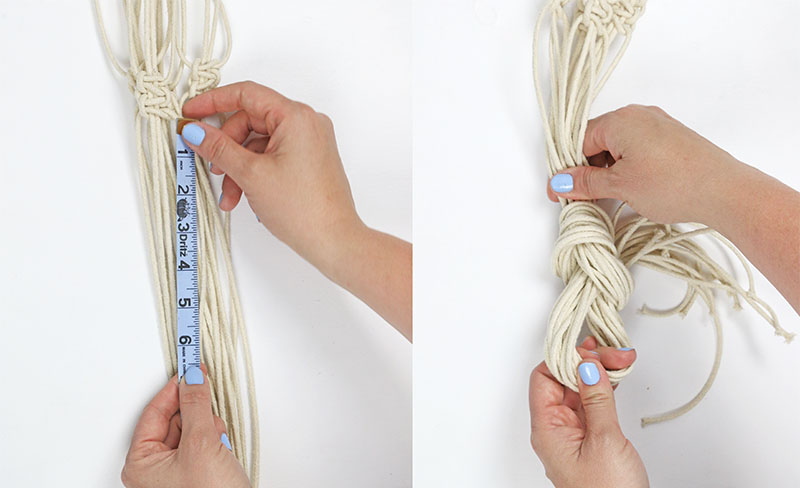
Step Four. First Row of Square Knots.
Next up, we will do a row of square knots. Start by dividing your 16 long strands into four groups of four strands each. 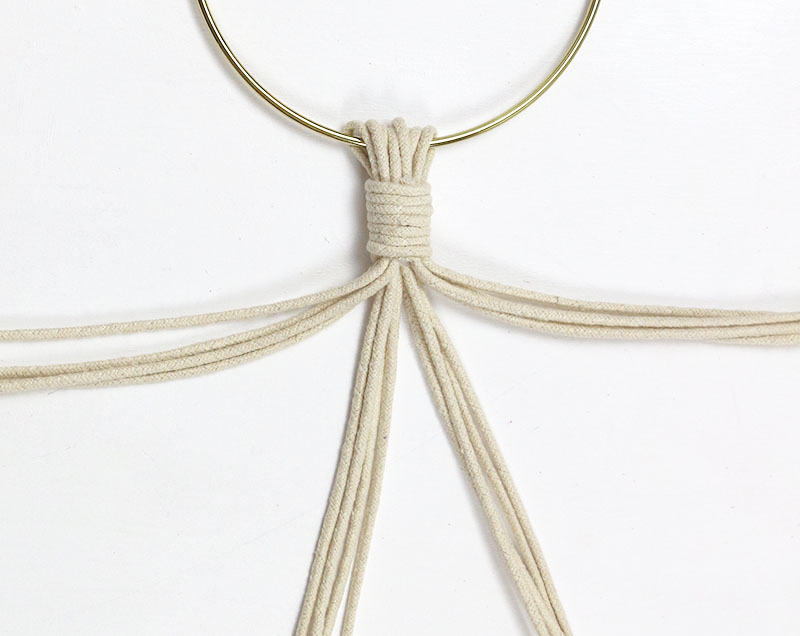
We will work two square knots over each of these four groups. To get them evenly spaced around the planter, I used a measuring tape and measured the same distance from my wrapped knot along each group of cords and marked it with a pencil. For my hanger, I measured 20 inches for my first row of square knots. Each group of four strands needs to be separated into the two outer cords that will be used to tie the knots and the two center cords that the knots will be tied over.
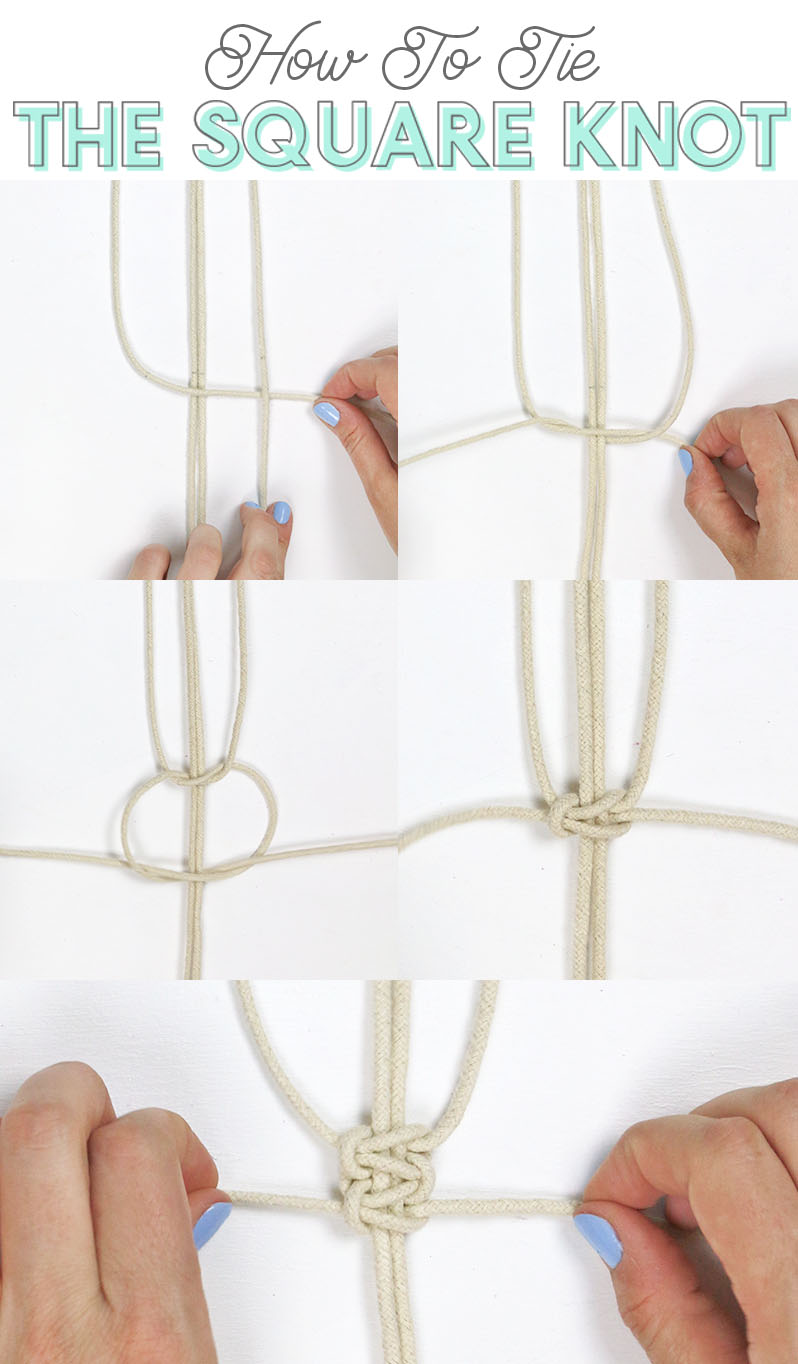
How to Tie the Macrame Square Knot
- Lay the left cord over the center cords and under the cord to the right.
- Thread the right cord under the center cords and up over the cord on the left. Pull to tighten, lining the knot up with your measuring mark.
- Repeat this process going the opposite direction: Lay the right cord over the center cords and under the cord to the right. Thread the left cord under the center cords and up over the cord on the right.
- Pull to tighten. Square knot formed.
- Repeat to create two square knots.
UPDATE: I just made a video all about how to tie the macrame square knot that you might find helpful, so I’m adding it in here. Be sure to subscribe to my youtube channel for more video tutorials like this.
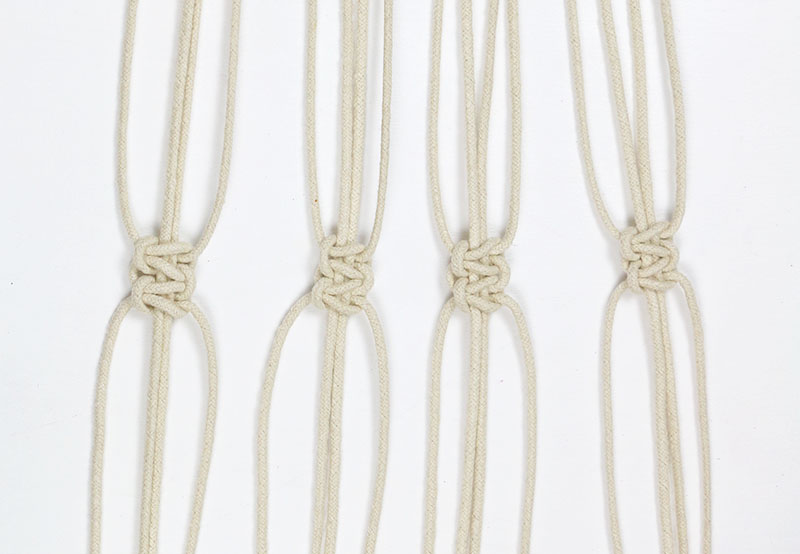
Follow these steps to create two square knots over each four strand group at the same distance from the wrapped knot.
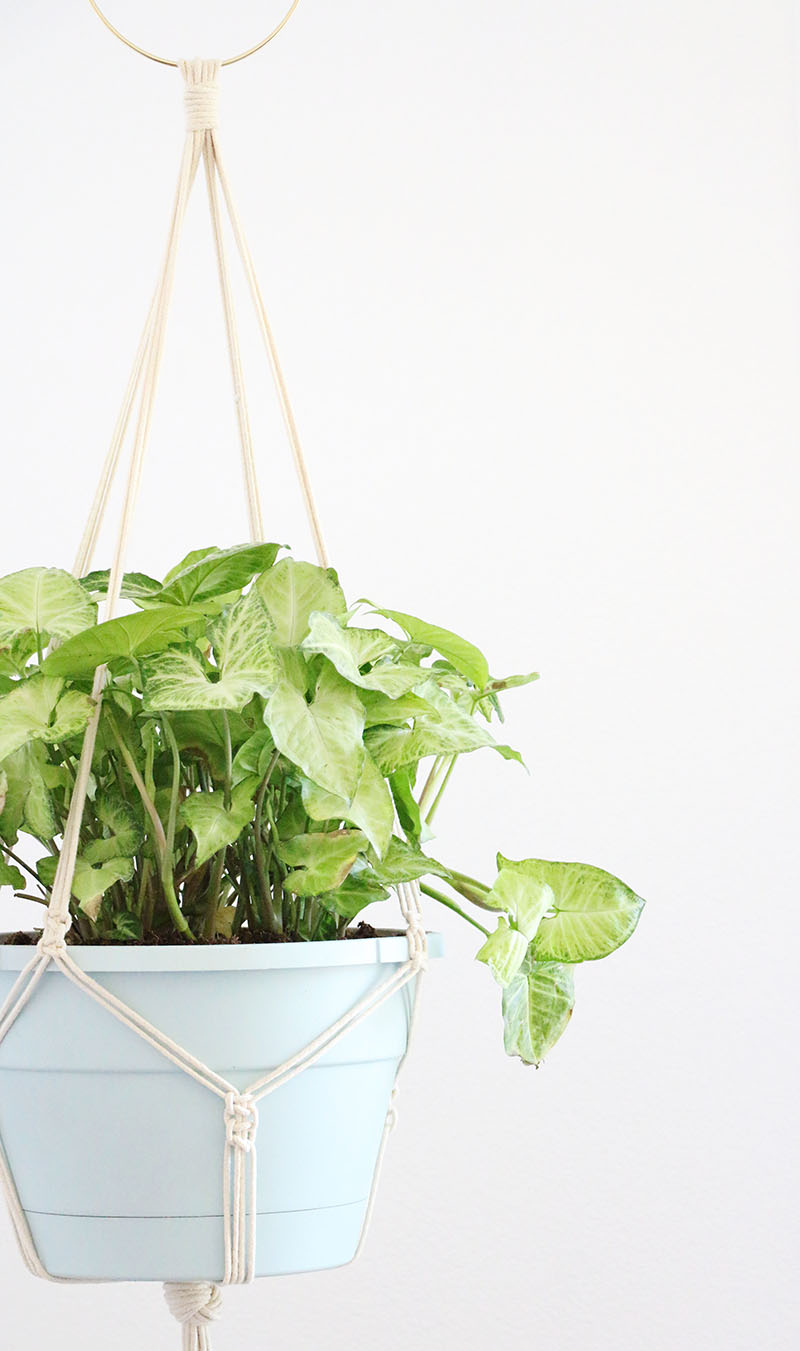
Step Five. Second Row of Square Knots.
Next, we will make another row of square knots a bit below our first row. These knots will be made over new groups of four strands. You will take two cords each from adjacent groups of four – one center cord and the right from one and one center cord and the left from the other. Measure how far below the previous row of knots you want these next knots to be. I decided that about five inches lower would look good on my planter.

Next, tie two square knots at the measured mark over these new groups of four strands.

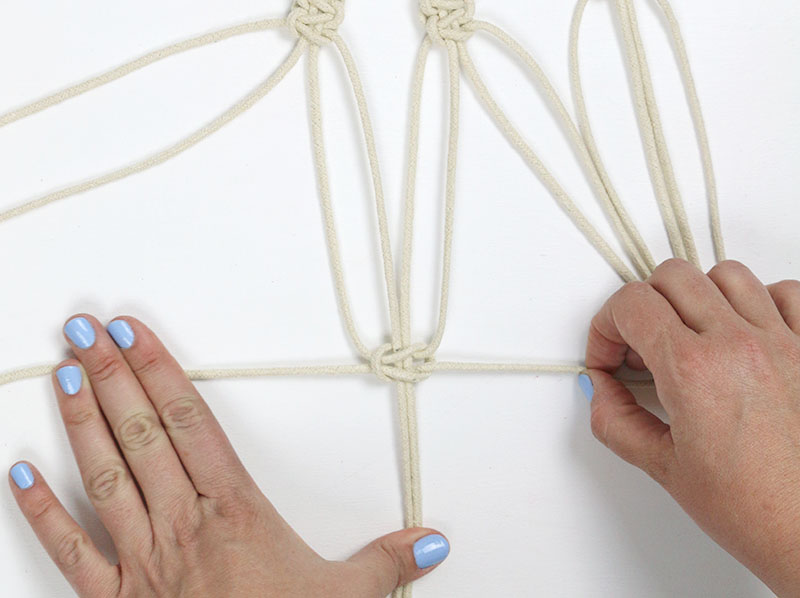
At this point, your work will be forming a kind of tube, so you will have to flip your work over to tie the final group of four strands.
Step Six. Knot and Trim to Finish.
To finish off your DIY macrame plant hanger, you will need to tie all of the cords together with one final knot. Measure how far below your second row of knots you want your final knot to be. I placed mine about 7 inches below. Loop all of the cords together and pull through to tighten and secure the knot. Trim cords to even out the ends.
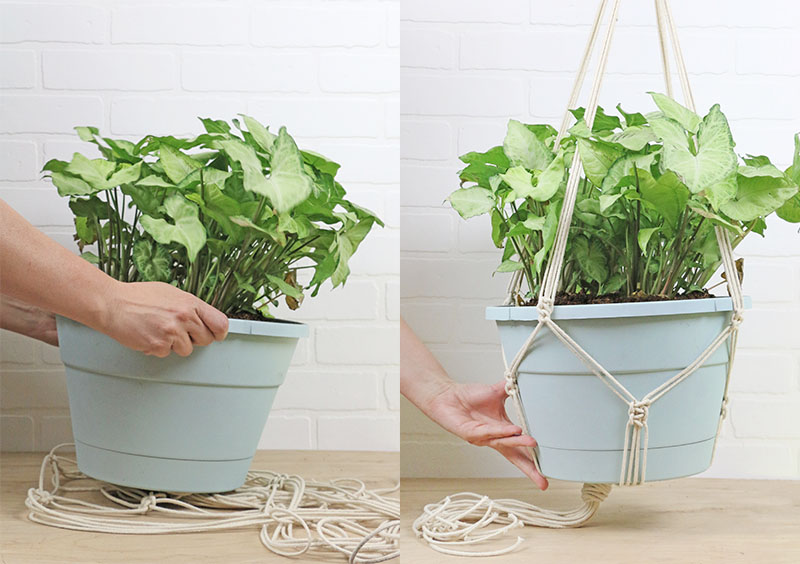
Step Seven. Insert Planter and Hang.
All that’s left to do is insert your planter and hang it up. Take care to carefully sort your plants’ branches between the groups of cords and make sure that the hook you hang your planter from is securely attached to the ceiling and able to handle the plant’s weight.
I am loving this handsome little fellow hanging in the corner of our family room. He is really brightening up the place and making it feel more homey. But he really needs a name – any suggestions?
Have you guys tried macrame yet? Would you give this simple little macrame plant hanger a try? If you do – I want to see it! You can share your photos to my facebook page or tag me on insta. Until next time –
Happy Making!

Check out more of my Home Decor posts here:
[the_grid name=”Home Dec Footer”]


Comments + Project Love
Antonella | White House Crafts says
Beautiful ? I’ve always admired these. I guess I should one day give it a try!
Wendi says
So happy to have,found this tutorial, I’m going to try and make 3 of these to hang in my café,window-thanks!
Alexis says
I love that idea! Good luck! I’m sure they will be beautiful. 🙂
Hannah says
Loving this so much one of the most clear tutorials and it is so boho cute
Wena says
great tutorial!
I’m a beginner gardening hobbyist and fascinated with macrame hanging planters. In fact, I’ve already created few of them but used the simplest technique. I would love to try this and promise to share my finished projects with you. Thank you!
Natascha says
Thanks for the tutorial! Any idea what kind of weight limit there is on the metal ring? I’ve got a pretty big Kimberly Queen fern that I’d like to hang in a window using this method and I’m unsure if he ring would hold the weight. Thanks in advance 🙂
Constance says
Just make sure the ring (what ever size) is tacked closed, then it won’t come apart whatever weight you need it to hold.
Jadwiga says
This is easy even for makrame beginers. I’m going to make this for my friends housewarming party. Many thanks! and greetings from Poland!
April Nichols says
I just finished making this! So fun and easy! Mine isn’t as pretty as yours but it’s sure cute!
Alexis says
Oh yay! I’m sure it is adorable. 🙂 Thanks so much for letting me know!
Jean says
What was the length of your planter please?
erin says
You said cut 8 cords, and then said that when you had your 6 cords, you should double them over the ring, giving you 16 cords…
Alexis says
Oops! Thanks for catching that. Just fixed it. 🙂
Katie says
Thank you so much for the detail knot-making photo – I think even I can handle this one! 🙂
susie says
curious how much time you think it took you to knot up one hanger?
Alexis says
Hi Susie! Not long – maybe 30-45 minutes?
m says
hi! stumbled across this an excited to try it out. where did you buy the gold hoop?
Alexis says
I got my hoop from Consumer Crafts here: http://shrsl.com/udp7 🙂
Shawn says
Love it! Going to make a couple of these on this beautiful sunny day. Thanks for inspiring me to hang my plants!
Alexis says
Thank you for stopping by and leaving me a sweet comment! Enjoy your macrame! 🙂
christine a witham says
I am so happy I found y our blog. Now I can learn. But I have some old hangers and they are very long. Some spots are rotting. I am wondering , is there anything I can treat these with to save them from deteriorating.
Kayla Marie says
Hi, I was wondering what size pot fits in this?
Gina London says
I made it with my mother in law and we had so much fun. Have photo to show but don’t see how to post it
K says
Followed your directions step by step and made my first macrame plant holder! Thank you for such clear instructions…maybe I have finally found a hobby 🙂
Natasha says
I have made a few of these now and love the way they’ve turned out. Awesome post, thank you for sharing!
Alexis says
Oh good! I love to hear that! Thanks so much for stopping by and leaving me a sweet comment. 🙂
Risha says
Thanks so much, Alexis! I can’t wait to make this. I’d like to do a double planter–do you have any advice on how to modify this delicious macrame recipe?
Kayla says
just double the measurements when cutting your cord. I made this with differant measurements for 10cm pots and I make 3 in one
Marcia says
I was looking to make a 3 tier one also. How much cord did you use? Thank you.
Shelby says
hey thanks! was gifted a plant & didn’t know where to put it – have a cutie hanging in the window now. thanks for the tutorial
Bea says
Hi, I was doing great until step 5. I started right to left and inter-knotted the groups of four but don’t understand the flip. Could you please explain it more in depth for me? Thank you.
Annie says
My first ever macrame project. Superb, thank you so very much.
Pixie Annie x
Lizanne says
Loved it! First time attempting Macrame and this tutorial helped a lot!! Can not wait to hang my plants! 🙂 THANK YOU!
Rhi says
Hi, thanks for the tutorial! I’m just finishing up doing it and am wondering: how was the top portion (that wraps around the upper end of the ring and attaches to the ceiling hook) tied? I’m worried I’ll end up making an aesthetic knot that isn’t secure.
Heidi says
Looks easy and fancy. I wil give it a try. My pot and hanger in plastic were one but the hanger broke. Now i don’t have to throw the pot.
MONICA says
Love your content! Such a great tutorial. Question – what did you use to connect the top of the gold ring and the ceiling hook? / How? Thanks!
Dee says
Thank you! Simple and gorgeous! Also, what did you end up naming the plant? Is it an arrowhead? What is the plant on the floor in the bottom left corner?!?!? It’s gorgeous! Love the basket it’s in too!
Linde says
I Love it! Just made it and I am very happy with the results. It’s so easy to do, even for beginners!
Adriana says
Hi! I just came across your tutorial and I’m going to make this! but I have it in mind for a smaller pot/narrow space. Can you share the dimensions (length) of the finished project?
Thank you!
Marcia says
Hi! Please note overall size of your one. From top to end of tassels. Thank you.
LauraS says
I would also be interested in what your overall length is with that length of cord NOT including the tassel?
Natalie says
Can you use a wrapped knot at the end or does it have to be a big single knot?
Thanks!
Constance says
Yes you can wrap the end after you tie the knot. Just repeat what you did for the top.
Cassie says
This was nice and easy for me as a beginner – I’ve taken one class where I learned the square knot and this jogged my memory enough to do it alone.
I’m going to put a jar and tea light/bunch of fairy lights in one!
Thank you!
Shirley Bender says
This was do easy thank you much for keeping it tha way. All toll I did in about an hour. I out an Asparagus plant in it and it looks lovely 😍. How can I keep in touch and send pictures.
Tina says
Schön, diese Anleitung gefunden zu haben. Wird ausprobiert
Pamela Wilkes says
My Concern is that I need to print your tutorial without the ads for my ladies church group that meets this next Tuesday March 6,
2023. If you could help me out in some way, I would greatly appreciate it. Our group meets this next Tuesday March 6, 2023.
Thank you in advance
Sincerely,
Pamela Wilkes