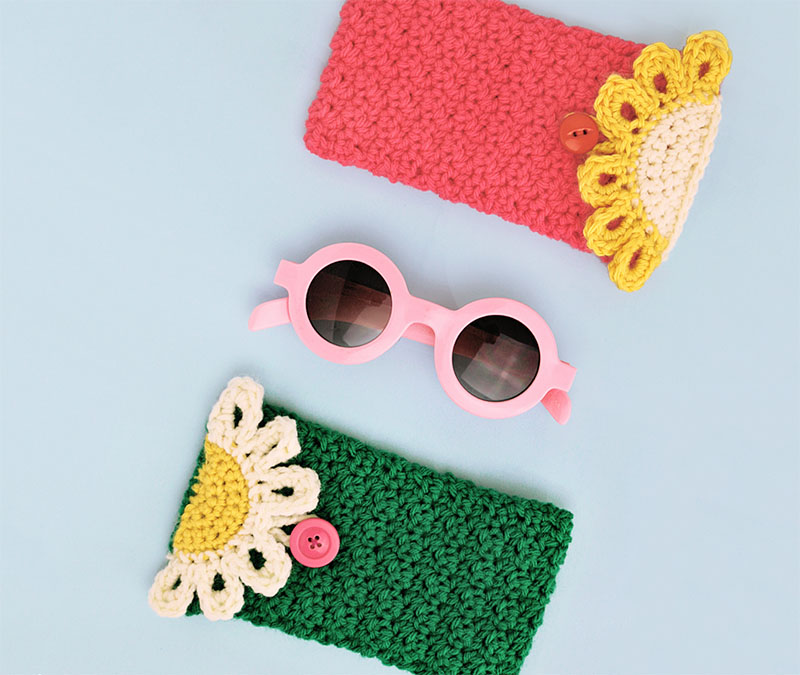
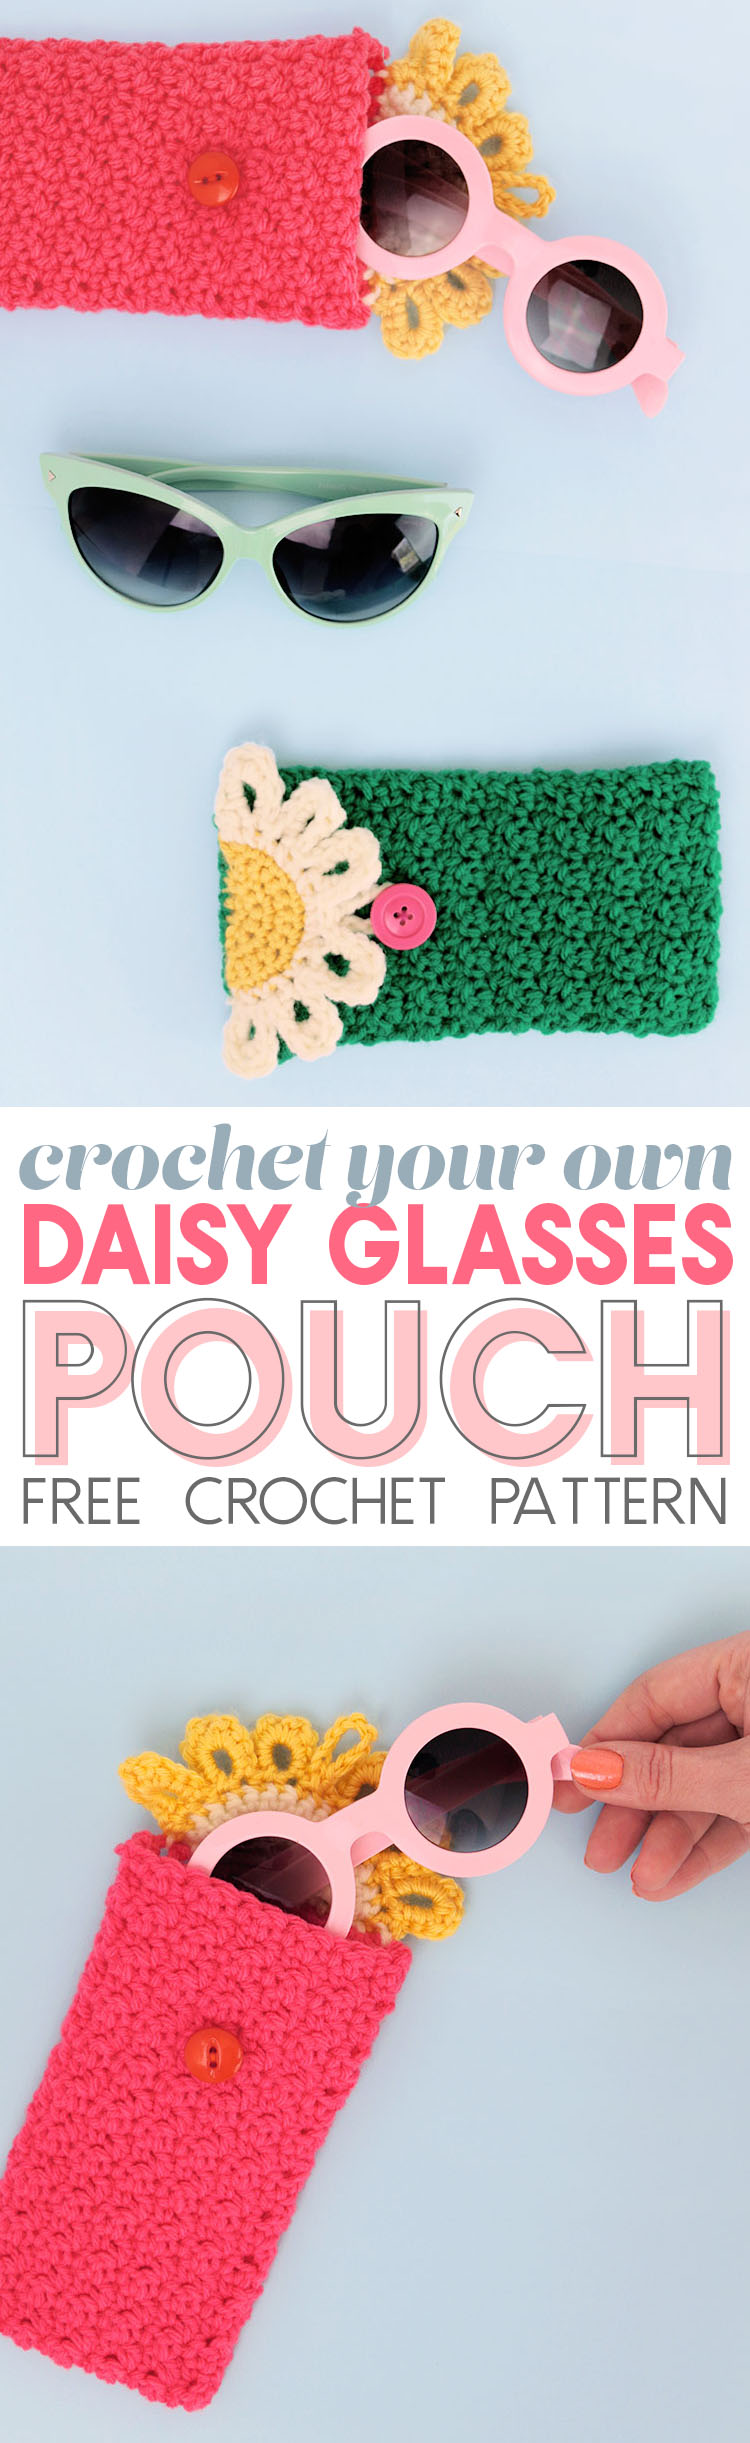
Keep your favorite sunnies safe in this cute floral crochet glasses pouch. The Happy Daisy Pouch is a free crochet pattern that is simple and quick to make. This pattern was originally shared on Crafts Unleashed and make contain affiliate links which help to support Persia Lou. Thanks!
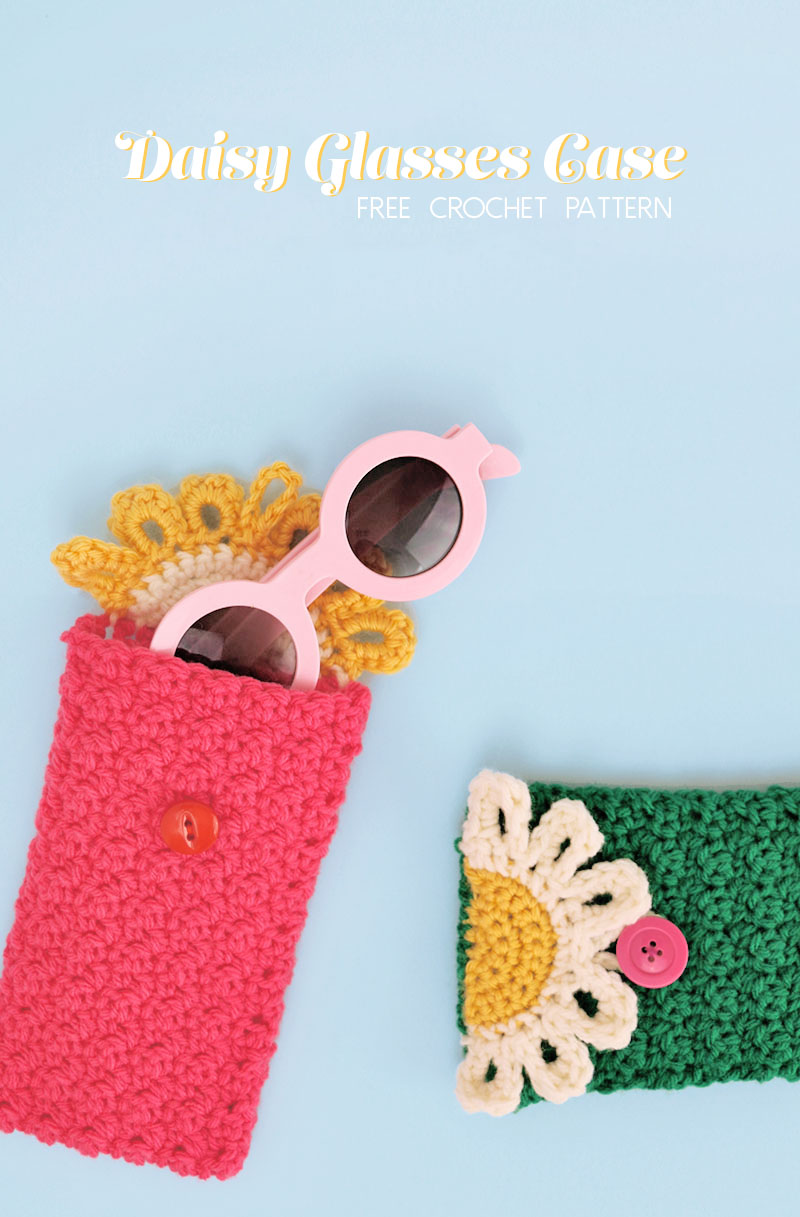
Who’s ready for a new crochet pattern? ? I have a sweet little pattern for you guys today. The Happy Daisy Crochet Glasses Pouch is a simple little glasses or sunglasses case with a cute graphic floral flap. I love easy little crochet projects for warm summer days, don’t you? Just because it’s hot doesn’t mean you need to pack up your yarn and hooks! I mean, I need something to keep my hands busy while I’m watching The Bachelorette! Hahaha… anyone else watching? (Psst – If you are, tell me in the comments! I want to hear your thoughts.)
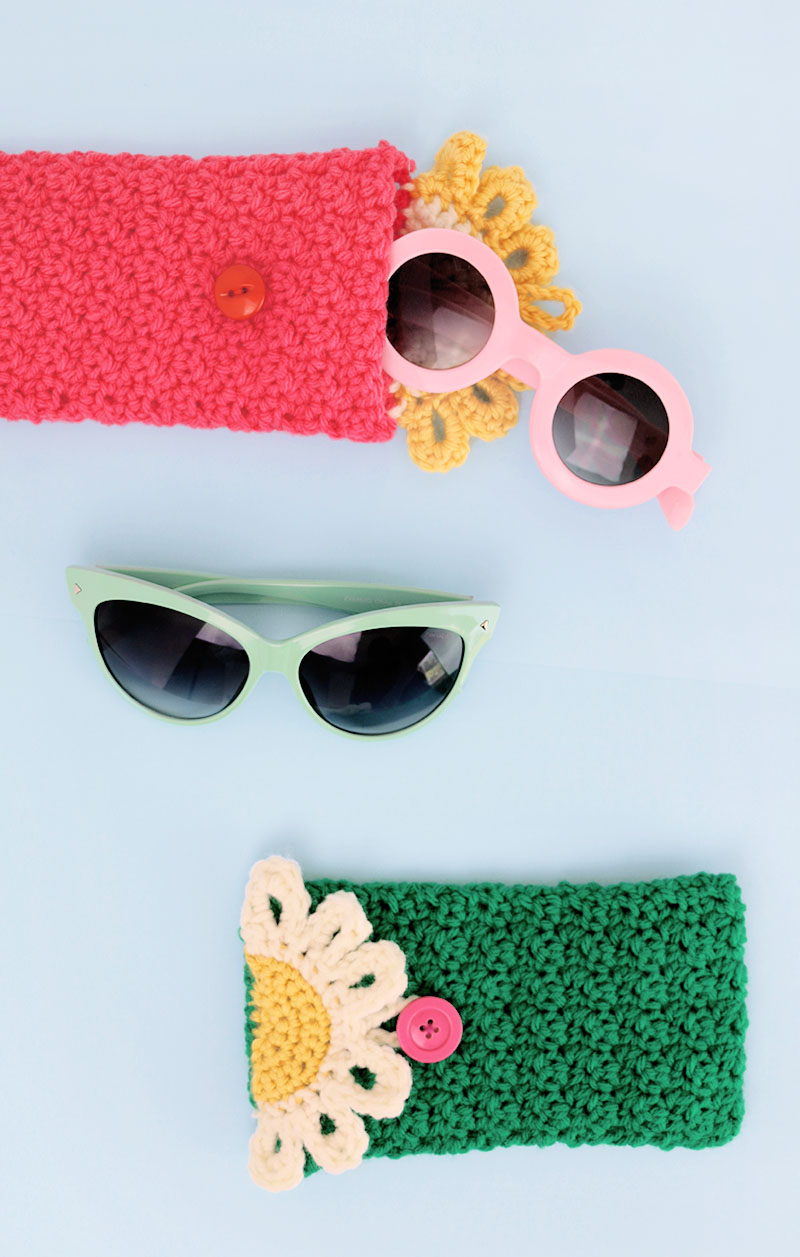
But okay back to these cute little cases. Maybe you are like a real adult who has a glasses case and doesn’t just throw your sunglasses into your bag to bang around and get scratched up and bent and broken and lost like I have in the past. If so, I’m really proud of you. Good job. If not, hey – maybe you could make a super cute daisy glasses pouch to help with that whole situation. 🙂 Let’s make some, okay?
The Happy Daisy Crochet Glasses Pouch Pattern

Crochet Glasses Pouch Supplies:
- Medium 4 Worsted Weight Yarn. I used All Things You Essential Acrylic in Kelly Green, Arbor Rose, and Aran White AND Caron Simply Soft in Sunshine Yellow
- Size H (5.00 mm) Crochet Hook
- Yarn Needle
- Scissors
- Buttons (I used 3/4 inch)
- Sewing Needle and Coordinating Thread
Please note: This pattern is free for personal use. You may sell items you make using my patterns, but please use a link when possible. You may not sell or redistribute my pattern. If you would like to share the pattern with a friend, please send them the link. Pageviews help to support this blog and allow me to provide free patterns like this one. Thank you! 🙂
This pattern uses American crochet terms. HEREThe main pouch portion of this pattern is worked in what I call the Lemon Peel Stitch, which I have a photo tutorial for right .
Crochet Glasses Pouch Pattern
Row 1: With Color A, begin by making 12 foundation single crochet stitches. (You can find a video tutorial on the foundation single crochet stitch here.) OR Ch 13, sc in 2nd ch from hook, sc in each remaining ch (12 fsc or sc).
Row 2: Ch 1, sc in same st, dc, *sc, dc, repeat from *4 times (6, sc, 6 dc). (In other words, alternate sc and dc stitches. In rows 3 on, you will always be working sc into dc and dc into sc.)
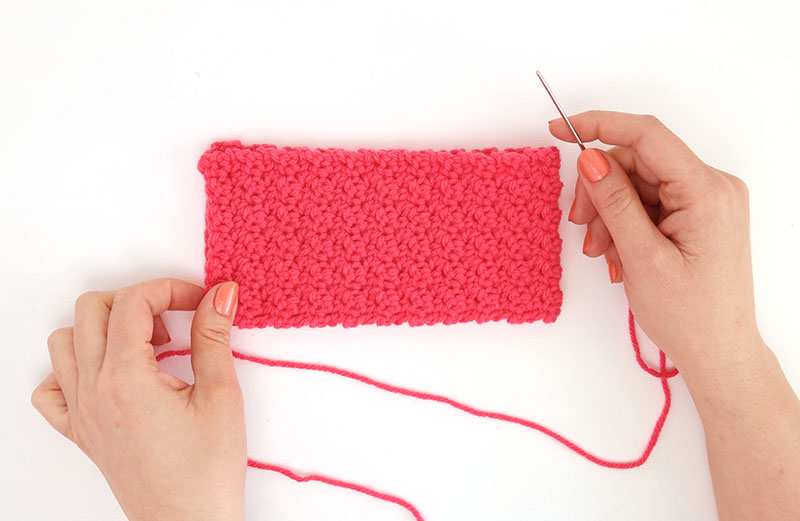
Rows 3 on: Repeat Row 2 until piece is about 14 inches or 35 cm long. I did 43 total rows. Finish off, weave in ends.
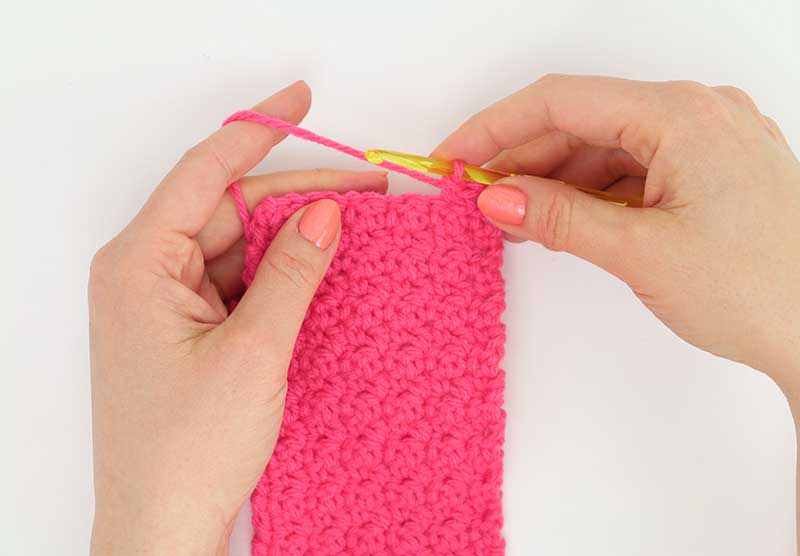
At this point you should have a strip of fabric about fourteen inches long that we will sew into our pouch. Start by folding the strip in half width-wise keeping the edges matched up. Next, thread a length of matching yarn onto your yarn needle and sew the edges of the strip together. Finally, weave in your yarn ends to secure the seam.

When your little pouch is finished, it is time to crochet that cute little daisy flap!
Crochet Glasse Pouch – Daisy Flap Pattern.
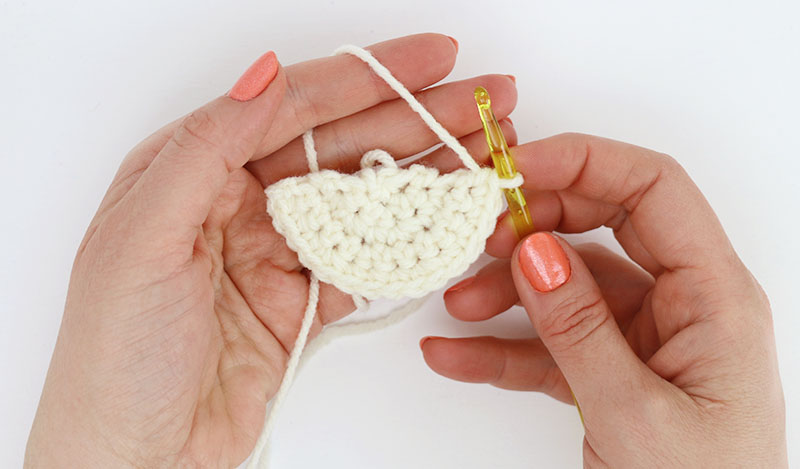
Row 1: Starting with Color B, ch 2, 3 sc in 2nd ch from hook (3 sc). Turn.
Row 2: Ch 1, 2 sc in same st, 2 sc in each st (6 sc). Turn.
Row 3: Ch 1, sc in same st, 2 sc, *sc, 2 sc, repeat from * once (9 sc) Turn.
Row 4: Ch 1, sc in same st, sc, 2 sc, * sc, sc, 2 sc, repeat from * once (12 sc). Turn.
Row 5: Ch 1, sc in same st, sc, sc, 2 sc * sc, sc, sc, 2 sc, repeat from * once (15 sc). Turn. Finish off Color B.
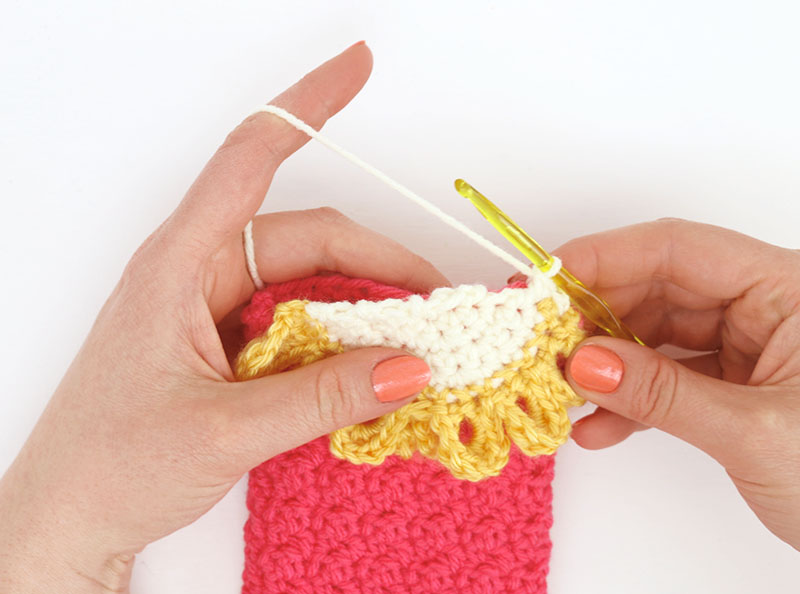
Row 6: Join Color C (yellow or white) where you finished off Color B. Ch 1, sc in same st, sc, *ch 6, sl st in sc at base of ch 6, sc, sc, repeat from * twice, ch 10 (this ch 10 will form the button loop, use more chains for a larger button), sl st in sc at base of ch 10, *sc, sc, ch 6, sl st in sc at base of ch 6, repeat from * twice, sc. Turn.
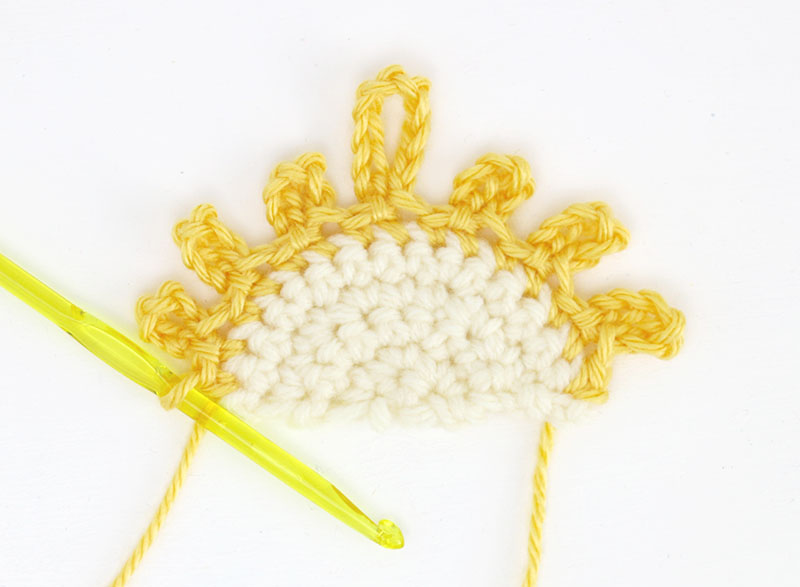
Row 7: Ch 1, sc in same st, *in next ch 6 loop: (sc, sc, hdc, dc, ch 1, dc, hdc, sc, sc), sl st in next 2 scs, repeat from *once, in next ch 6 loop: (sc, sc, hdc, dc, ch 1, dc, hdc, sc, sc), sl st in next sc, working in front of ch 10 loop, sl st in next 2 scs, *in next ch 6 loop: (sc, sc, hdc, dc, ch 1, dc, hdc, sc, sc), sl st in next 2 scs, repeat from * once, *in next ch 6 loop: (sc, sc, hdc, dc, ch 1, dc, hdc, sc, sc), sc in last st. Finish off, weave in ends.
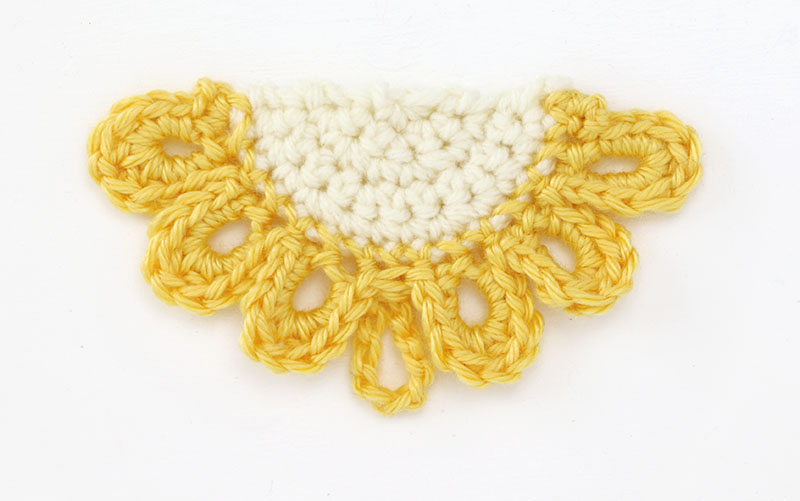
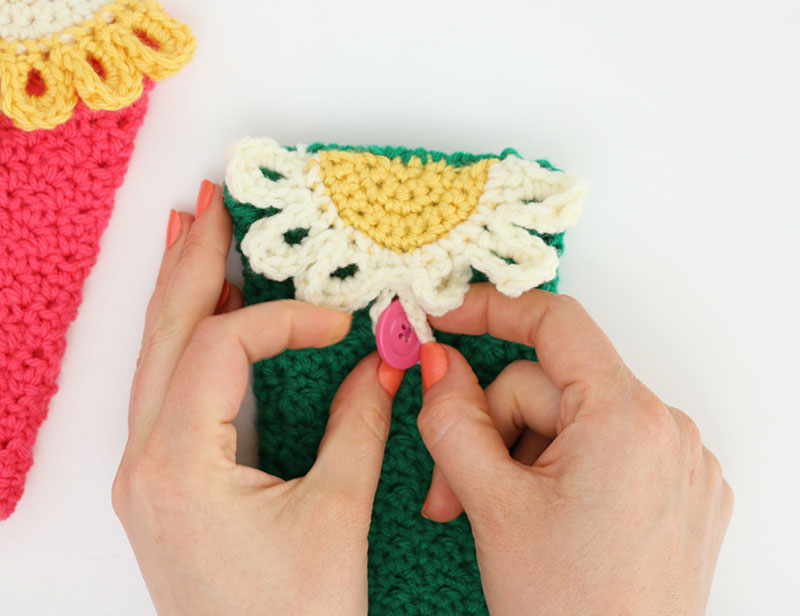
Isn’t that little half daisy cute? I love those loopy petals. With your flap and pouch crocheted, you are ready to join them together. Start by lining up the edge of your flap with the top edge of the back of the pouch. Using Color B (the color of your daisy center), work single crochet stitches through both the flap and the back edge of the pouch. Using single crochet stitches gives you a more finished edge along the top of your glasses case.
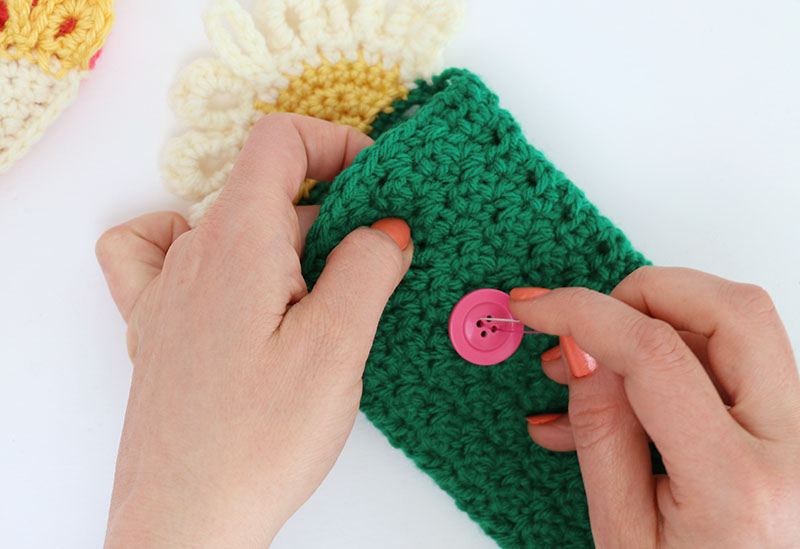
You are almost done! The final step is to use a sewing needle and coordinating thread to attach your button to the front of the pouch. Be sure to line up the button with the chain 10 loop.
And that’s it! Slip in your sunnies and glasses to keep them scratch free and ready to wear. What do you think of my little crochet glasses pouch? I think it’s pretty cute. 🙂


That’s it for today, friends! Happy Making!

If you like this post, you may like these other free crochet patterns:


Comments + Project Love
Amy | Delineate Your Dwelling says
I have zero desire to crochet… but time and time again you make me want to learn! This glasses case is so so adorable.
Alexis says
Thank you sweet friend! <3 And you may have no desire to crochet, but I want you to do it selfishly just so I can see all the cute things you would make! 🙂
Amy | Delineate Your Dwelling says
I should clarify… I would LOVE to crochet, but no time to learn. That’s what I meant. 😉
Angel says
I Love to crochet my grandma taught me at 7 years old plus knitting.
debra says
I”am Very slow learner and can you pls make a slower vidoi…..for us slower people pls of this stiche I would apprecate so much
matkailijakirppu says
Very cute! Thanks for the pattern! 🙂
Aimee says
Cute pattern … I’ve made three already. Thank you for a great pattern.
Alexis says
Oh I love that! So glad you like the pattern. 🙂
Laura Jueschke says
Hi, I am confused! I started this case, made the 12 foundation single crochets….and have done about 9 rows now…..but you say to fold it in half width wise…..so does that mean you have two sides to sew? You don’t have a photo of how to fold it! Thanks!
Laura
Alexis says
Hi Laura! Yes, you will have to sew up two sides. The first photo after “Next, thread a length of matching yarn onto your yarn needle and sew the edges of the strip together. Finally, weave in your yarn ends to secure the seam.” shows the piece folded in half. Hope that helps!
Careena says
I took inspiration from your pattern to make a daisy side bag thanx great inspiration
Alexis says
Oh I love that! Thank you so much for stopping by and leaving me a comment. 🙂
Debbie says
I love the Bachelor and Bachelorette- there must be some of us still out there as the shows keep coming!
Vanessa says
Super, super cute pattern!! I am working on it right now and have a quick question…what is the finished size? I am using a dk weight yarn and added a couple of more chain stitches. I plan on making some wider for sunglasses and some smaller for reading glasses. Thanks for sharing!!
Ruth says
I was looking for a small gift to add to DDil’s and dgd’s gifts. This is perfect! I had already made a glasses holder didn’t care for it at all and then I say this one…it’s wonderful. thank you for making it and sharing the pattern
Ruth says
I’ve made two so far except I haven’t made or put on the flap yet. I think the flap might not be going to match the body of the case as it should. So I’m going to adjust . I will make at least two more.
Alpana says
Hi,
Thank you for sharing the written pattern of Eye Glass cover.
I made it the perfect way. It looks so cute.
Thank you.