In this step-by-step tutorial (with video!) I will show you how to print and cut with your Silhouette machine. The Silhouette print and cut feature allows you to print designs and then accurately cut around them for amazing custom creations.

Today, I am breaking down the Silhouette print and cut process. I have shared lots of print and cut projects on this site in the past (you can check some of those out here), but I have never done a full step-by-step tutorial of how to print and cut with your Silhouette Cameo or Silhouette Portrait, so I am excited to share this full beginner’s guide with you all!
Silhouette Print and Cut 101
I have a nice, detailed video tutorial all about the print and cut process that you can watch below, plus I will have a full written explanation as well if you prefer reading to watching. So let’s get started!
What is Print and Cut, Anyway?

The Silhouette print and cut feature is what allows you to cut precisely around designs you have printed on your home printer. Basically, the Silhouette software adds registration marks in the margins of your printed design, and then the machine’s built-in optic scanner reads the marks to accurately position cuts around the printed design.
Print and cut is perfect for making custom stickers, cards, gift tags and boxes, party decorations, magnets, photo booth props, and so much more.
Which Silhouette machines can Print and Cut?
All of the Silhouette cutting machines have the print and cut feature. This includes all versions of the Silhouette Cameo (including the new wider Cameo Plus and Cameo Pro), the Silhouette Portrait, and the Silhouette Curio. (If all these machines confuse you, I recently created a video comparing all of the Silhouette machines that you might find helpful here.)
How Big Can the Silhouette Print and Cut?
The size of your print and cut area is determined by your printer and by which Silhouette machine you are working with. Here are the maximum recommended print and cut media sizes for each Silhouette machine:
- Silhouette Cameo – 12 inches x 12 inches (Technically, the larger Cameo models (the Plus and Pro) allow for larger media sizes, but Silhouette recommends sticking with 12″ x 12″ to make sure everything stays properly aligned.
- Silhouette Portrait – 8.5 inches x 11 inches (Letter size)
- Silhouette Curio – The print and cut area for the Curio depends on what size base platform you are using. With the smaller base that comes with the machine, the max print and cut area is 8.5 inches x 6 inches. With the large base, you the print and cut area is 8.5 inches x 11 inches.
How to print and cut with your Silhouette
You can watch my full video tutorial for the print and cut process below, or keep scrolling to read more.
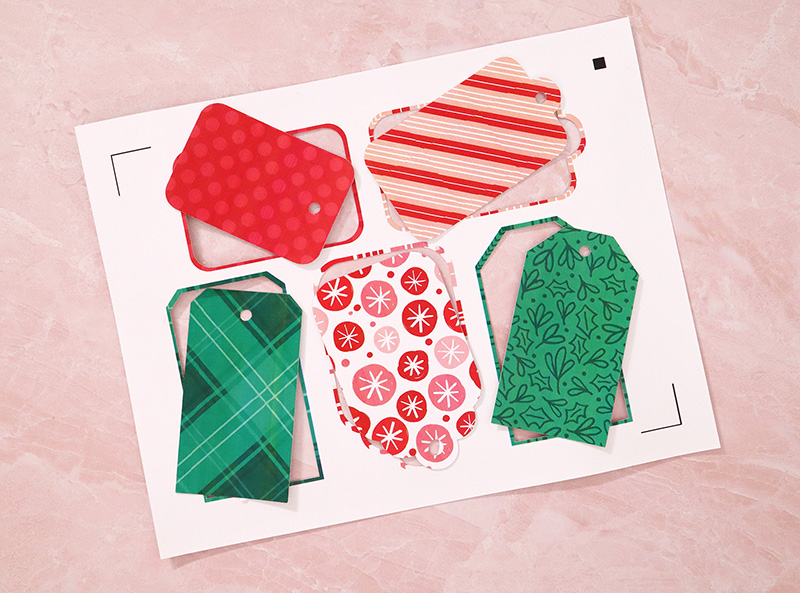
You can download the free gift tag sticker designs I used in the video right HERE.
Step One. Prepare Your Design.
The first step is to prepare your design in the Silhouette Studio software.
Make Sure the Registration Marks are Turned On.
When creating a print and cut project, it’s important to make sure you have the registration marks turned on. In the Page Setup Menu, click on the Registration Marks Tab. Then check the box next to “On” to turn on the registration marks.

You should now see a couple of black marks in the margins of your page in the Silhouette Studio software. The grid marks indicate that you should not place any printed design within that area. The red box shows where cut lines can be placed.
Create the Cut Lines, if Needed.
If you are using a print and cut ready design that already includes the cut lines, then you can skip right over this step. (Check out some of the print and cut files you can get in the Silhouette Design Store here.)
If you are creating your own print and cut project, you will need to tell the software where you want the machine to cut by adding cut files to your design. You can easily create simple cut line shapes (rectangles and circles, for example) by using the shape tools in the software.
For more complex shape, you can use the Trace tool. To do this, click on “Select Trace Area,” and drag a box around the shape you want to trace. Increase the Threshold until the design all turns yellow. Then click on “Trace Outer Edge.” This will create a cut line right around your design.
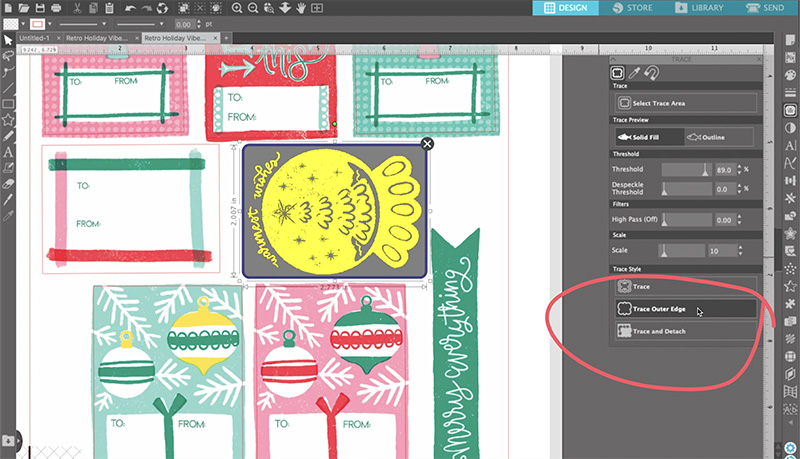
If you want a bit of white space around your design, then the Offset tool makes that really easy. Open up the Offset Panel (the icon is a star), and then with your cut lines selected, click “Offset.” You can adjust the width of the offset as you wish.

Step Two. Print.
When your cut lines are all ready, it’s time to print! Load your sticker paper or other media into your printer then go to File > Print, and the software will open up a print preview for you to review. If everything looks good, send the job to your printer.
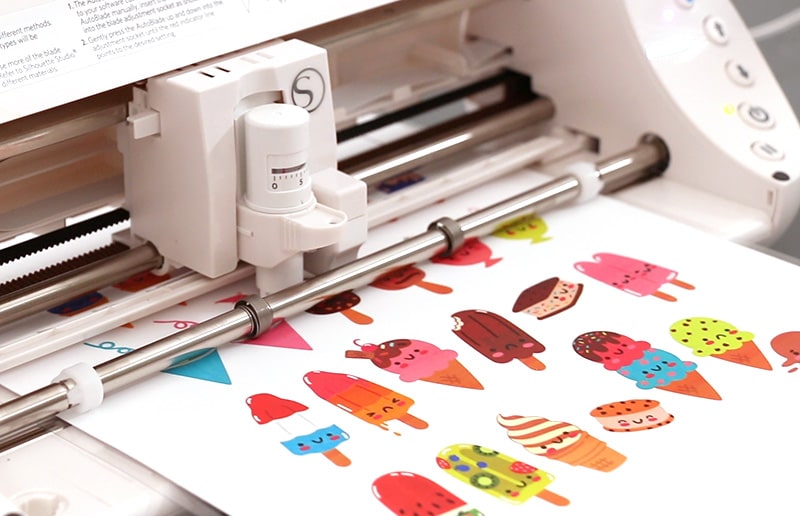
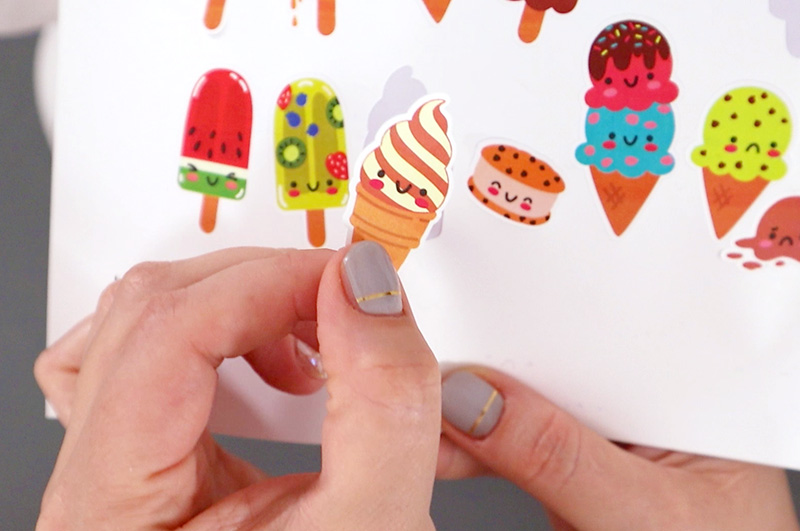
Step Three. Cut.
Finally, place your printed material on your cutting mat. Load it into your Silhouette and then adjust the cut settings as necessary in the software. Click “Send” to start the cut. Your machine will read the registration marks, and then cut around the printed design.
And that’s it!
If you want a simplified, printable guide for printing and cutting with your Silhouette, I’ve got that for you just below. Just click “Print” for a little Silhouette Print and Cut cheat sheet.
How to Print and Cut with your Silhouette

Learn how to make amazing print and cut projects with your Silhouette machine!
Materials
- Paper, Cardstock, or other Printable Media
Tools
- Silhouette Cameo, Portrait, or Curio
- Silhouette Studio Software
- Printer
Instructions
- Begin by preparing your design in the Silhouette Studio software. First, make sure the registration marks are turned on. In the Page Setup menu, click on the Registration Marks Tab. Then check the box next to “On” to turn on the registration marks. Position your design within the red box and away from the grid marks in the corners.
- Next, create cut lines if needed. If you are using a print and cut ready design that already includes the cut lines, then you can skip this step. You can easily create simple cut line shapes (rectangles and circles, for example) by using the shape tools in the software. For more complex shapes, use the Trace tool.
- When your cut lines are all ready, it’s time to print! Load your sticker paper or other media into your printer then go to File > Print, and the software will open up a print preview for you to review. If everything looks good, send the job to your printer.
- Finally, place your printed material on your cutting mat and load it into your Silhouette machine. Adjust the cut settings as necessary in the software. Click “Send” to start the cut. Your machine will read the registration marks, and then cut around the printed design.
Recommended Products
As an Amazon Associate and member of other affiliate programs, I earn from qualifying purchases.


How to Use the Print Bleed Feature
The Print Bleed feature is a new-ish addition to the Silhouette’s print and cut tool that makes it really easy to get clean cuts without any white space around the cut. The Print Bleed feature is available in version 4.2 and later of all editions of the software (including the free, standard version of the software).
To use the Print Bleed feature, simply check the box next to “Print Bleed” in the Registration Marks menu. Then adjust the bleed radius as you like. This will cause the color around your designs to bleed out when printed. You will not see the color extend in the software, but it will show up in the print preview.
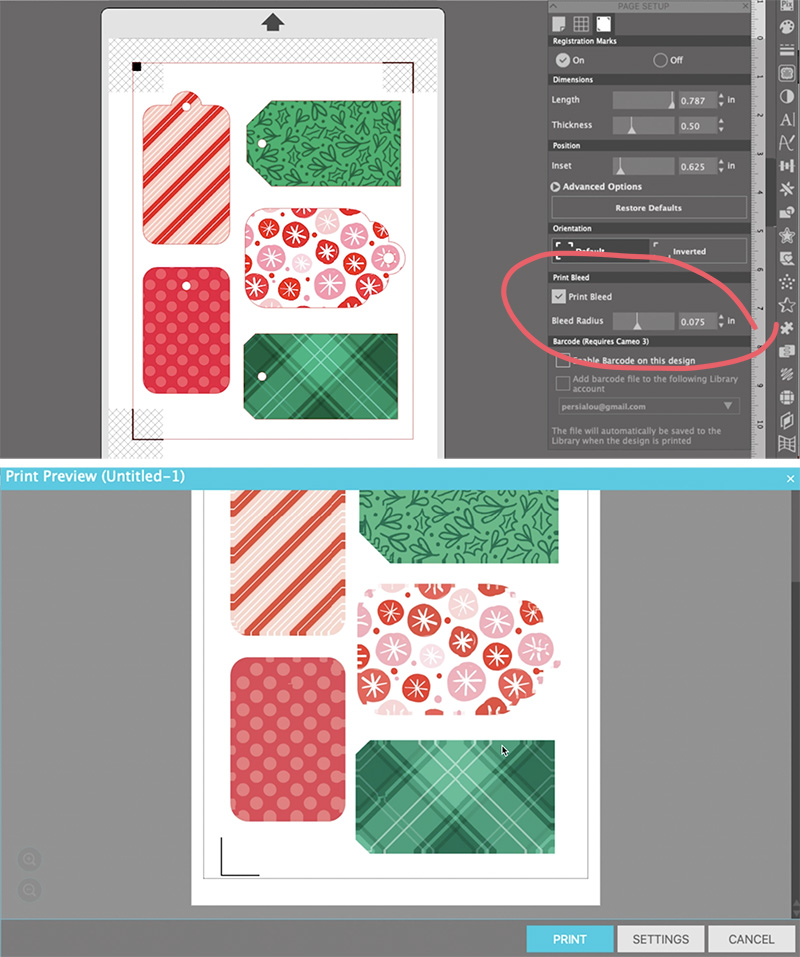
This option really makes it easy to get that full bleed cut with one click. However, it does apply the print bleed to the entire document, so it won’t work for every project.
My Favorite Print and Cut Materials
Silhouette machines are kind of the best out there when it comes to print and cut, so it’s probably not surprising that they make all kinds of great printable materials that pair perfectly with the print and cut feature. I wanted to quickly mention a few of my faves.
- Printable Sticker Paper. I have said for years that Silhouette’s white sticker paper is my very favorite, and I stand by that declaration. But did you know they have TONS of awesome printable sticker papers? No, really. I’m talking about clear sticker paper, holographic sticker paper, scratch off sticker paper, rose gold foil sticker paper, and glow in the dark sticker paper! If you can’t make up your mind, then maybe try out the sticker paper sampler pack.
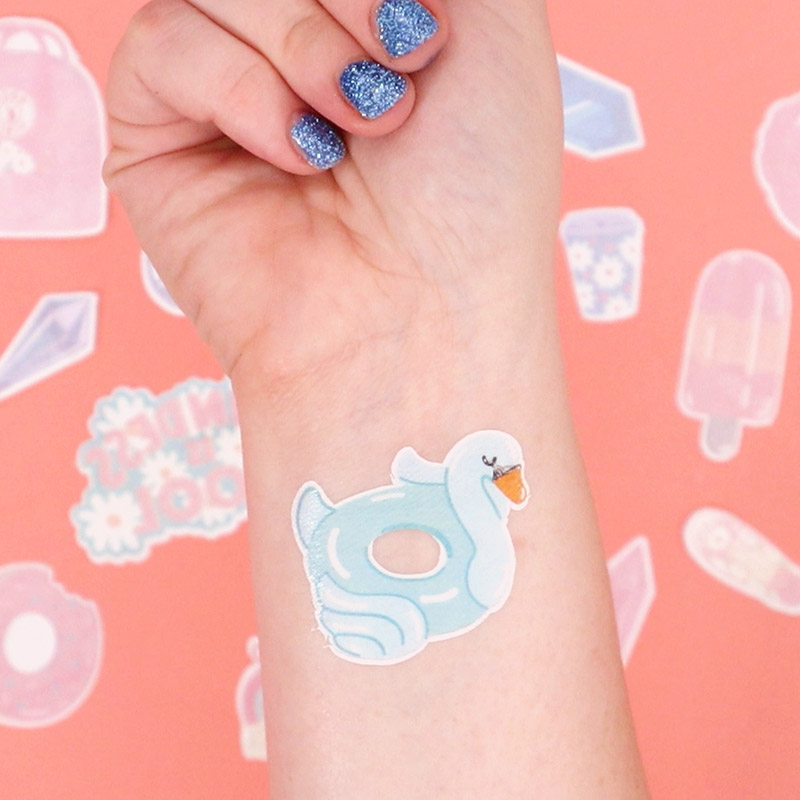
- Tattoo Paper. I have printed lots of tattoo paper posts on here. Guys. I just love this stuff. There is the classic tattoo paper, which is wonderful. I also love the white tattoo paper (as seen in the swan tattoo above).
- Shrink Plastic. I love crafting with shrink plastic, and it’s a perfect material for print and cut projects! I just wrote up a full post all about how to cut shrink plastic with your Silhouette right here.
- Printable Vinyl. Printable vinyl is the easiest way to create multi-colored vinyl decals, and pairing printable vinyl with your Silhouette’s print and cut feature is magic. I have a full guide on making your own printable vinyl decals here.
- Printable Heat Transfer. Similar to printable vinyl, printable heat transfer material makes multi-color t-shirt and tote bag DIYs super easy.
I’m going to stop there, but there are even more printable materials you may want to try out, including magnet paper, window clings, and printable cotton canvas.
I hope this guide to the Silhouette print and cut feature was helpful for you! What’s your favorite thing to print and cut?
Until next time, Happy Making!

Silhouette Print and Cut Projects

Free Printable Rainbow Sticker Sheets
You can make your own adorable rainbow sticker sheets with this free printable! This post contains affiliate links, which help to support
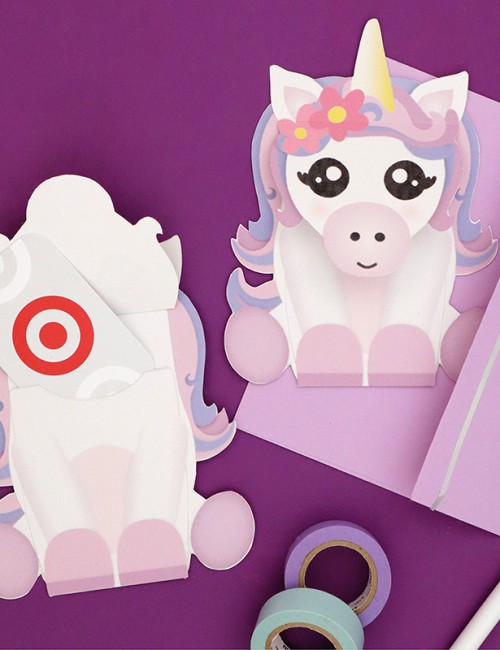
Free Printable Unicorn Gift Card Holder
Download this free printable unicorn gift card holder and make an magically adorable card to send loved ones a special gift! Just
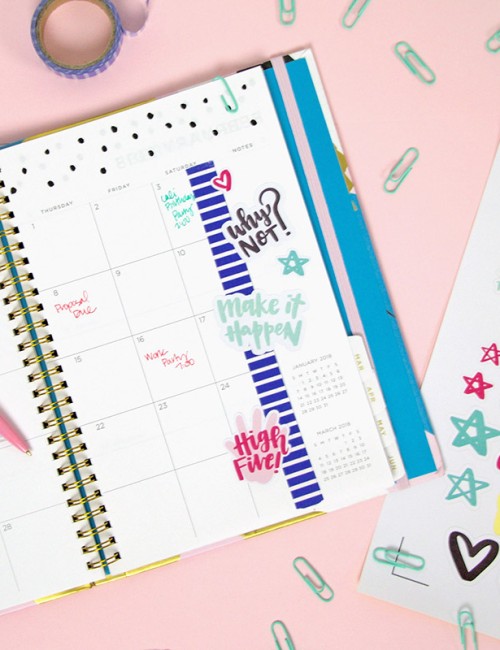
How to Make Stickers with your Silhouette: DIY Planner Stickers
Learn how to make stickers using your Silhouette Cameo! It’s easy to make DIY planner stickers or any other kind of custom


Comments + Project Love
David says
Hi !
Thanks for the helpful tutorial.
I tried print and cut and used the offset feature. When I select “print” the offset line shows up and is printed. I also ended up with 2 cuts somehow but there was only one cut line. When I use the trace feature, the lines do not show up when printed but remain present and are cut appropriately. Is there some offset setting I’m missing that is causing this to happen?
Thanks in advance for any help you have.
Suzana says
Good day, I have one question for you?
For example, I I print the pictures on another printer and put them in the silhouette studio and never I can guess the printed paper with the preparation in the program, please, can you help me?
Thank you
Suzana