Printable Vinyl 101 – Learn how to print on vinyl to make your own awesome DIY vinyl stickers at home! Custom printable vinyl stickers are perfect for labeling and decorating all your stuff. Once you see how easy it is to make custom vinyl decals you are going to be labeling all the things! A big thanks to Expressions Vinyl for sponsoring this post, which also contains affiliate links that help to support this site at no extra cost to you.

I am really excited to share today’s tutorial with you all! As much as I love working with vinyl, I know that it can be really intimidating if you have never worked with it before!
Today, we are kicking things off with a complete guide to working with printable adhesive vinyl! I love printable vinyl because it is a super easy way to create beautiful multi-colored designs. Plus, its easy to use even if you don’t have a Silhouette or other cutting machine. I’m going to specifically be focused on printable adhesive vinyl today, but don’t worry, I have a post on printable heat transfer vinyl in the works.
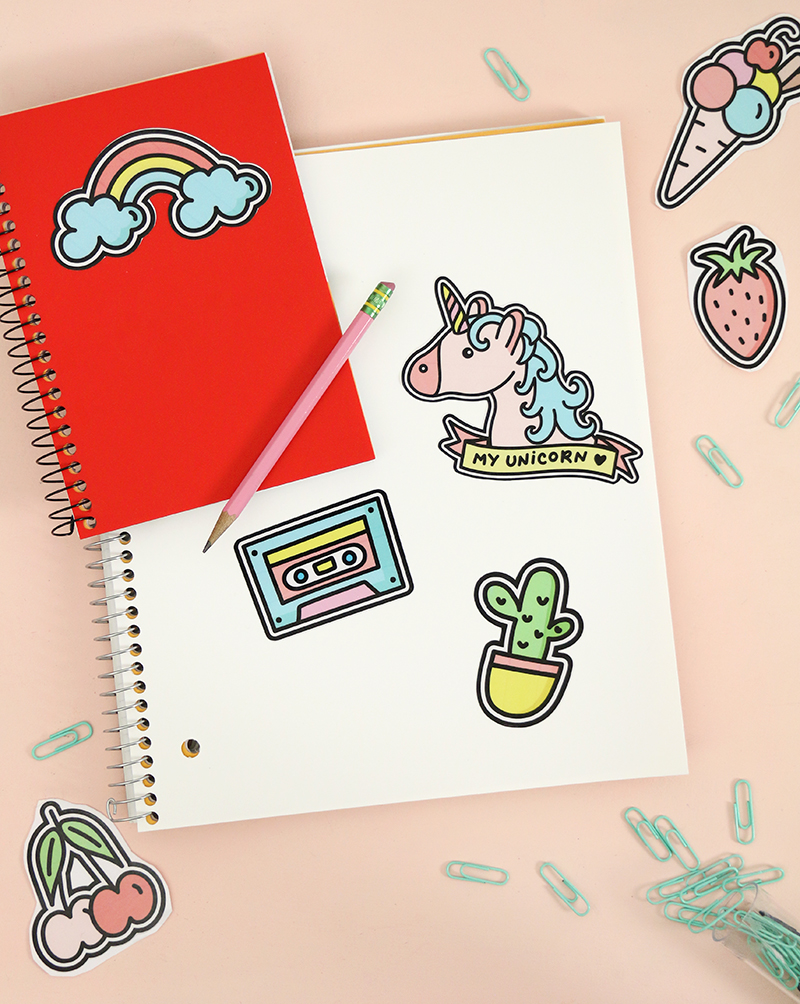
Printable adhesive vinyl can be used to easily make custom decals and stickers in whatever designs you like! These decals are durable, water and weather resistant, and have a permanent adhesive. They can be adhered to any hard, smooth surface indoors or outdoors. I applied my decals to some notebooks and water bottles, but they can be used in so many ways! (I have even used printable vinyl to make a DIY laptop skin in the past)
Okay, are you ready to make your own awesome DIY vinyl decals?? Here’s everything you need to get working with printable vinyl.
DIY Vinyl Decals Supplies:
- Inkjet Vinyl (you can buy it by the sheet or in a starter pack that comes with laminate overlay included)
- Vinyl Laminate (available in an “economy” matte finish or “premium” glossy finish)
- Application Tool
- Inkjet Printer
- Silhouette Cameo or other electronic cutting machine (optional, but very nice to have)
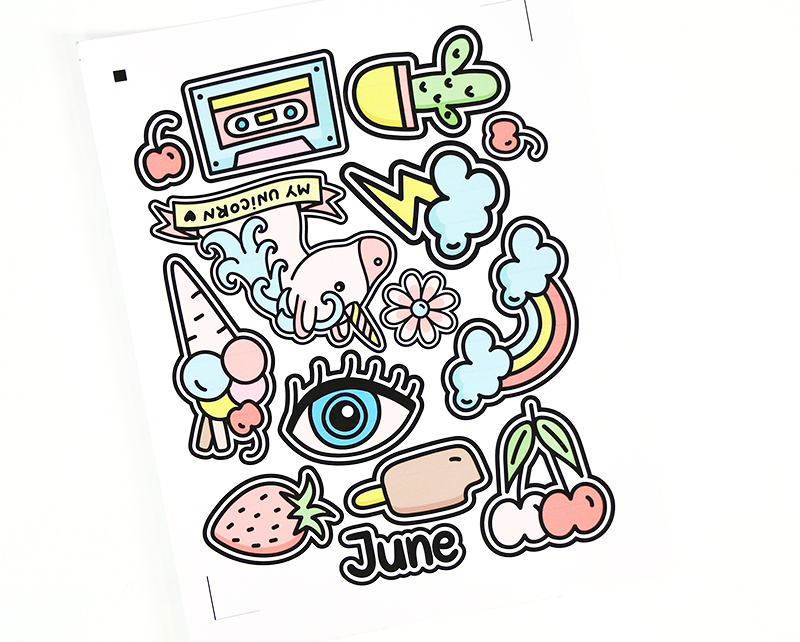
- Your Sticker Designs (I used some cute little illustrations included as bonuses with the Unicorny font, which you can get right HERE)
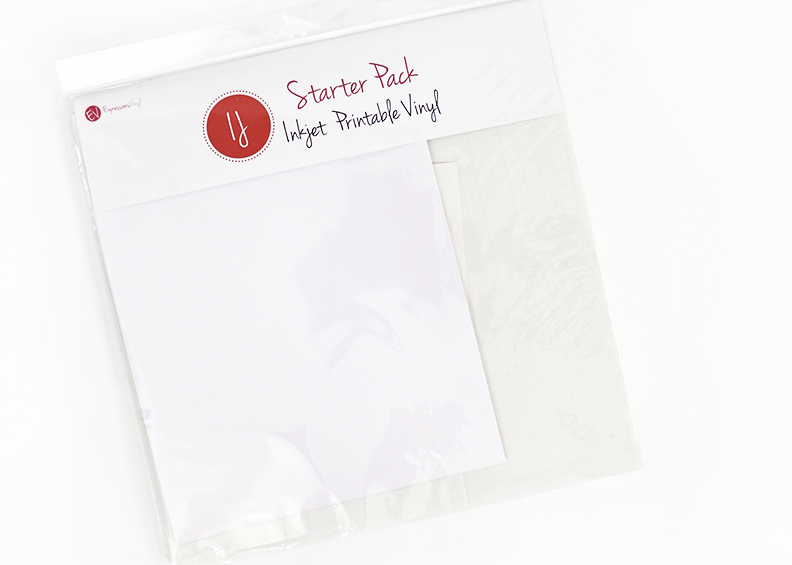
Psst – If you are brand new to working with printable vinyl, then the Expressions Vinyl inkjet vinyl starter pack ^ is a great option because it comes with enough material to make several sheets of decals and to try out the different laminate types.
>>Click HERE to Pin so You can Find this later!<<
Printable Vinyl Guide: How to Print on Vinyl
UPDATE: I just uploaded a new video all about working with printable vinyl that you can check out below. Plus you can see how my decals have held up to a couple of months of use!
Printable adhesive vinyl works great with an electronic cutting machine, but I just want to make it clear that you absolutely do NOT have to have a fancy cutting machine to make your own vinyl decals. You can easily work with printable vinyl with just a pair of scissors or a craft knife.
However, if you are cutting an intricate design, lots of decals, or if you just want a really nice, precise cut, then I would recommend a cutting machine like the Silhouette or Cricut. I use a Silhouette, and will walk you through the basic steps of working with that machine, but the basic steps will work for if you are cutting with a Cricut or by hand.
Step One – Prepare Your Design and Print.
If you are cutting your decals by hand, then you just need to use any photo editing software (or Word would even work) to place your designs on a 8.5 x 11 size page and print them off using your inkjet printer. That’s it!
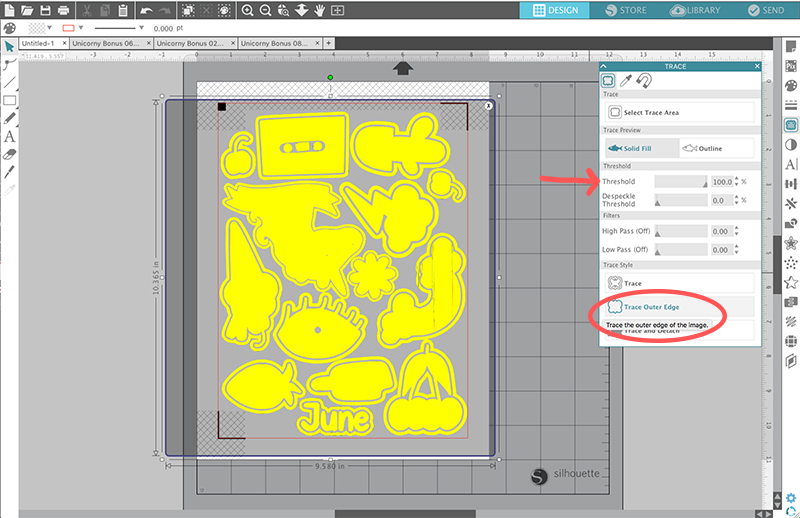
If you are working with a Silhouette, you need to set up your document in the Studio software before printing. In the page settings tab, start by setting the page size to 8.5 x 11 (or whatever size printable vinyl sheet you are using – just remember you need to use a size your printer can handle). Next, make sure you have the registration marks turned on. You have to have the registration marks turned on for the machine to cut the decals!

Next, open up your designs in the software and arrange them on your page. I used these adorable designs that come as bonuses with the Unicorny font for my stickers. As you place your designs, you can rotate them to fit as many as possible on your page. You don’t want to waste any of that vinyl! Just make sure to avoid the hashmarked areas and to keep all your cut lines within the red line.
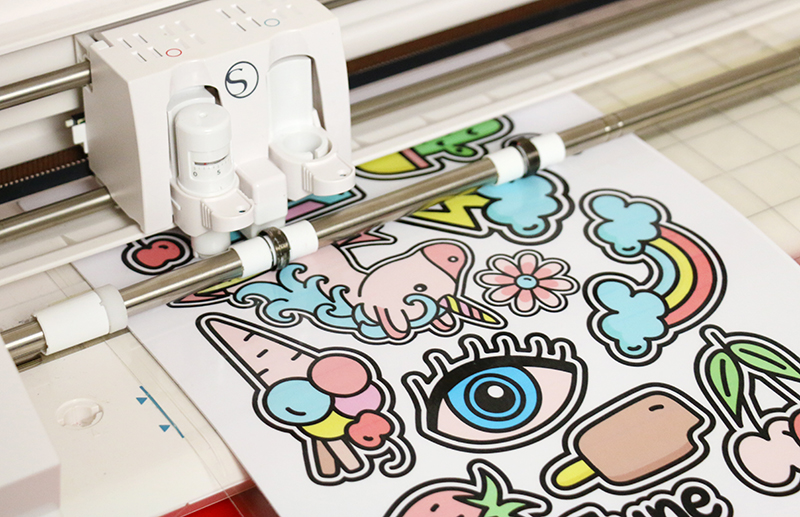
After you have your designs all placed, it’s time to create a cut line around the edges of each of your designs. To do this, open the trace window and click select trace area. Then drag to create a rectangle around all of your designs. Next, adjust the threshold setting until the design is completely yellow. Finally, click “Trace Outer Edge” to create cut lines around the edge of each shape. A red line should appear around the edge of each of your designs where the Silhouette will cut.
Now it’s time to print! Load your vinyl sheet into your printer so that the image will print on the matte side. Click File > Print to send the page to your printer. Remember, this vinyl is designed to work with inkjet printers. After it’s done printing, it should look something like this:
Step Two – Apply Vinyl Laminate.
At this point, you could simple cut and apply your decals, but if you want them to be extra durable (and especially if you want them to be washable), then you should first apply a vinyl laminate overlay. On it’s own, inkjet printable vinyl is rated to last outdoor for one year, but when you add a laminate overlay, it will last for 4-5 years. I made my laptop skin a year and a half ago, and it still looks great, and I think the laminate is why it has held up so well. You can choose from a glossy or a matte finish. For these decals I went with the glossy overlay.
Start off by cutting your laminate down to 8.5 x 11. Peel one edge of the laminate away from the backing and carefully line it up with the edge of your page. Using your application tool (or an old credit card would work pretty well too), slowly smooth the laminate down onto your vinyl while pulling the backing away.
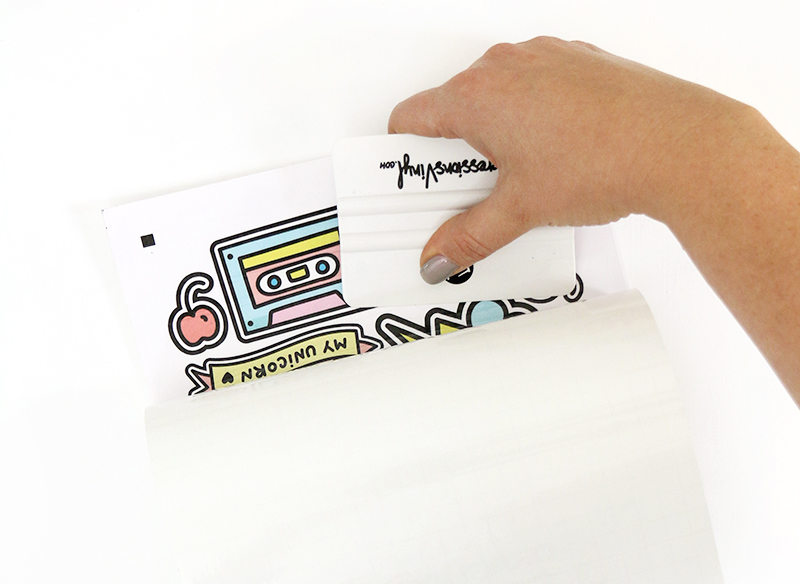
Use your application tool to burnish the laminate overlay onto the printed vinyl sheet.
Step Three – Cut Vinyl Decals.
Now that your designs are printed onto the vinyl and the laminate has been applied, you are ready to cut! If you are cutting by hand, simply use a pair of sharp scissors or a craft knife and cutting mat to carefully cut along the edge of your designs. If you are cutting with the Silhouette, place the vinyl onto your cutting mat and load it into the machine. Adjust your cut settings. For printable vinyl with a laminate overlay, I recommend these settings: Blade: 2, Thickness/Depth: 33, and Speed: 5.
Send the file to cut, and the machine will use the registration marks to cut right along the edge of your designs. It’s so cool!
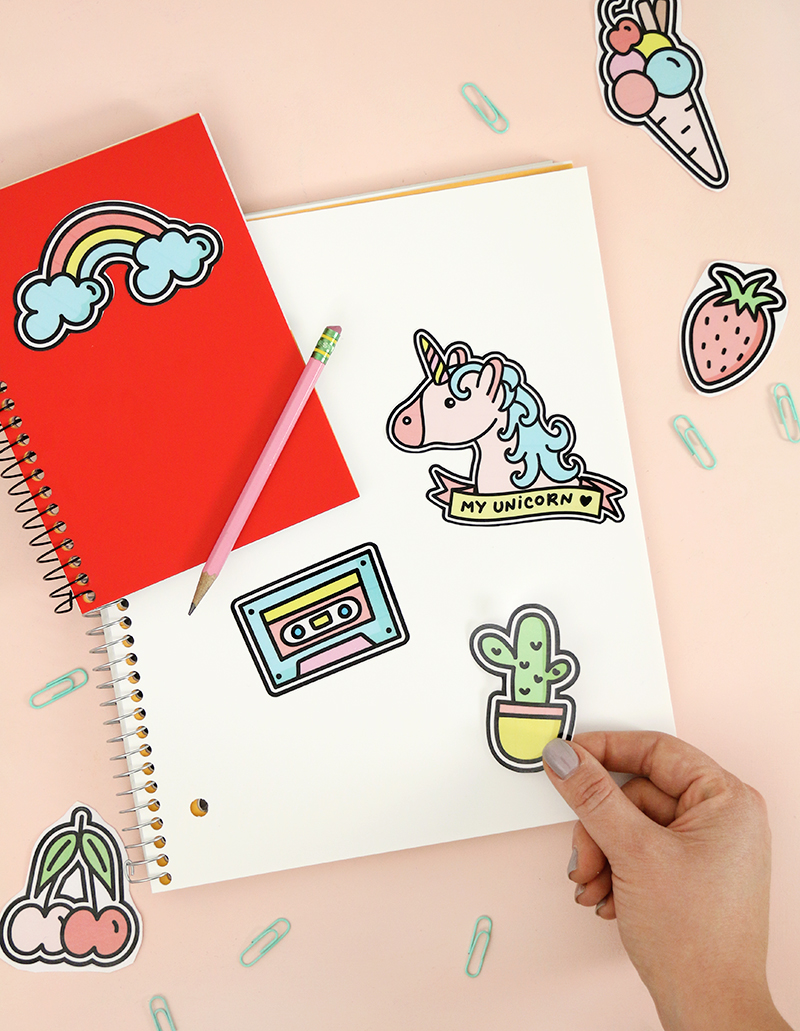
Step Four – Peel and Stick!
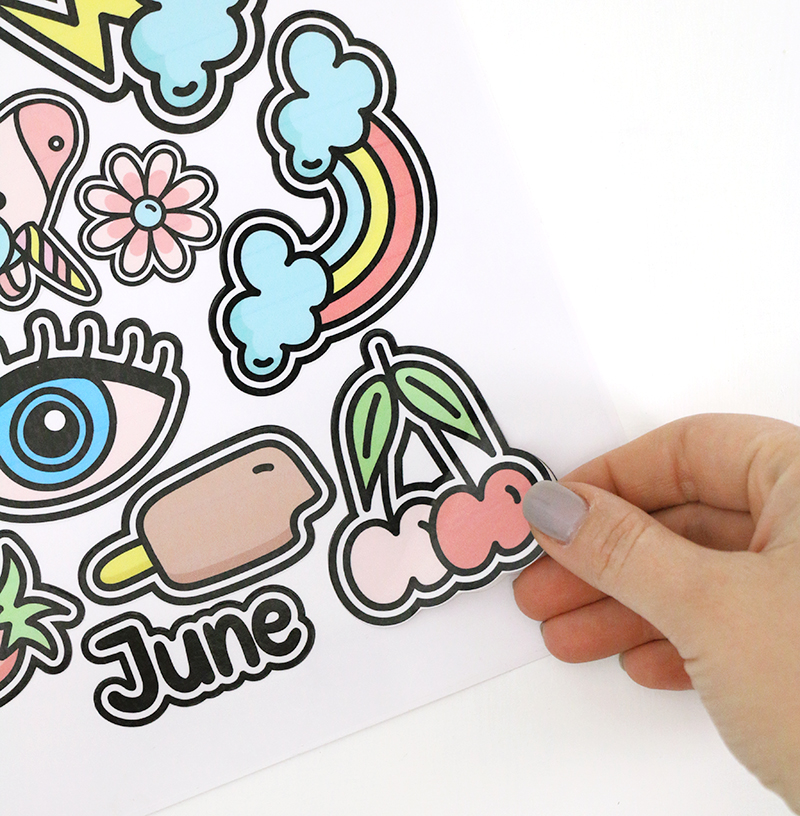
All that’s left to do at this point is to peel the stickers off the backing and apply them wherever you want! I used mine to decorate some new notebooks and personalize my kids’ water bottles.

>>Click HERE to Pin so You can Find this later!<<
Printable vinyl is kind of perfect for making cute labels for all of your kids’ stuff, don’t you think? Because printable vinyl stickers have a permanent adhesive, they can stand up to washing well. Hand washing is recommended, however, to keep the decals looking good as long as possible.
And now you know how to print on vinyl! What do you guys think? Have you used printable vinyl before? What kinds of DIY vinyl stickers are you going to make? Tell me all about it in the comments, and let me know if you have any questions there too. 🙂
Happy Making!

Check out more vinyl ideas here:
[the_grid name=”Vinyl Projects”]


Comments + Project Love
Jennifer says
Oh wow, I had no idea printable vinyl existed! Thank you so much for sharing this tutorial.
Rebekah Purnel says
My daughter is a sticker lover and asking to give her some handmade stickers! Couldn’t understand what to do. Your ideas have made my job easier and I have tried to make some. She loved them too much and already applied to her water bottle!!! Thaks for these wonderful ideas.
Alexis says
Yay! So glad it worked so well for you!
yify says
Wow! This can be one particular of the most useful blogs We’love ever arrive across on this subject. Actually Excellent. I am also a specialist in this topic therefore I can understand your effort.
Samantha Baker says
Printable vinyl to create stickers? LOVE IT!!! And what a brilliant idea to personalize boring waterbottles with the vinyl die cuts! My daughters will love this 🙂
Christina Mackay says
Thank you for your sharing and work. These are really helpful to me. With your blog, I can make a unique sticker for the children.
Sarah Jones says
Does this only work on InkJet printers? My son really wants to create his own stickers…but I just have access to LaserJet printers.
Alexis says
The Expressions Vinyl printable vinyl says to use it with an inkjet printer, but the last time I used it I printed using my laser printer and had no problems. I would definitely be sure to use the clear laminate overlay to protect it though. 🙂
Angelique says
Witch brand of expressions vinyl do you use??
Alexis says
I recommend their inkjet printable vinyl with the Oracal laminate overlay. You can get both in their starter kit here: http://shrsl.com/pu8w
Adrianne Ramirez says
Hi!
Great tutorial! I’m trying to make kiss cut sticker using printable vinyl. What cut settings do you recommend?
Ter says
How do I apply printable vinyl to a plastic cup without looking like I stuck a sticker on the cup
colin says
What do you mean by “Use your application tool to burnish the laminate “?
Bree says
Loved the video! If you add the vinyl laminate over your design do you also use the acrylic spray as well or is it just one or the other?
Alexis says
You don’t need a spray if you use the vinyl laminate. Hope that helps!
Jordan says
Hi! I’ve been trying to apply the printable vinyl to a disc ornament but i am having a hard time applying it and leaving out the creases. Have you tried the vinyl on an ornament before? If so, what shape did you make the picture to look best without creases?
Simonne says
Sadly I do need a machine since I have a laser and not an inkjet printer.
Denise Glass says
Thank you for posting. I am a professional organizer and I have the worst handwriting in the world ?!! Sometimes for labels I need them to be customized and I was trying to find a solution.
The info you give is informative and I am looking into seeing if this is a good rout for me.
I just subscribed and am looking forward to lots and lots and lots of information. ?
Emily says
Thank you so much for sharing this! I was unaware printable vinyl was a thing, but decided to do some research when a friend asked if it were possible to make some decals! I can’t wait to get started with a new project! Your video was super helpful!
Matthew Baldwin says
Not sure if this will reach you or not, but I was wondering if there is a specific printer I in would need to use for the printable vinyl.? I know it says the inkjet printer and you said you use the laser jet, what does that mean? Brand type? Thank you so much for your help.
Alexis says
An inkjet printer uses ink, while a laser printer uses toner. So the vinyl is designed to be used with an inkjet printer (which is the most common type of home printer), but I prefer my laser printer so decided to give that a try, and it worked fine. So, basically, any home printer you have should work fine. Hope that helps!
Miss M says
Hi
You didn’t mention the printer settings?
Paper selection? And any other settings that you need to select before printing?
Missy says
I have tried this for the 1st time and love it ! the colors come out so vibrant and I don’t have to worry about weeding my images or using multiple colors of vinyl ..
I will definately be using this more to make projects…
Alexis says
Yay! So glad it worked well for you! 🙂
Leanna says
Will this printable vinyl work with sublimation ink
Alexis says
I have not tried this, so I can’t give a good answer. I’m sorry!
DJ says
Can a dye sub printer print on this vinyl and will it still need a laminate?
Kara says
I have a canon inkjet pixma mg 3022 it’s not the one you showed to use but would it work?
Kara says
Another thing… have you done the printable htv post yet?
Anh says
I love your tutorial! It worked great for me. I am helping my kids make stickers for a “flea market day “ at school. I wanted to add an laminate overlay to the vinyl stickers but I don’t know what cut setting I should use. I have a Cricut Explorer air 2. Would you perhaps by chance know?
Chloe says
Hi I’m in the uk, I’m hoping there is a waterproof/resistant vinyl that I can print and cut with to go on a cup, any ideas please
Mary says
Do you have to use an ink jet printer? I only have a laser color printer.
Sandi says
Can you use any inkjet printer?
Marissa says
Thanks so much for this tutorial! I’m wondering if you have ever tried and had success with cutting the stickers and the backing ? I’m thinking of doing the kiss cut and then having an additional cut that is offset from the kiss cut that goes through the whole thing so that I could hand out individual stickers that look nice. I tried it with my auto blade on the deepest cutting depth and it didn’t go through. Maybe I need a different blade? I’m new to silhouette so I’m just not sure what the options are.
Melissa says
Hello, I’m extremely new to this and just have a few questions. I’m disabled and of course on disability. I was wondering how to go about making fingernail decals for nail art as gifts to all my nieces, aunts, and female cousins as my funds are limited. The last person I asked humiliated me and right out refused to help me because she is a nail artist who actually makes and sells them. PLEASE is there any advice or help you could please offer me?
Alexis B. says
It would be the same steps as above just the images would be smaller. When it comes to decals for fingernails the sizing is what matters.
Xander says
Do you have any tips for flattening vinyl sheets? My sheets are rolled and hit my print head messing up my whole print. Tried a heavy box and it helped but not enough.
Jennifer says
I have this same question, I’ve been searching everywhere for the answer too! My printer keeps jamming bc the printable vinyl won’t lay flat! 💔
Patsy says
I always just keep weight on top of mine when not in use to flatten them out. You can get like a paper bag from a store n put magazines or literal weights in it and it’ll flatten the entire thing with however much weight you want to put in just evenly distribute the weight.
Robin says
I am new at this and just recently ordered circuit explore air 2 and will get it tomorrow so exciting can’t wait. My question is I have Epson Stylus NX 300 and Hp deskjet F4440 printers. I wanted to know if either will work with printable vinyl? Trying to learn so much.
Alexis B says
As long as they are inkjet you should be fine. She used her laser printer and said they worked so if they are laser that is fine too. Laser uses toner and inkjet uses cartridges.
Max Verganti says
You know, there is a distinct difference between decals and stickers. Those words are not synonymous A decal is rubbed on usually via transfer tape a sticker has an adhesive backing.. I wish you people would stop calling stickers decals. This tutorial is for stickers.
Lynne says
Hi, love your site. So kind of you to put up tutorials to help us out. I’m new to Silhouette and trying to learn all I can! I have a question about printable vinyl. If I want to use a design that has multiple pieces, how would I go about doing it without it having a white background? Would I use transfer tape? I hope I am making sense, been trying to find the answer to this for a while. Thank you so much. 🙂
Stacia says
Can you print a picture on vinyl?
Alexis Middleton says
Yes! You can absolutely print a photo on printable vinyl.
Kristie Hughes says
I have to cut the vinyl by hand. And what I was going to use for the design is a colored picture out of a coloring book. Will that work? And I don’t have any transfer paper. And I’m a beginner. I think I might decorate a flower pot,or planter. This is my 1st time working with vinyl. I was going to use either construction paper or wax paper for transfer paper. If you have any pointers you could share with me that would be awesome. Because I really have no idea what I’m doing. 😆. Thank you.😁