Learn how to make DIY vinyl decals and decorate all the things with custom designs! If you are new to working with vinyl, it can be a bit overwhelming, but this step-by-step guide will teach you exactly how to use adhesive vinyl, and you will be making wall decals, signs, mugs, and more in no time! This post contains affiliate links, which help to support this site at no extra cost to you.
Guys – I am a big fan of crafting with vinyl and my Silhouette. I mean, I even made an entire online course all about crafting with vinyl and your Silhouette.
I am a total vinyl crafting nerd, and I want to share my vinyl nerd love with you all. 🙂 If you have never worked with vinyl before, I hope you will give it a try because I think you will love it. This post will get you started on your vinyl crafting journey and teach you everything you need to know about using adhesive craft vinyl with your Silhouette or Cricut.
Ready to make some DIY vinyl decals? Let’s do this!
How to Use Adhesive Vinyl with your Silhouette or Cricut
There are a few basic steps in working with adhesive vinyl, and we will go through each one. They are preparing your cut file, cutting, weeding, and applying. That’s it! For demonstration purposes, I will be making a DIY vinyl decal to add to my ipad case. I am using my “Makers Gonna Make” design that you can get over in my So Fontsy shop.

Step One – Prep Cut File
The first step in crafting with vinyl is to prepare your cut file in the cutting machine software you are using. (If you do not have an electronic cutting machine like a Silhouette or Cricut, you can cut vinyl by hand, but it is just more difficult to get intricate designs. Check out this DIY planter I decorated with vinyl cut completely by hand for an example.)
What’s a Cut File?
When I say “cut file,” I mean the design that you want to cut from vinyl and put on your shirt or other surface. The most common cut file type is probably SVG, but you might be using a .Studio, .png, .dxf, or .jpg file depending on the software you are using. I personally am a fan of SVG files because they work with most cutting software. (NOTE: You must have at Silhouette Studio Designer Edition or higher to use SVG files, and I definitely recommend that Silhouette users upgrade to Silhouette Studio Designer Edition.)
Where to Find Cut Files
If you are looking for cut files, then be sure to check out the free cut files I have here on the blog. I also have a cut file shop and participate in a monthly cut file bundle that you may want to check out. Finally, I am also regularly pinning awesome cut files to my Silhouette board here.
For this example, I am using my Makers Gonna Make cut file design, which is available in my shop.
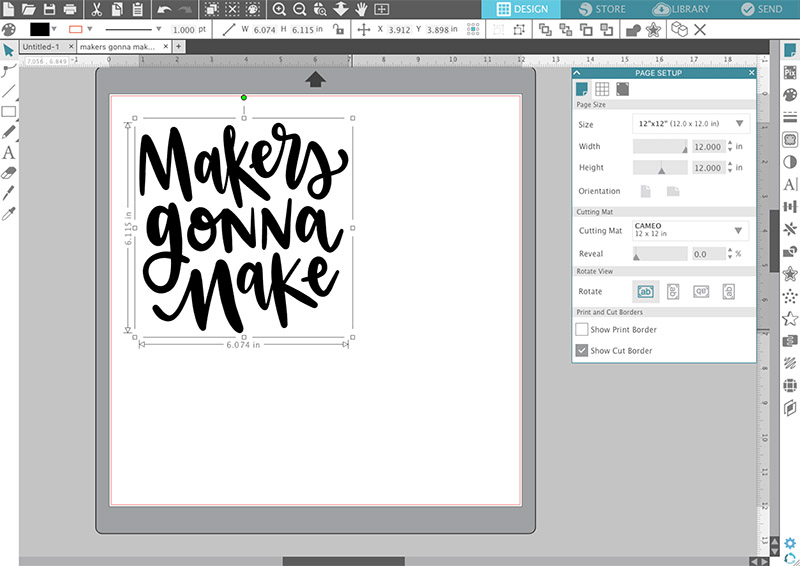
Scale Design
Once you have your design and surface picked out, you need to measure your surface to determine how big you will need to cut the design.

I will usually just grab a ruler or tape measure to determine how big I want my decal to be. I decided I wanted it to be about 6 inches wide.
Open up your cut file design in your cutting machine software, and then scale the design to the size you want. I am using Silhouette Studio software, but the process should be similar with any program you are using. Simply click on the design and then drag the corner handle to scale the design to the size you want.
2. Cut Design from Vinyl
Now we are ready to load our vinyl into the cutting machine.
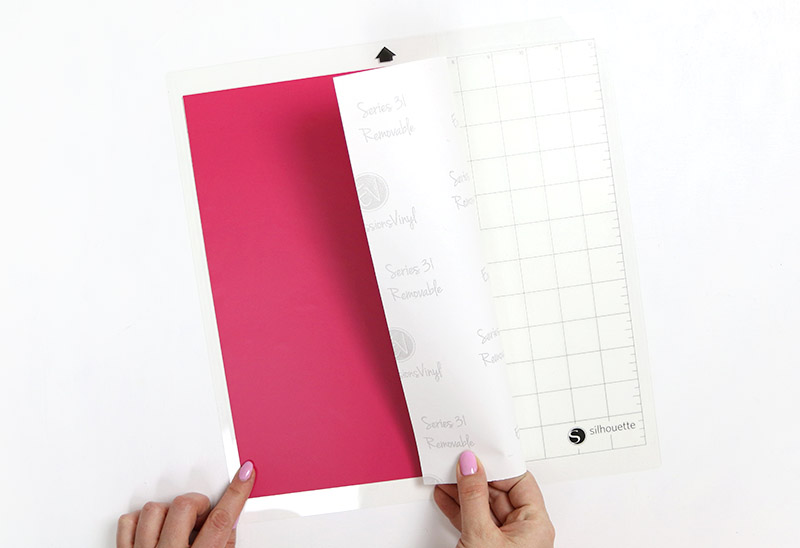
Place Vinyl on Cutting Mat
It is possible to cut vinyl directly from the roll without a mat using your Silhouette, and I will add a post all about how to do that soon, but for now, let’s just focus on how to cut with a cutting mat. You can get Silhouette Cameo cutting mats in 12″ x 12” and 12″ x 24″. The Cricut cutting mats are really similar, and I have used Cricut mats with my Silhouette
Whatever mat and machine you are using, put your adhesive vinyl paper backing side down onto your mat so the colored vinyl side is facing up (see image below). If your vinyl came on a roll, you can cut off a piece to fit on your mat. For my decal I decided to use Expressions Vinyl Series 31 removable vinyl in Bright Berry. (For more info on how to choose the right vinyl for your project, check out this post.)
Adjust Cut Settings and Cut
Finally, you will need to adjust the cut settings in your software or on your machine to work with the material you are using. This process will be a little bit different for every cutting machine, but just make sure to choose the settings for the particular type of vinyl you are using (glitter vinyl may require different settings than regular glossy vinyl, for instance). Working with my Silhouette, I selected Vinyl, Matte from the Materials menu.

I recommend doing a small test cut, especially when you are working with a new material to make sure the cut settings will work well with the material you are using before attempting to cut the entire design. You want the blade to cut through the vinyl cleanly without cutting through the backing. This is called a “kiss cut,” and it will make it much easier to weed and apply your decal in the next steps. If your test cut has gone through the paper backing, you may need to decrease your thickness/depth or blade setting, or if the test cut didn’t go all the way through the vinyl, you may need to increase the thickness/depth or blade setting.
When you are happy with your cut settings, load your cutting mat with the vinyl paper backing down into your machine, and cut!

3. Weed out Excess Vinyl
The next step is called “weeding.” Basically, weeding just means removing any excess vinyl from around your design that you do not want to be transferred to your final product.
How to Avoid Wasting Vinyl when Weeding
If your cut design is considerably smaller than the piece of vinyl you cut it from, then I recommend first trimming off the extra vinyl before weeding. You can just use a pair of scissors and trim around your design. This allows you to use the rest of your vinyl piece for another project. (In my weeding images below, I actually cut a rectangle around my design with my Silhouette first and and then trimmed off the extra vinyl with scissors after weeding. Either way works!)
Tips for Weeding Adhesive Vinyl
To weed off the excess vinyl, you will need some kind of tool. I personally use, love, and recommend this weeding hook. It is sharp and works great for removing that vinyl. You can also use a Silhouette hook, a Cricut hook, tweezers, a craft knife, or even a straight pin.
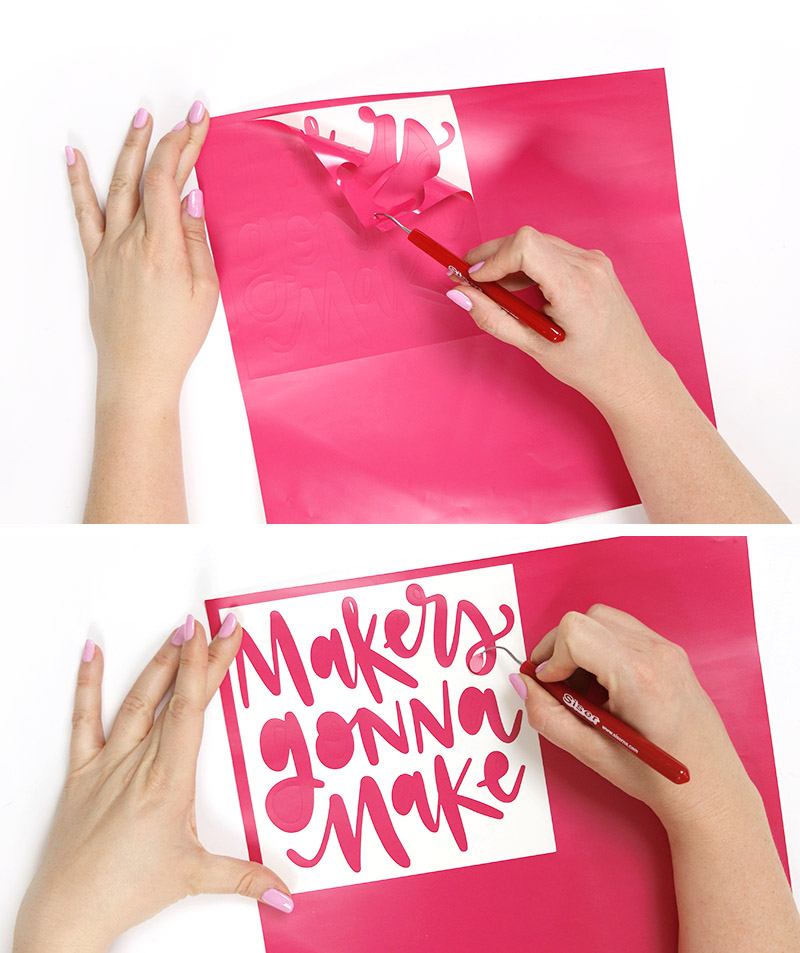
If you have any difficulty seeing your cut lines, you can try gently bending your vinyl or holding it up to a light or window. The Cricut Bright Pad is another option. Once you find your cut lines, use your hook or other weeding tool to gently lift up the edge of the negative space and pull it up off of the paper backing. I like to start by removing the vinyl from around my design first and then remove the pieces from inside letters and other parts of the design.
3. Use Transfer Tape to Apply Decal
Now that you have your design all weeded, you will have a bunch of separate pieces of vinyl positioned on your paper backing, and you need to move them from the paper backing to your final surface. To do this easily and keep all though pieces where they need to be, you need transfer tape or transfer paper. (I have also written a full step-by-step guide all about working with transfer tape that you can check out right here.)
Guys – a good transfer tape is your secret weapon in becoming a DIY vinyl decal master. There are lots of different brands and types of transfer tape available, but I really like using and highly recommend one of the clear transfer tapes from Expressions Vinyl. One of the rolls will last you forever. If you get it, I do not think you will regret that purchase.
Apply Transfer Tape
Whatever transfer tape you use, start by cutting off a piece about the size of your decal, and smoothing it on to the top of your decal.
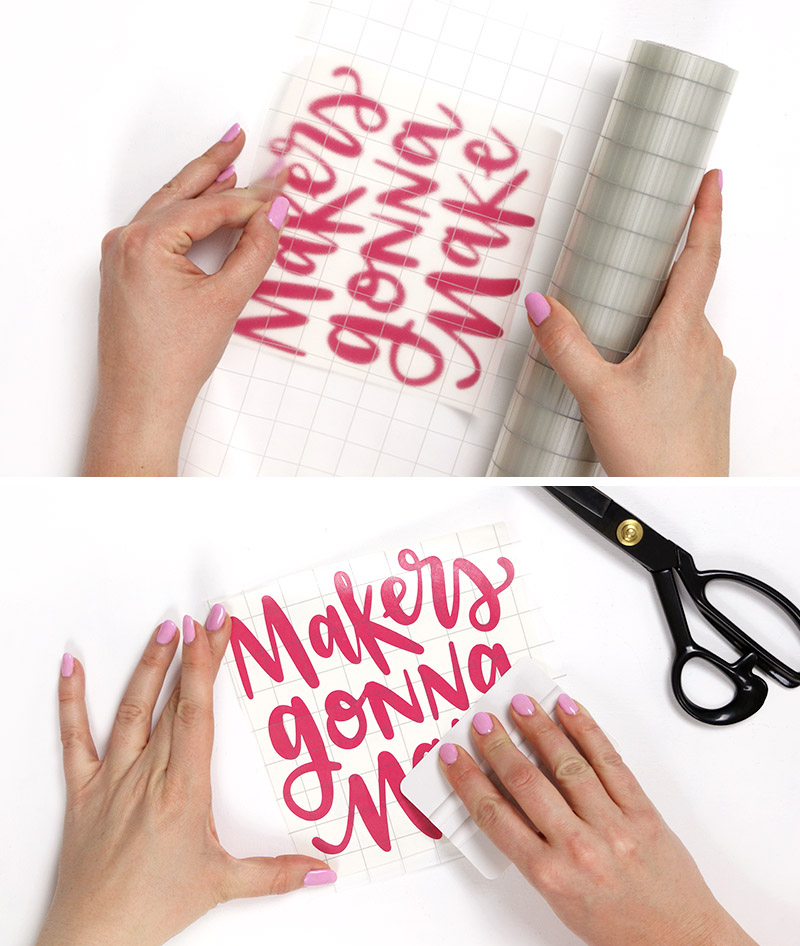
Use an application tool, scraper tool, or even an old credit card to smooth the transfer tape onto the decal. Next, slowly peel the transfer tape and the vinyl decal up off of the paper backing.

Apply Vinyl Decal
Then, carefully position your decal over your surface. Gently place one end down on the surface and smooth it out with your fingers. Then use your application or scraper tool to burnish the decal onto your surface. Remember, the vinyl’s adhesive is activated through pressure, so give it a good rub to get it to stick well.
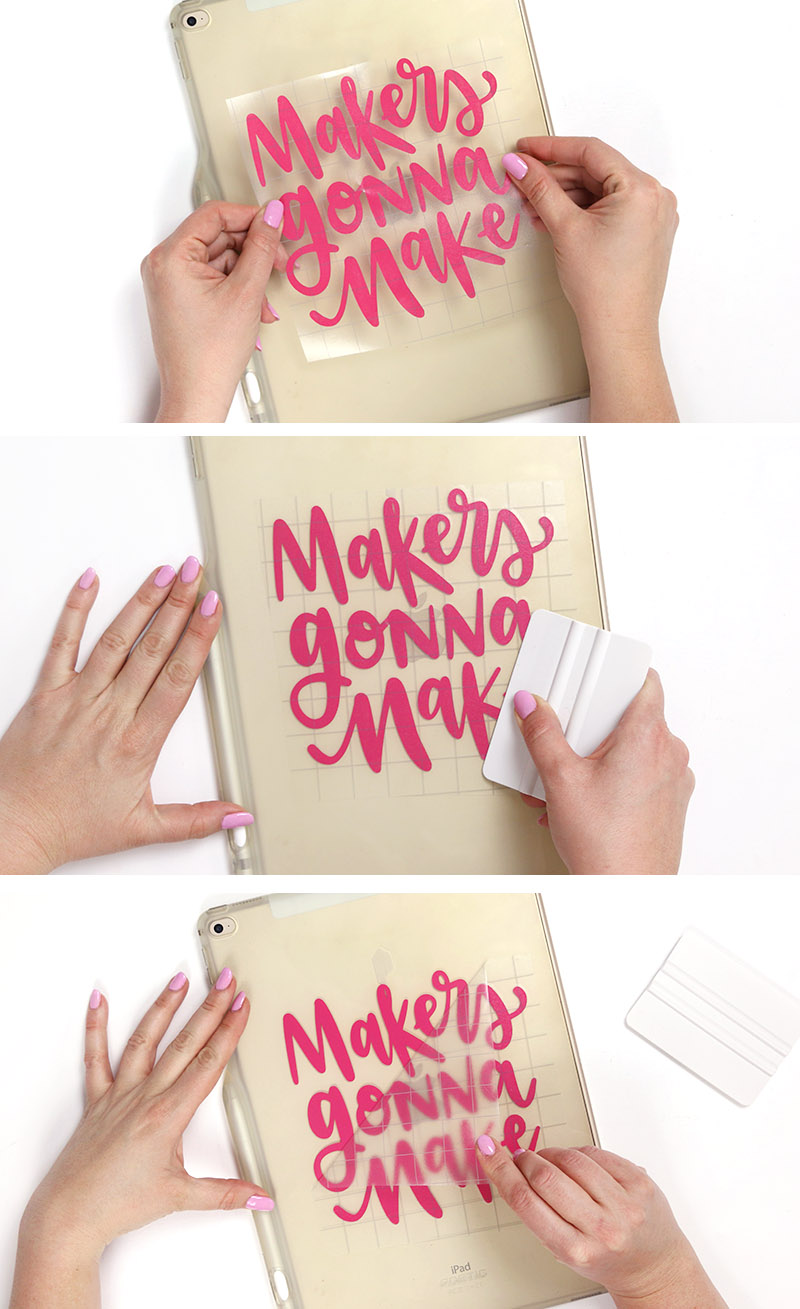
Finally, peel off your transfer tape, and you are all done! Your awesome DIY vinyl decal is applied!
Now that you know how to use adhesive vinyl to create a simple vinyl decal, you might want to try out some more advanced adhesive vinyl techniques:
- Learn how to make multi-colored vinyl decals easily with registration marks.
- Learn how to use the hinge method for precise application and smooth application on curved surfaces.
- Learn how to make colorful and detailed vinyl stickers with printable adhesive vinyl.
If you would like to branch out into the world of heat transfer vinyl and make your own custom t-shirts, tote bags, and more, be sure to check out my beginner’s guide on using heat transfer vinyl right here.
Until next time, Happy Making!

Check out my latest vinyl project posts:
[the_grid name=”Vinyl Projects”]


Comments + Project Love
Boushra says
thank you so much for your help
Alexis says
You are welcome! 🙂 Thanks for stopping by and leaving me a comment.
Lorna Webster says
Hi, thanks for this, I am a total beginner!
If I attach transfer tape, the side facing up will then be sticky, correct? What if I want to save it for later, or give it to a friend, what can I cover the sticky side with that will not damage it and will be peelable later, both for regular adhesive vinyl and permanent outdoor vinyl?
Alexis says
When you apply transfer tape, you put the sticky side of the transfer tape down on top of the decal to help pick it up from the paper backing. The sticky side of the transfer tape should be facing down towards the decal. The top of the transfer tape is not sticky. If you want to get a decal to a friend to apply, I would apply the transfer tape on top of the decal and just leave the paper backing in place. Explain that to apply the decal, they will peel off the paper backing, apply the decal to the surface, and then peel off the transfer tape. I hope that makes sense! Let me know if you still have questions.
Lorna Webster says
Thank you, I think I understand! So, for example, it will be Transfer tape, middle layer of decal (color, non-sticky side facing transfer tape) and then the paper backing from the vinyl.
Leah says
My smart permanent vinyl pieces are super small, and all out of place. They are also so small I don’t feel like they are sticky? Do people add glue to vinyl ever??
Misty says
Thanks for the article! I’m a newbie! 🙂 Quick question…I made my cut and when I went to pull the excess vinyl off, what I cut started to pull off (not staying on the backing). What am I doing wrong?? Thanks~
Alexis says
Is it possible that the cut didn’t go all the way through? If the excess vinyl is still connected in places to your design, it may start to pull up too. So I would recommend adjusting your cut settings and see if that helps. Other than that, my only other tip would be to just go slowly when peeling the vinyl off.
Mickey says
Hi Alexis,
My girlfriend is beginning to get into this stuff and I want to help her out.
What hardware and materials are good for beginners? I’m looking to buy her a printer but want to make sure I get the right one.
She wants to do a lot of lettering so whatever you recommend for that would be great.
Thanks so much for your advice. Great column btw!
Alexis says
Hi Mickey! I am a Silhouette user personally, but I have lots of friends who love their Cricuts. If she will mostly be cutting vinyl and paper, then I would recommend either the Silhouette Cameo 3 or the Cricut Explore 2. I personally believe the Silhouette software is far superior, which is one reason that I love it. Some people argue that Cricut has an edge in cutting ability, but I don’t have personal experience with that, so I can’t really comment. If she is interested in cutting fabric, maybe check out the Cricut Maker (it is more expensive though). Hope that helps!
Linda S says
I just started using my Cricut to make vinyl decals. My problem is that the paper backing of the vinyl sticks to the mat and doesn’t come off. I’ve tried the lightest duty mat and still managed to ruin the mat. What the heck am I doing wrong? Can I just put the vinyl in without a mat? I have a Cricut Explorer.
Nikita says
Hi my name is Nikita and I’m trying to find out all the supplies that I need step by step doing heating vinyls I want to start making my own shirts I’ve been looking at your site for a minute but I don’t know what to start from
JUDITH ANN COREY says
I was lost….I watched videos (not the best ones I guess) and wasted so much time and material…..I saw this post, and found the answer I was looking for. I will follow you from now ON!!!!
Beth says
Hi my daughter is just beginning with her cricket. She has made beautiful designs but everytime she goes to put it on a cup or notebook it will not come off. What is she doing wrong?
Alexis says
Hi Beth! The design won’t come off the mug or it won’t come off of the transfer tape? If she is wants it to be removable, then you need to make sure she is using an adhesive vinyl with a removable adhesive. Oracal 631 is a good one to give a try. You can
Michelle says
Hi I am totally new using a cricut not to mention vinyl – I am hoping to make some decorative signs for my daughter’s bridal shower- I bought the vinyl sheets multi color to get the hang of it and the transfer paper but forgot the tape – is there special trick to making words? Any additional help would be amazing!! Thank you:)
Amy says
What if you are just covering a very small solid area.. like a solid square inch (think way smaller) is the transfer tape necessary ?! I am covering mini resin lipsticks, and they are small, but I also realized the “permanent” vinyl isn’t so permanent.
Alexis says
No. You don’t really need transfer tape for smaller solid shapes. Just peel and stick. 🙂
Sara Johnson says
Thank you so much for the info Alexis!I just found your blog a couple of days ago and I love it. I used your idea to make decals to decorate my Cricut, I printed some beautiful boho roses and gorgeous butterflies, they look awesome. Thank you for all of the wonderful information, your instruction or so easy to understand and I love that you share economical ways to make our crafts.
Samantha Ly says
hey Alexis , do you have any guides or steps on how to cut and DIY pictures and words onto a photo frame without any help of a machine?
Alexis says
Hmm… I do not, but that is a good suggestion. Thank you!
Amy says
Hi, do you recommend permanent or removable vinyl for iPhone/iPad cover projects for withstanding wear and tear of being put in and out of a bag? thanks!
Alexis says
Hi! If you are putting the vinyl onto a case, then I would go with permanent. If you are placing it directly on the device, then you might want to use removable, just to avoid any issues with the adhesive affecting the device itself. Good luck! 🙂
Astrid says
Hola, quiero hacer mi etiquetas para trajes de baño, que tipo de Transfer puedo utilizar,? Y si lo puedo hacer en una impresora casera?
Dallas Jackson says
What a great guide! Thanks for this!
Can I ask if you have any experience with Teckwrap Craft Heat Transfer Vinyl Folie? (I don’t think you’re affiliated with them, so don’t feel obliged to answer if your not comfortable doing so!).
Also, for those of us yet to graduate up to a cutting machine, can simple designs be cut from PU HTV manually, with a craft blade?
Thanks again!