Learn how to turn your child’s artwork or handwriting into a permanent vinyl decal to customize mugs, glasses, and other gifts. This simple project makes a perfect DIY Father’s Day gift idea or gift idea for any special occasion. I will also walk you through the steps of using the trace tool in the Silhouette Studio software so you can turn any handmade design into a cut file. Thank you to Expressions Vinyl for sponsoring this post, which also contains affiliate links that help to support Persia Lou.

Father’s Day is around the corner, and my kids just love to make handmade gifts. In the past we have made storybooks for Dad, but this year I had the idea to turn some of their little drawings into permanent designs on cups, t-shirts, or anything else we could think of. It really just took a few minutes with my Silhouette and some Expressions Vinyl to get this project done, but I am so happy with how it turned out!
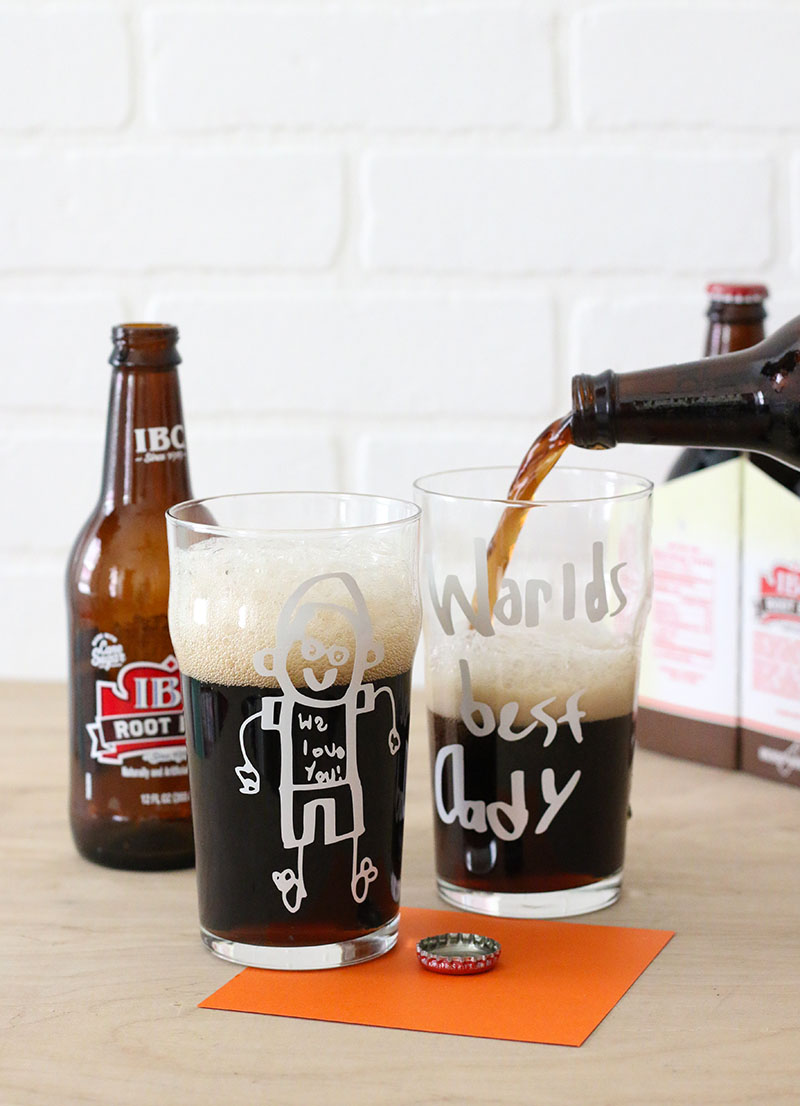
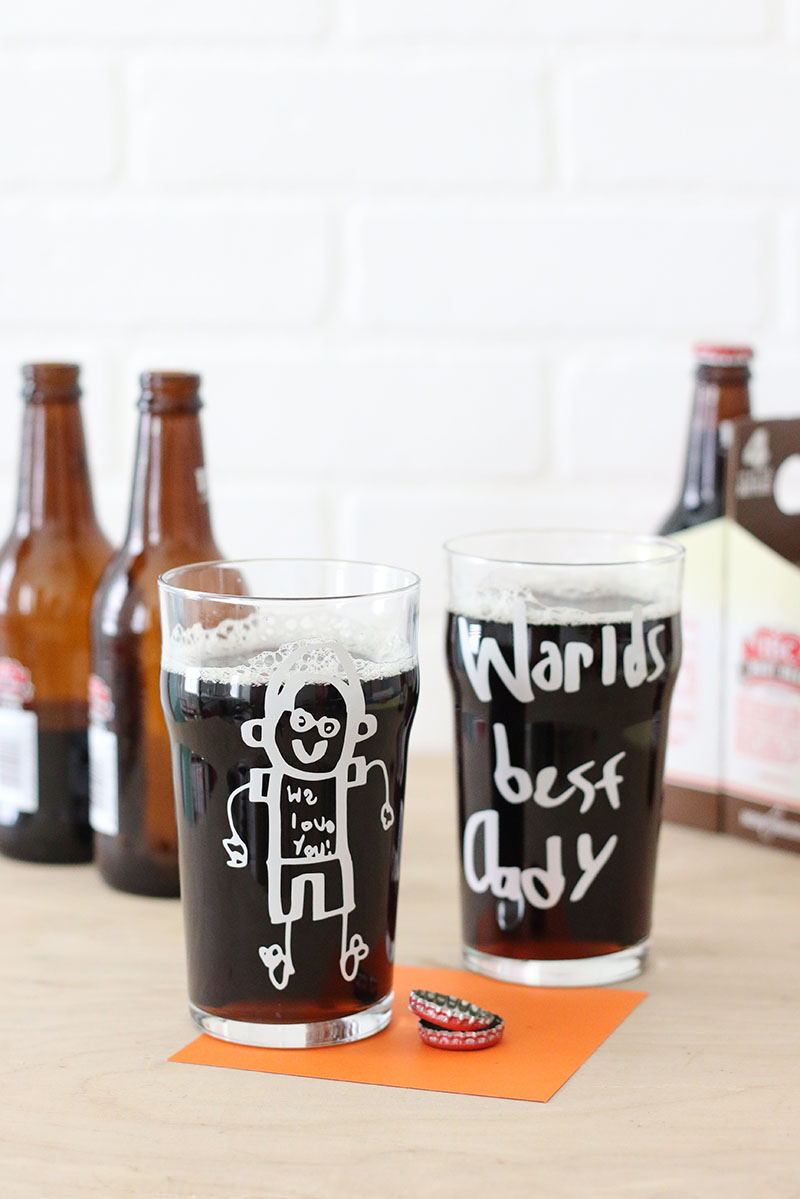
We ended up putting our designs on some mugs and glasses, but you could apply your decals to anything you can think of – boxes, tech, walls – whatever! You can even use heat transfer vinyl to apply the designs to shirts and other fabric items.
I came up with this as a DIY Father’s Day gift idea, but of course you could use the same process to make gifts for moms, teachers, or anyone who loves your kiddos. You can use the same process to put your own designs and handwriting on projects too – let’s not let the kids have all the fun! 😉
DIY Father’s Day Gift Idea – Kid’s Artwork Mugs
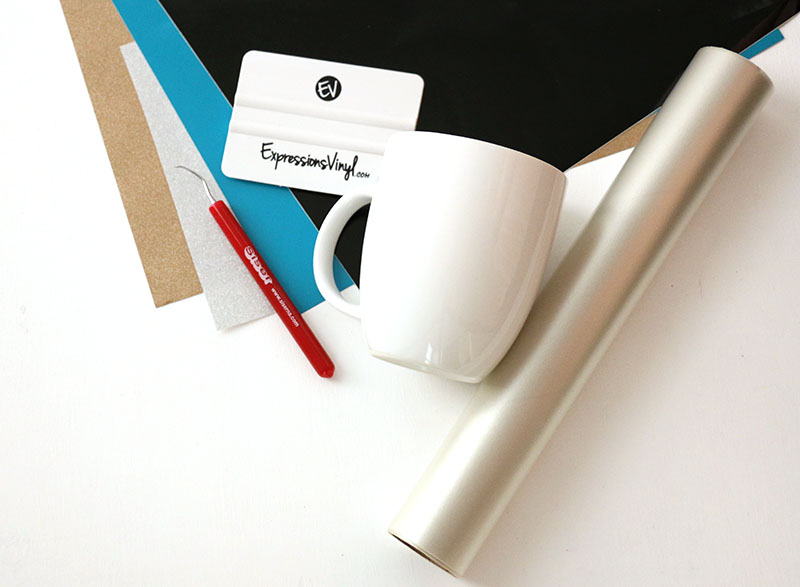
DIY Father’s Day Gift Idea Supplies:
- Permanent Adhesive Vinyl (I used Expressions Vinyl Series 51 in Jet Black and Oracal 651 in Light Gray)
- Blank Mugs, Glasses, or other items you want to personalize
- Weeding Tool
- Application Tool
- Transfer Tape
- Silhouette Cameo and Silhouette Studio Software (comes with the machine)
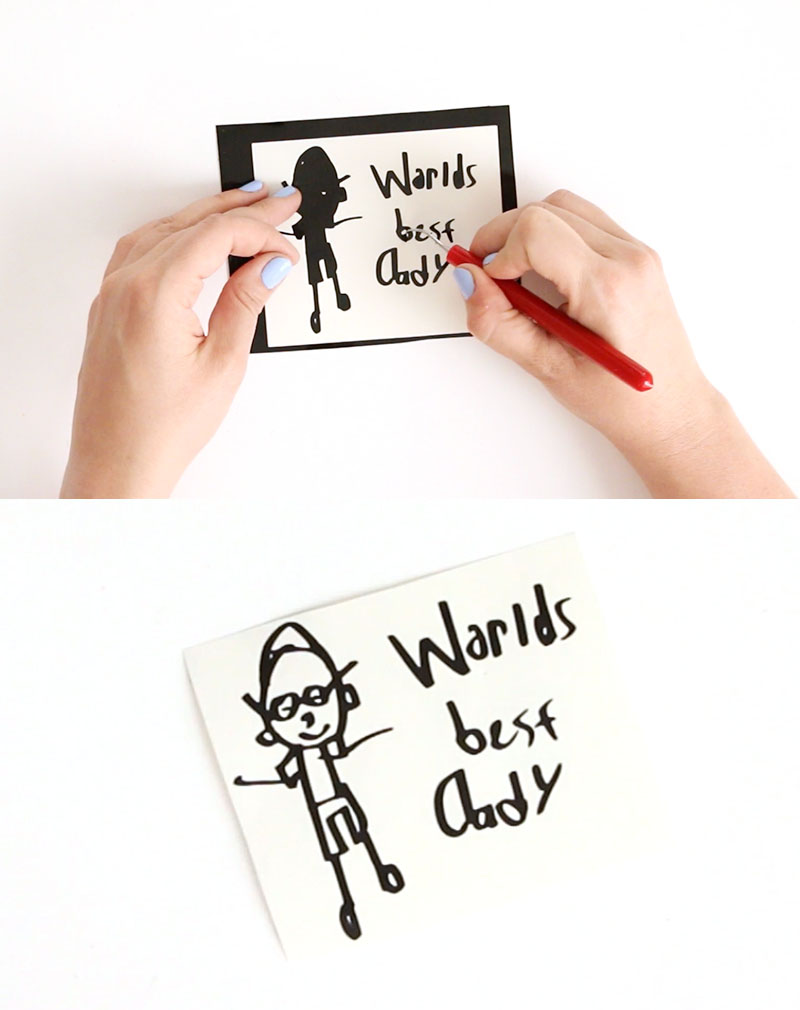
Step One. Let The Kids Draw!
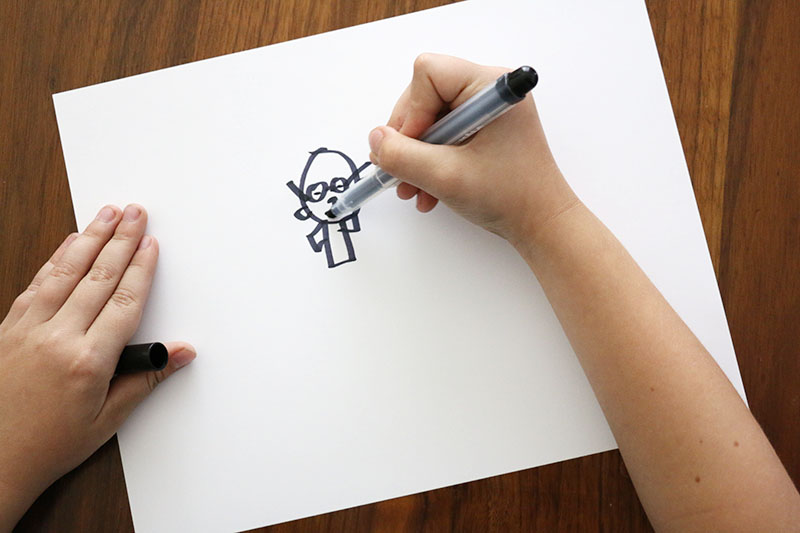
Grab some white paper and dark markers and let the kiddos get to work. It will be easier to turn the designs into decals if the lines aren’t too thin, so markers are great for this. Black markers or other dark colors will make it easier to scan and trace later on.
I told my kids to draw pictures of their dad and write things like “world’s best Dad” or anything that he might like on a cup or t-shirt. My six year old came up with some of the cutest little sayings. My favorite might be “Yikes! You are amazing!” ? I mean, who doesn’t want that on a mug or t-shirt?!
I also really liked this little number:

It says, “You are amazinger than amazing. You’re super duper amazinger.” I mean… It’s pretty good.
Step Two. How to Trace in Silhouette Studio.
When your kids are done drawing, it’s time to turn their creations into awesome gifts! The first step is to scan the images onto your computer. If you have a scanner at home, that will work great. If not, take a photo of the drawings in bright light. When you have your scan or photo ready, open it up in the Silhouette Studio software.
UPDATE: Check out a video tutorial of how to trace images in Silhouette Studio 4.1 right here.
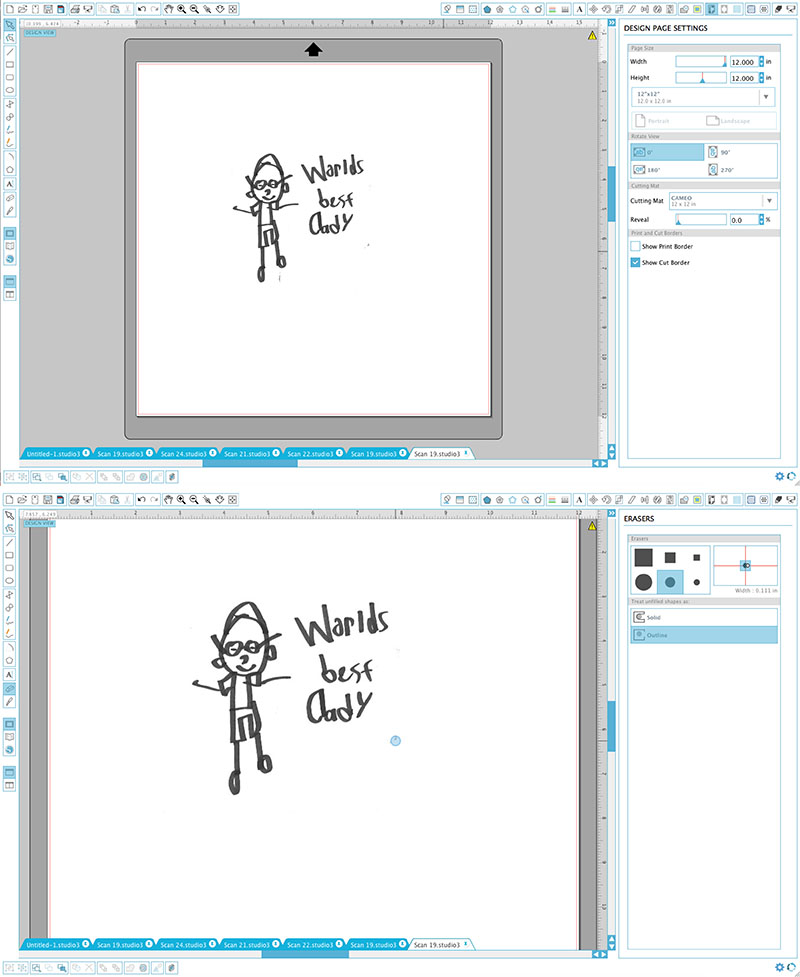
If your scan or photo has any little stray marks that you don’t want to trace, use the eraser tool to get rid of them.
Next, we will use the trace tool to turn our cute little sketches and phrases into cut lines. Open the Trace window – it’s the button that looks like a little blue square surrounded by a yellow square. When you have the window open, click on “Select Trace Area” and draw a rectangle around your design.
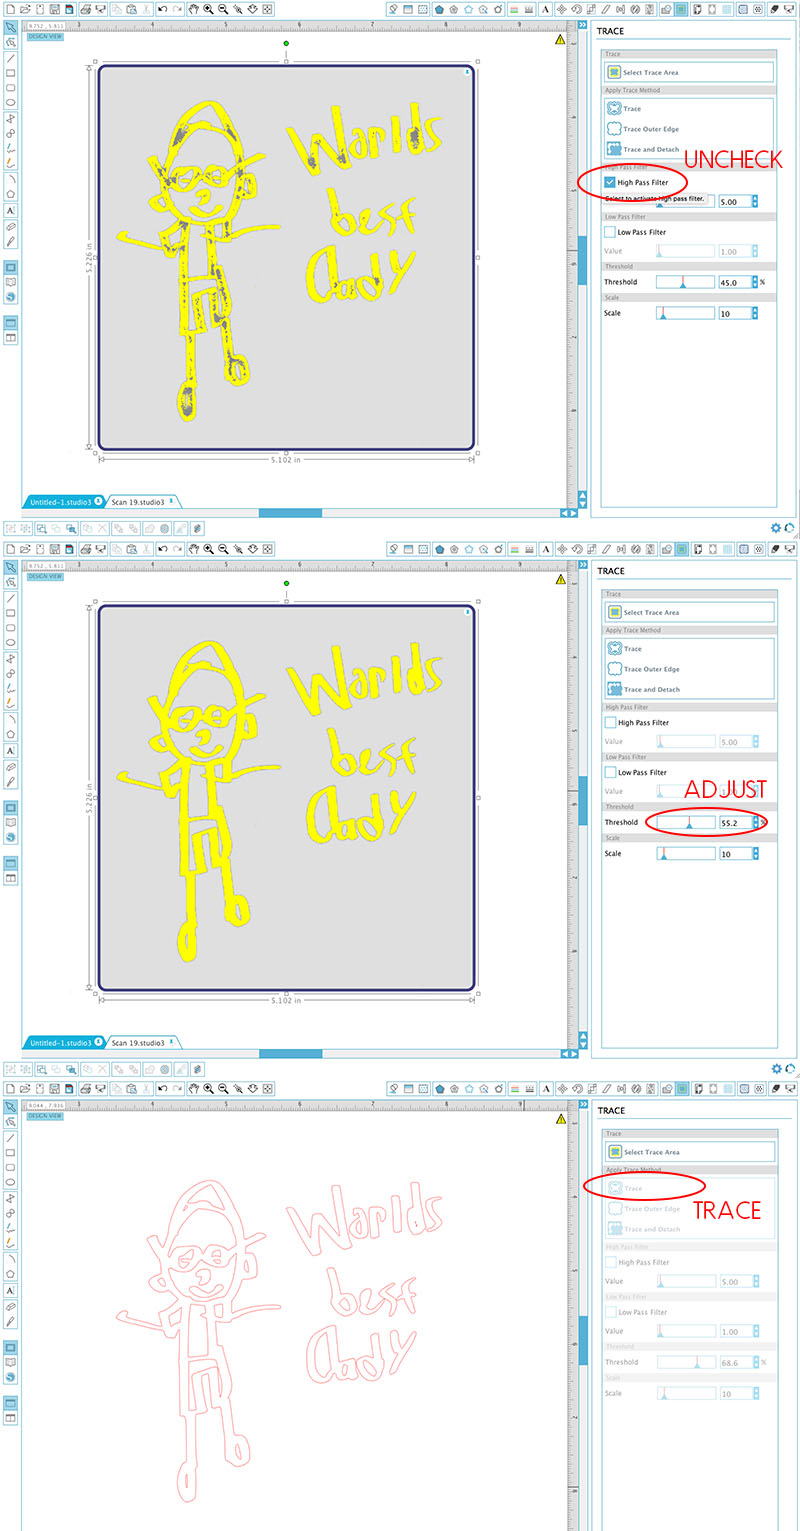
Your design should fill in with some yellow, and it will probably look a little splotchy at this point. Uncheck the High Pass Filter box, and then adjust the Threshold until the design is filled with yellow (I usually set mine to somewhere around 50-60). Finally click on “Trace.” This will create red cut lines around your design. At this point you can delete your original image.
Step Three. Cut.
Next, you will need to size your design to fit on your project. Measure your mug, glass, or whatever to determine how big the decal should be. Then click on your design and use the handles in the corners to scale the design accordingly.
Open up the cut menu and select vinyl from the material menu. Adjust your blade to the correct setting. I always recommend doing a test cut with vinyl to avoid wasting any material. You want the blade to cleanly cut through the vinyl but leave the backing intact. If your test cut turns out well then go ahead and send the file to your Silhouette to cut. (NOTE: If you are planning on applying your design to t-shirt or fabric and will be using heat transfer vinyl, the image needs to be mirrored. You can see how to cut and apply heat transfer vinyl in this post.)
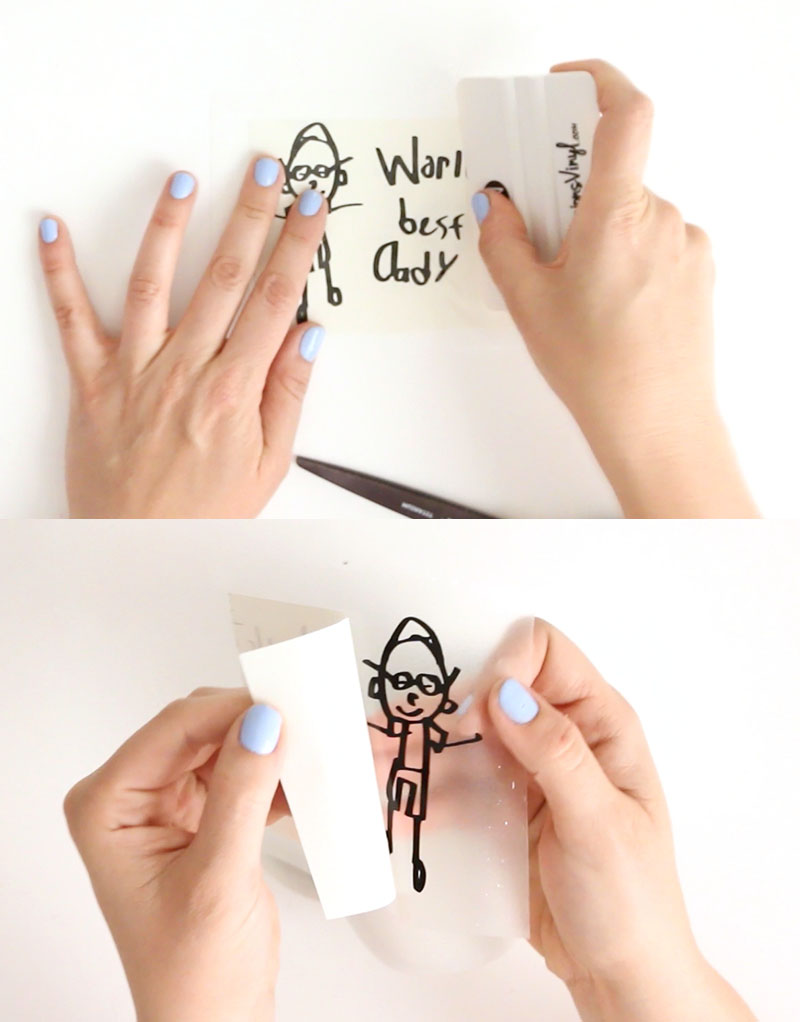
Step Four. Weed.
After the machine has cut the design, it’s time to remove all that excess vinyl. This step is called weeding. You can use a weeding hook if you have one, or if not, a straight pin or tweezers work great for this too. Be sure to pull off all the little pieces from inside the letters. Refer to the original drawing if you need to.
Step Five. Apply.
So now we have this cool decal, but how do we get it onto our final project?
There are actually some different methods for how to do this, and I will be walking you through the basic steps in this post. To see some more advanced techniques like reverse weeding and the hinge method (these techniques are particularly great for really intricate and delicate designs), be sure to check out this post right HERE.
No matter what method you use, the secret to moving cut vinyl to the final project is transfer tape. I highly recommend Expressions Vinyl’s clear transfer tape because it is just really easy to use. Cut a piece of transfer tape about the same size of your design, and smooth it over the top of the decal. Use the application tool or an old credit card to burnish the decal onto the transfer tape. Peel the transfer tape and the decal up off the paper backing.
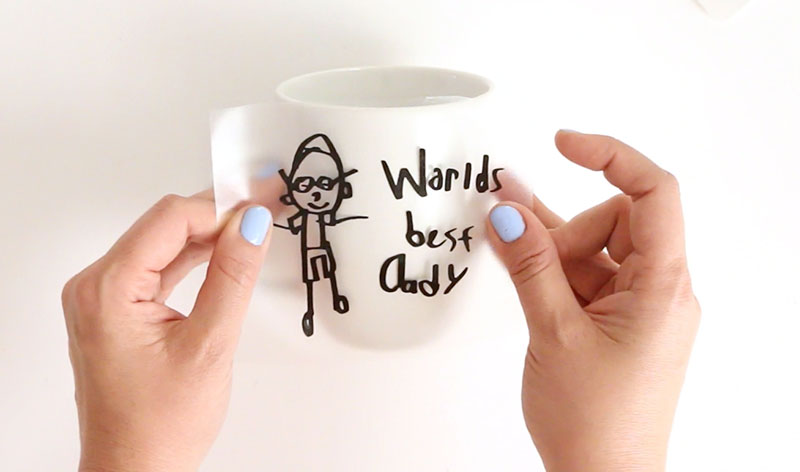
Now we can easily move our decal to our mug or cup. Be sure to move slowly as you do this to avoid bubbles and wrinkles in your final project. If you are placing your decal on a curved surface like a cup or mug, I suggest starting from the center of the decal and smoothing out from there. You can use scissors to cut lines in the transfer tape between pieces of your design to make it easier to form the transfer tape to that curved surface.
![]()
When your design is fully applied, use your application tool to really burnish it onto the mug. The permanent adhesive is activated by pressure, so this is an important step to getting a long-lasting application. Finally, peel off the transfer tape to reveal your finished project!
![]()
And that’s it! Your cute little custom cup is all ready for gifting and sipping. I think it would make a super cute gift paired with Dad’s favorite drink.

As far as caring for your cute new mugs and glasses, be sure to wait 24 hours to let the adhesive cure before washing. If you want your mug to last in pristine condition, then hand washing is recommended. I have had pretty good luck with washing my vinyl mugs in the dishwasher, but I have also had a few casualties. Thin and delicate designs will probably not fair well in the dishwasher.
UPDATE: Check out the Mother’s Day version here!
Okay – that’s it for today! Happy Making!


Comments + Project Love
Samantha says
Alexis, this is so adorable and so clever!! Fathersday is coming up in August here in Australia and these are just perfect! Gonna use your creativity and make some smashing kids art cups!
Alexis says
Oh yay! Thanks so much, Samantha! 🙂
Kelly Case says
I love, love, love this idea! My husband’s birthday is coming up and I’ve been struggling to think of what the kids could do for him. This is it!! I’m going to get my Cricut out and have the kids start their drawings! Thanks so much for the inspiration!
Breige says
How do I delete my original image?? I’ve gotten so far, and now can’t delete the original image & still have the Pixscan mat background!!