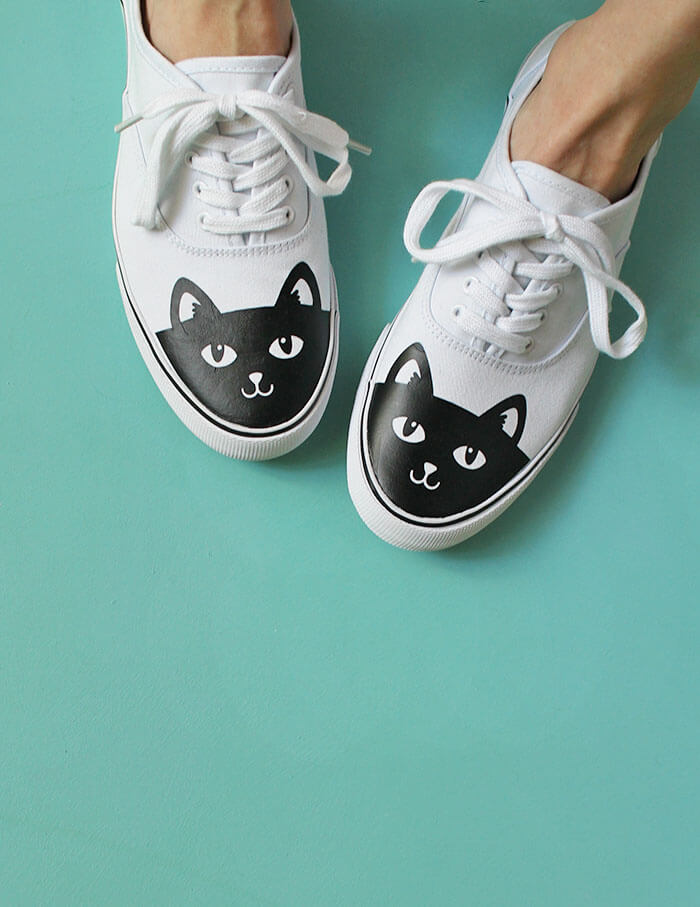
Make your own adorable DIY cat shoes easily with heat transfer vinyl. It’s easy to personalize your sneakers with this simple DIY technique. This post includes affiliate links, which help to support this blog. Thank you!

Guys. I’m not sure how this happened, but we are already halfway through October. I don’t understand it, but here we are. The good news about all of that is that it is almost Halloween, which is one of my favorite times of the year!
Making my kids’ Halloween costumes every year is one of my very favorite things, even if I don’t always have enough energy left to make a full costume for myself. When I don’t have a full costume I still like to wear something a bit festive to the Halloween parties, school festivals, etc., etc. and that’s where these cute little DIY cat shoes come in.
Last year I had my black cat hat and you’re freaking meow’t shirt, and I thought a little pair of cat sneakers would be a nice touch. I love black cat gear for Halloween because they definitely have that Halloween vibe but can still be worn year round.
It is super simple to make your own personalized sneakers with heat transfer vinyl, and I’m going to walk you through all the steps.

DIY Cat Shoes Supplies:
- Plain Sneakers
- Black Heat Transfer Vinyl
- Multi-Use Paper or a Piece of Cotton Fabric
- Craft Knife and/or Scissors
- Mini Craft Iron
- Silhouette Cameo or other electronic cutting tool
- Weeding Tool
- My Cat Face Cut Files (Download the svg file for the shoes HERE for the knee patches HERE – Download the Studio3 shoe file HERE and knee patch file HERE)
Step One – Cut
Start by cutting the cat face design out of your heat transfer vinyl. I used my Silhouette Cameo. You could also use another electronic cutting tool if you have it or trace the design with a craft knife.
Step Two – Weed
Use a weeding hook or a straight pin to remove the excess vinyl from your design – all of the negative space.

Step Three – Trim
To fit the design perfectly to the shape of the toe of my sneakers, I positioned it on the toe, and used my craft knife to score through the clear carrier sheet around the edge of the shoe. Then I cut along the score lines with my scissors.

Step Four – Apply to Shoe
Once the vinyl is cut down to match the shoe’s shape, it’s time to apply it!
To apply heat transfer vinyl to any surface, you need heat and pressure, and it can be a little bit tricky to get those when working with a small, flexible canvas shoe.
Instead of using a regular iron, which is a bit large for this project, I went with a mini craft iron, and I totally recommend it. And to be able to apply pressure, I just stuffed the toe of my shoe with crumpled up tissue paper, which gave me a firm surface to press down on. You need heat and pressure on each section of the design for 10-20 seconds.

That little iron can get hot, so I ended up using some heat resistant gloves that we have for the grill to protect my other hand as I held the vinyl design in place. They worked great!
Make sure not to put the iron directly onto the vinyl design because it will melt the vinyl! (Sad face) Cover it with a piece of the multi-use paper or a piece of cotton fabric.
You will know your design has been applied well, when you can see the texture of the fabric through the vinyl, like so:

Repeat the process for the other shoe, and you are all done! So fun, right? I’m thinking all of my sneakers need a little heat transfer vinyl love now. There are so many possibilities!
I used the same design altered just a bit to add some adorable knee patches to a pair of leggings for my daughter. Because the leggings were striped, I did a white layer behind the black layer, and I think they turned out so cute! I also used the expressions vinyl stretch HTV, which works perfectly on stretchy leggings, especially on the knees.

Aren’t they adorable? Now we are officially all ready for Halloween with our black cat gear. 🙂
I hope this post has showed you that vinyl projects don’t have to be intimidating! If you want to learn more tips and techniques for working with vinyl, I have a great new resource! My new Craftsy course, Silhouette Saavy: Venture into Vinyl. It’s an online video course that will teach you everything you need to know to make vinyl projects with your Silhouette. We make everything from large wall decals to t-shirts to an etched mirror, and I walk you through each step.

Click here to check out the new class!
If you make your own DIY cat shoes or black cat leggings, I would love to see them! Share your photos to my facebook page or tag me on instagram or twitter (@persialou), and don’t forget to use the hashtag #persialou for a chance to be featured.
Happy Making!


If you like this post, you might want to check out these:
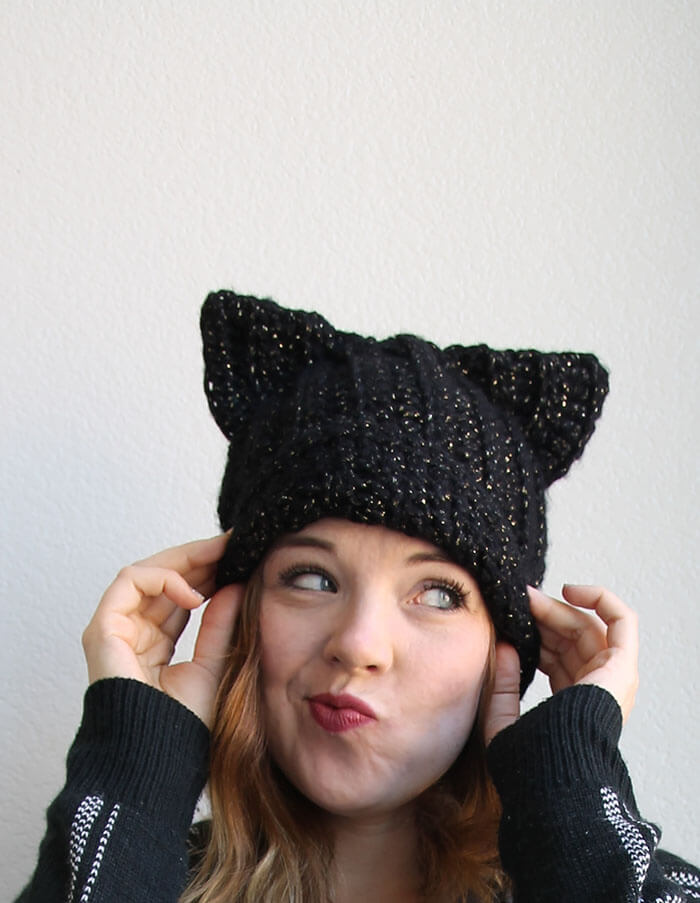
Black Cat Slouch Hat – Free Crochet Pattern
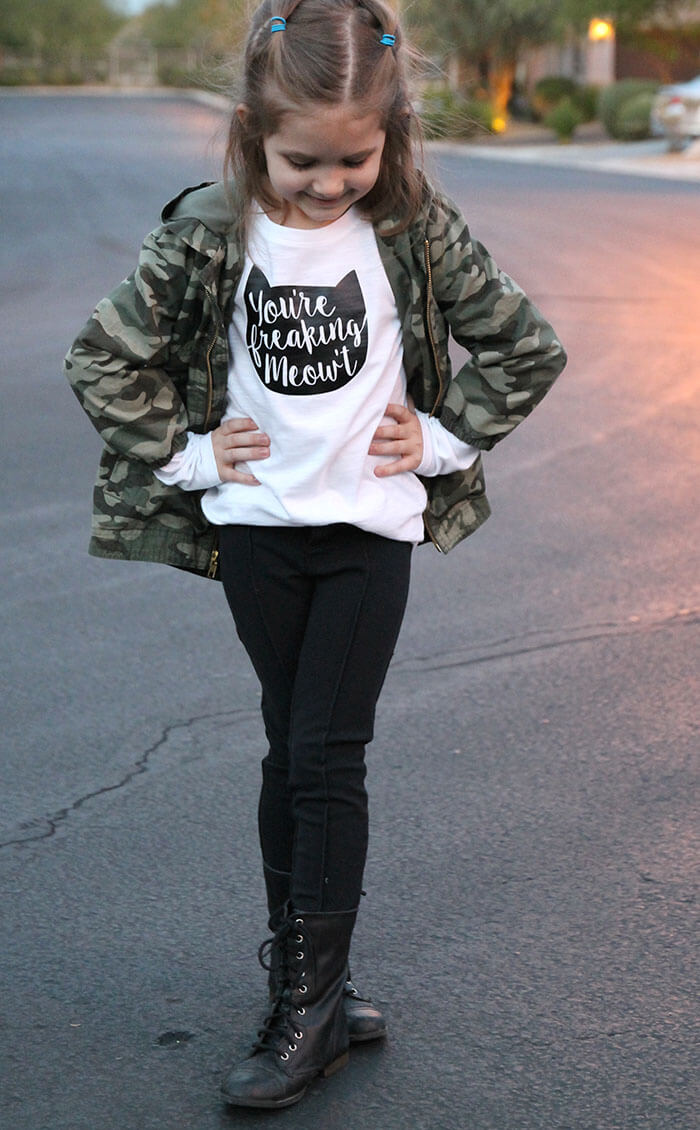
You’re Freaking Meow’t – DIY Tee


Comments + Project Love
the cape on the corner says
love these! i would totally wear them.
b
Alexis says
Thanks so much! And yeah, I have been wearing them all the time! 🙂
Maritza says
Brilliant, Alexis! I love that little iron too!
Alexis says
Thank you!! I love the iron too. 🙂
Delia says
So so cute! I totally want one of those mini irons now too!
Alexis says
I love that little iron! You would totally use it all the time for your sewing too I think.
Amy | Delineate Your Dwelling says
You are seriously the coolest. The shoes AND the leggings are adorable!!
Alexis says
YOU are the coolest! Thanks so much, friend!
Marlene @ Idle Hands Awake says
Aaaaahhhhh, these are adorable! I work at a cat hospital so I think I NEED to make these!
Alexis says
YES! You need some!
Jenn says
I love the idea of making these into custom shoes for my daughter! I tried to download the file, and .SVG will not open in my SIL Studio. I just have the regular, not designer edition. Is there any way around getting it to open? Thanks! 🙂
Alexis says
Hi Jenn! I just added the Studio3 files for you. 🙂
Jenn says
thank you so much!!! that super sweet of you 🙂 looking forward to making something special for my little! 🙂
Suzanne says
I LOVE these and my cat-obsessed sister NEEDS them! Rather than buying the mini iron just for this project, do you think a curling iron would work?
Alexis says
I think that’s a great idea! Or a flat iron maybe? Just watch the temperature on it though and be sure to cover the vinyl. You want your iron to be about 305 degrees. I know my flat iron can get a lot hotter than that. Good luck! If you try it out, I would love to hear how it goes!
Tom harrison says
Hi, great post! Do you know how to possibly print designs on to the vinyl to then cut out and apply?
Thanks
Alexis says
Hi Tom! You can use printable heat transfer material. I used some in this post (http://persialou.com/2016/12/diy-tote-bag-stepping-forward-confidence.html), but I haven’t tried it on shoes so I’m not sure how well it will wear. If you give it a try, let us know how it goes!
Laura says
Hi! I love these. Will washing shoes be ok w the vynil or will it come off??? Thanks!!!
Alexis says
I haven’t tried washing the shoes with vinyl before, but I have washed clothing with the vinyl applied and it usually almost always works really well (sometimes the vinyl will lift but it’s usually because I didn’t get a good application – if you can see the texture of the fabric through the vinyl you are usually good.) So I guess I would say I don’t know for sure, but I think it could stand up to a wash. Hope that helps!
william says
great idea!! the information is really helpful. I would love to try them. thanks for sharing.