Today I’m sharing my simple method for scaling and positioning your heat transfer vinyl (or iron on vinyl) designs on your t-shirts and fabric projects. A big thanks to Expressions Vinyl for partnering with me on this post! This post contains affiliate links, which help me to support this site at no extra cost to you.

Hello, Hello! Today we are talking all about heat transfer vinyl, and I am sharing my quick and easy method for getting your HTV designs perfectly scaled and positioned on all of your projects. (Psst – if you are new to working with iron on vinyl, check out my beginner’s guide to HTV right HERE.)
To demonstrate my simple method for scaling and positioning heat transfer vinyl designs, I am using supplies from the new Vinyl Basics Box from Expressions Vinyl. I just got this awesome vinyl box in the mail last week, and I put together a little video to show you guys everything that comes with the box!
Check out the full unboxing below! (If you don’t see a video below, it may be because of an ad blocker.)
NOTE: In the video, I said the tool kit comes with the Vinyl Basics Box, but it is actually an add-on available to get in addition to your Vinyl Basics Box. Sorry for any confusion!
The Vinyl Basics Box is a great way to try out lots of different types of vinyl and perfect if you just got a new vinyl cutter for the holidays! I love how all of the vinyls match and work together.
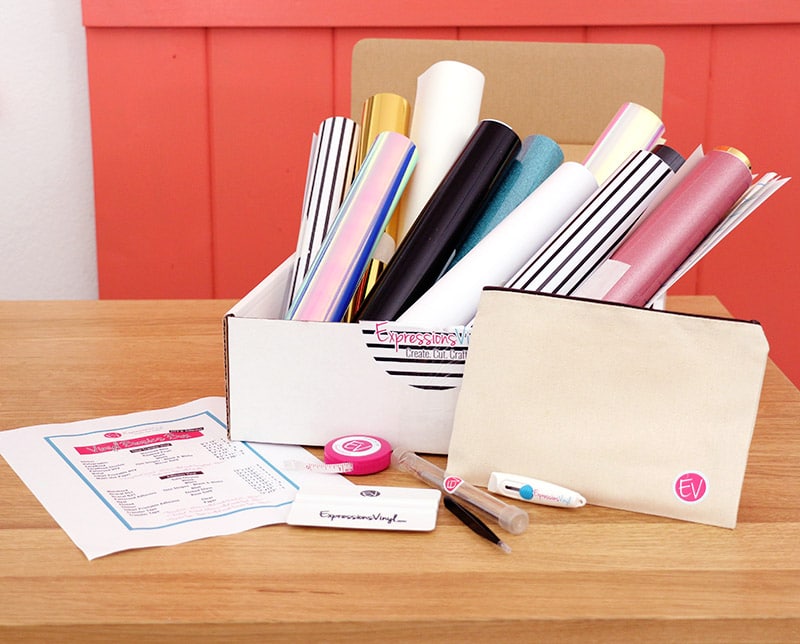
The Vinyl Basics Box includes:
- Thin Stripe Black & White Patterned Adhesive Vinyl (Check out my ideas for patterned vinyl here.)
- Black Oracal 651
- White Oracal 631
- Inkjet Printable Vinyl (Check out my guide to printable adhesive vinyl here.)
- Gold Chrome Metalized Vinyl
- Blue Opal Vinyl (I LOVE this stuff!)
- Rose Gold Glitter Vinyl
- Etched Glass Vinyl (Check out my guide to using etched glass vinyl here.)
- Clear Transfer Tape
- Transfer Paper
- Thin Stripe Black & White Heat Transfer Vinyl
- Black Easyweed HTV
- White Easyweed Stretch HTV
- Inkjet Printable HTV
- Holographic Rainbow Pearl HTV
- Mirror Gold Metal HTV
- Mermaid Blue Siser Glitter HTV
- Multi-Use Paper
So. Much. Vinyl. Seriously, if you guys are new to vinyl, the Vinyl Basics Box is a great way to get started at a great price!
The tool kit add-on also gives you a vinyl application squeegee, a fab weeding tool, fine-tipped tweezers, a measuring tape, utility knife, and a storage bag. Really everything you need to get crafting!

How to Scale and Position Heat Transfer Vinyl Designs
Now let’s talk HTV application! If you have ever made a shirt and have been disappointed by a too small, too big, or off center design, then this is the post for you! I am going to share my super easy method for getting your HTV designs perfectly scaled and positioned on your finished project. I’ve made a video tutorial that you can watch below, or keep scrolling for written steps and tips. 🙂
(If you don’t see the video below, it may be because of an ad blocker on your computer.)
My Easy Method for Scaling and Positioning Heat Transfer Vinyl Designs
Step One: Measure Your Shirt/Surface.

This may seem like an obvious step, but the first thing I recommend is getting out your tape measure. Start by laying your shirt or surface out flat and ironing out any wrinkles in the fabric. Then, measure the width of the garment. I recommend measuring just below the bottom of the sleeve across the chest for most shirts.
Your design should be placed at least a few inches from each side of the shirt. The distance from the edge of the shirt will vary depending on the size of the garment. Personally, I like to measure for every project I do because I may want a larger or smaller design from certain projects. If you are looking for a general idea of what size designs you may need for different garments, check out this post on HTV sizes for different projects on the Expressions Vinyl blog.
Finally, if you want to get a good idea of what size design will look perfect on your project without wasting any vinyl, then try this great tip from that EV post! Simply print out the design and place it on your project to get a clear visualization of the size. (The Baby Bear design used in the image below is Design Store ID 275299.)

Step Two: Scale Design in Software, Cut, and Weed.
Next, in your cutting machine software, scale the design to the desired size. Don’t forget to mirror the design horizontally (you can read more about HTV basics here), and send the design to your machine to cut. Then, remove all the excess vinyl from your design, and you are ready to apply!
Step Three: Fold Shirt/Surface in Half Lengthwise and Press.
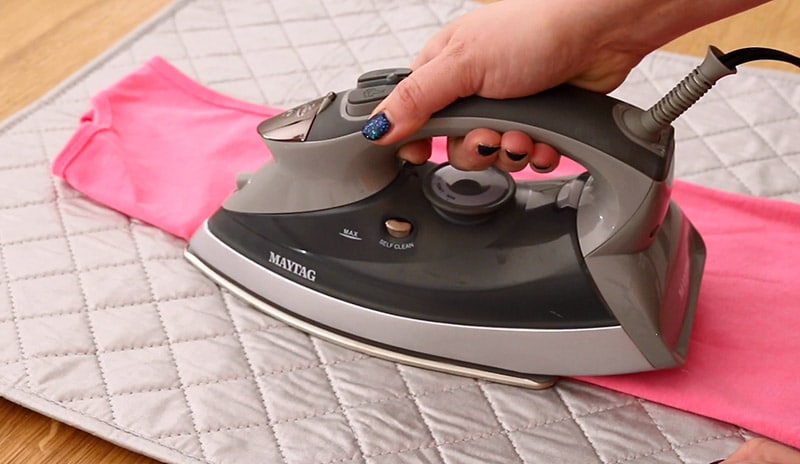
Once you have your design scaled to the perfect size, it’s time to get that perfect application. To easily get my designs perfectly centered on my projects I use this simple technique. Start by folding your shirt or surface in half lengthwise. Then use your iron (or heat press) to apply heat to the fold and to create a crease mark down the center of the shirt.
Step Four: Position Design over Crease and Iron On.
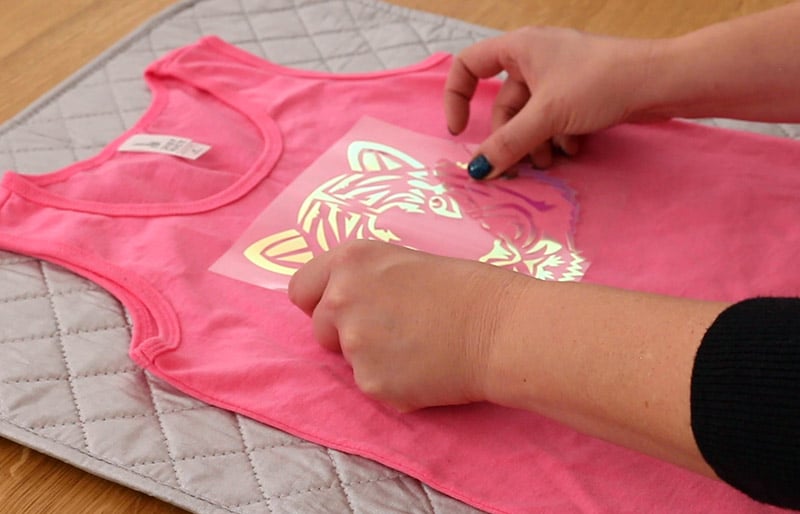
Finally, position the center of your design over the crease you have created. You can also fold your HTV design in half as well to match up the center points if you like (don’t worry about permanently creasing the HTV as it will smooth out when you apply it to the final surface). Then all that’s left to do is apply your design with your iron or heat press.
I’m really happy with the way this tiger tank top turned out! I used a design from the Silhouette Design Store (Design ID 207536) and that awesome holographic rainbow pearl HTV from my Vinyl Basics Box. Guys. This vinyl is SO pretty.
Seriously. Off to go add holographic HTV to ALL. THE. THINGS.
I hope this little tutorial/tip was helpful to you all. If you have any HTV applications tips or questions, drop them in the comments below.
Happy Making!

Check out more Heat Transfer Vinyl posts:
[the_grid name=”Heat Transfer Vinyl Footer”]


Let's Chit Chat!