Learn all about using fonts in Silhouette Studio! This complete guide to Silhouette Fonts will teach you how to add your fonts to the Studio software, choose the best fonts for your projects, as well as how to edit and manipulate fonts with your Silhouette Cameo. This post contains affiliate links, which help to support this site at no extra cost to you.
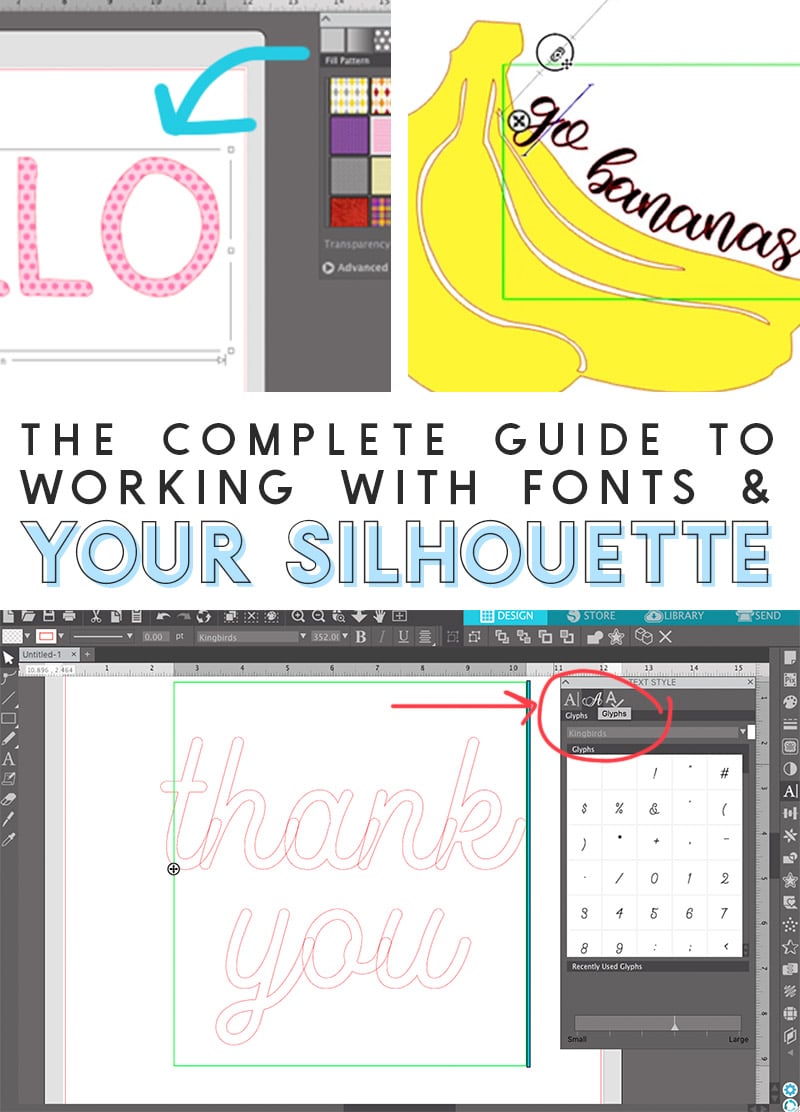
Hey there! I am excited to share this post with you all today. I have been working on this guide for a while now and trying to include as much helpful information as I can for you all. If you are wanting to create your own awesome designs with your Silhouette, then this post is for you! Today, we are taking a deep dive into the many ways you can use fonts in the Silhouette Studio software. Let’s get started!
How to Use Fonts in Silhouette Studio
One of the best things about owning a Silhouette is customizing your projects to be exactly what you want. Being able to use any font you want for your project is a huge part of that!
I’ve created a whole video to walk you through the basics of working with fonts and your Silhouette, how to install fonts in Silhouette Studio, and lots of tips and tricks for working with and manipulating your fonts. You can watch the video below, or if you are looking for even more detailed information, keep reading!
If you like videos like this, be sure to subscribe to my youtube channel so you don’t miss any new tutorials! (P.S. You can check out Colleen’s video and post on using fonts in Cricut Design Space right over here.)
Okay, let’s start off talking about the basics of using fonts with your Silhouette.
Silhouette Font Basics
You can really use any font you have downloaded onto your computer with your Silhouette machine. The Silhouette Studio software will work with any .TTF or .OTF font.
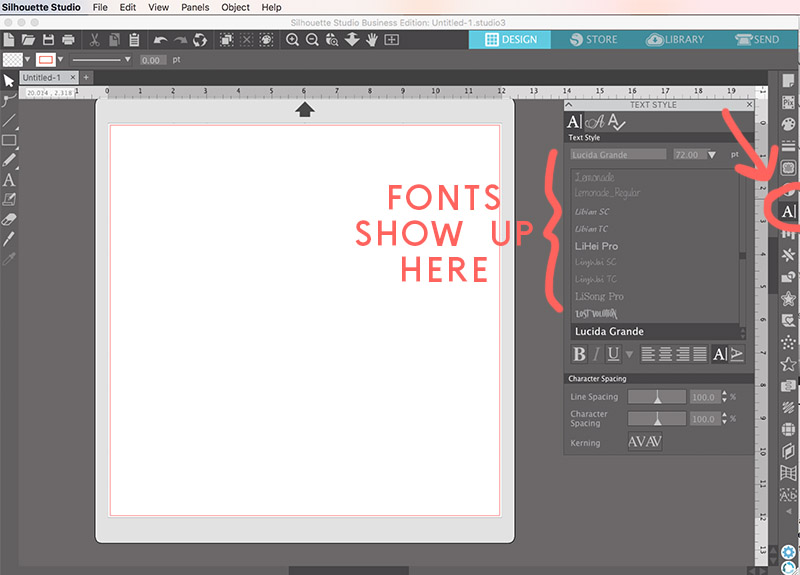
To see the fonts you have installed in your computer in the Studio software, simply open up the Text Style window by clicking on the “A|” icon on the right side of your screen.
So, now you know how easy it is to find your already installed fonts in the Studio software, but what about new fonts you just downloaded?
How to Install Fonts in Silhouette Studio
- First close your Silhouette Studio software.
- Then find the new font you just downloaded to your computer, and make sure the file is unzipped. You are looking for a .TTF or .OTF file. If the file has a .ZIP extension, it needs to be unzipped. (On a mac, double click on a ZIP file to unzip it. On a PC, right click on the file and select “Extract All.”)
- Next, install the font on your computer. For mac users, double click on the .OTF or .TTF font file, and then click on the “Install Font” button on the window that pops up. For PC users, right click on the .OTF or .TTF font file, and then click “Install.”
- Finally, once the new fonts are installed on your computer, just open up the Silhouette Studio software, and you should see your new fonts added to the Font Style window.
That’s it! So easy, right?
Now that you know how easy it is to add fonts to the Silhouette software, you are going to be wanting to download all the fonts, right? Let’s talk a bit about where to go font hunting.
Where to Find Fonts for your Silhouette
If you are looking for more fonts to use with your Silhouette, here are a few places you can find them.
- The Silhouette Design Store. You definitely do not need to get your fonts from the Silhouette Design Store, but it is one good option. Most of the fonts available in the design store are fonts that will work well with your machine (for instance, I get most of my sketch pen fonts from the design store). You can also access the design store directly from your Silhouette Studio software by just clicking on the “Store” button in the upper right corner
- Free Font Websites. For free fonts, my first stop is usually font squirrel, which has great, free fonts that even can be used for commercial projects (be sure to double check the license for each individual font). I have also used fonts from dafont, but most of these are only licensed for personal use.
- Bundles! Bundles can be a great, inexpensive way to buy fonts at a steep discount. Check out sites like So Fontsy, Creative Market, Font Bundles, and The Hungry JPEG for lots of font bundle deals.
As you are font shopping, it’s good to know that some styles of fonts may work better with your machine than others, and I will cover that in more detail below.
What are the Best Fonts for Silhouette?
Best Fonts to Cut with Silhouette
Some fonts work beautifully for printing or graphic design, but will not work particularly well for cutting projects. Let’s look at the font Chalkduster in the image below as an example.

This font is great for giving you the look of handwriting on a chalkboard in print designs, but the texture of this font would be very difficult to cut. Just look at all of the tiny holes in that letter “e.” Can you imagine trying to weed all of those out?? Even without the holes, the edges of the letters are very rough making it difficult to get a smooth cut.
Another thing to think about when picking out fonts for your cutting projects is how thick or thin the lines of the font are. Let’s look at the font Illusias in the example image below.

This font is beautiful, but the thinnest part of the letters is pretty thin. You can certainly cut this font, but you need to think carefully about the scale and materials you use in your project. For example, I would probably not use this font if I were cutting from paper as the thin connecting lines would probably be too thin and tear too easily with paper. Even with vinyl, you would want to make sure you aren’t cutting this font at too small of a scale.
Basically, you can use any font you have with your Silhouette, but some styles of fonts will work better with some types of project. For example, the best fonts for vinyl will be fonts that are fairly smooth and that don’t have too much texture or lines that are too thin. Just remember to think about weeding and transferring your designs when picking fonts for your projects.
Best Fonts for Silhouette Sketch Pens
If you have worked much with sketch pens in your Silhouette, then you probably know that when you sketch regular fonts using pens, the pens only draw the outside lines of your fonts. There are workarounds to get your sketch pens to fill in your fonts, and I have a whole post about filling in fonts with sketch pens right here. However, did you know there are are actually fonts specifically designed for working with sketch pens??
It’s true! These special fonts are called Sketch Fonts (or sometimes Single Line or Foil Quill fonts) and they are made up of single lines rather than outlines so they are perfect for crafting with sketch pens (or your favorite pen in a pen holder). You can find these awesome sketch fonts by searching the Silhouette Design Store or at So Fontsy.
Working with Fonts in Silhouette Studio
Now that you know all about finding and installing the best fonts for your Silhouette, let’s talk a bit about how to manipulate those fonts in Studio to get the look you want! The Silhouette Studio software is pretty powerful and gives you lots of editing options and abilities.
How to Edit Text in Silhouette Studio
One of the first things you will quickly realize when working with fonts in Silhouette Studio is that once you click out of a text box (for instance, to scale or move the text), you will not be able to immediately edit that text again. If you click on the text at that point, the software will treat it like a shape rather than editable text. So how do you edit your text?
The solution is super easy. All you need to do is double click on the text and it will become editable again.

After double clicking, the box around the text will turn green. You can then make changes in the Text Style window such as changing the font, style, or spacing.
How to Change the Font Color in Silhouette Studio
By default, when you type text in Studio, your text will appear as transparent with a red outline. This is because if you are cutting your design, the fill color usually doesn’t matter. However, if you are designing a project that will be printed or used in some other way where color is important, you may want to change the color of your font.
To do so, first open the fill panel by clicking on the little paint palette icon on the right side of your screen. Then, click on the text you want to change to select it, and then choose the color you like. You can use one of the pre-selected colors, use the eyedropper tool to select a color from another part of your project, or click on “Advanced” for even more color options.
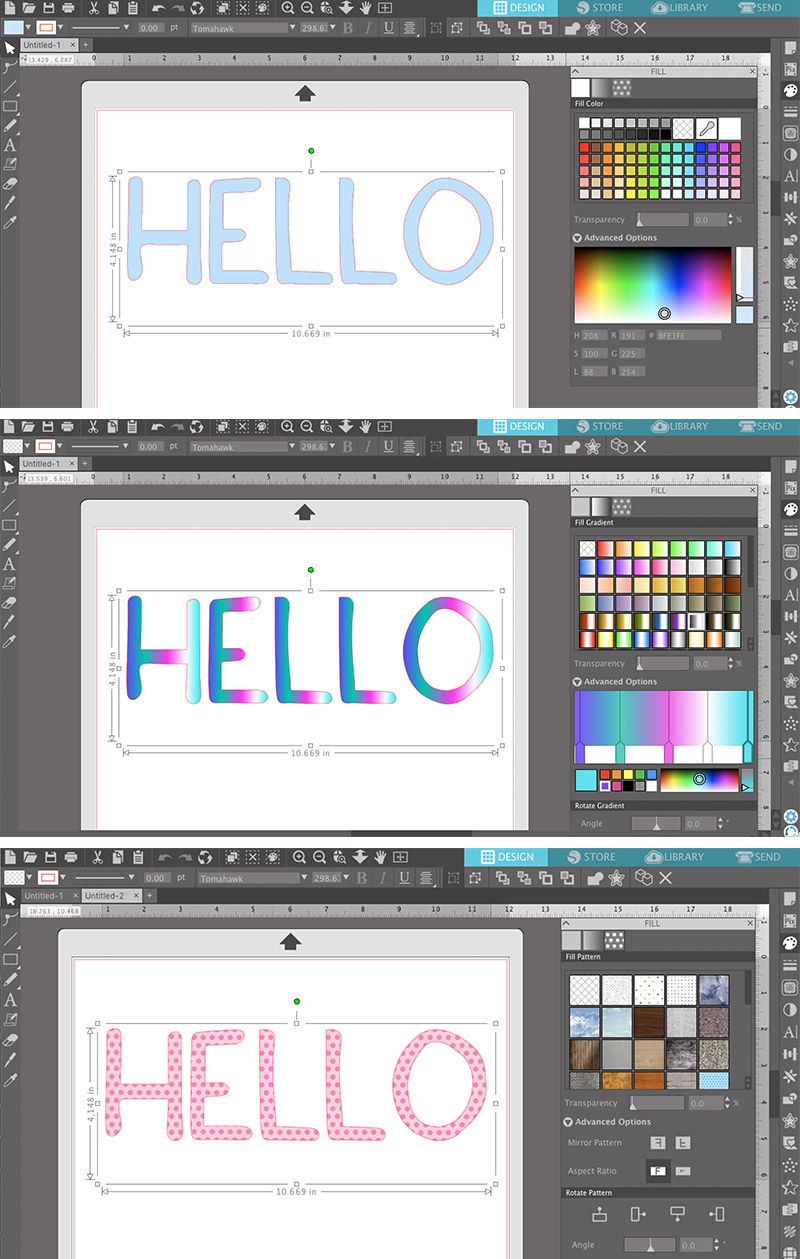
In addition to changing the color of your text, you can also add a gradient or pattern fill to your text in the Fill Panel. You can even customize your gradients and upload your own patterns for unlimited options!
Working with Script or Cursive Fonts in Silhouette Studio
Script fonts are beautiful and some of my favorite fonts, but it is important to know a few things about working with script fonts and your Silhouette.
What makes script fonts unique is their ability for all of the letters to connect to one another and make each word one piece. You can see in the image below when I type the phrase “love you” in this pretty script font the letters are all overlapping (which is what I want!); however, if I sent this design as is to my machine to cut, it would cut out each individual letter and then would be separate, individual pieces instead of one connected word.

To prevent this from happening, all you need to do is weld the letters together. To do this, just click on the text to select it, then open the Modify panel (the icon looks like a rectangle with a circle overlapping it), and then finally click “Weld.”

Now, you can see in the image above, after welding our text, the individual letters are connected together and the text is all ready to cut! Easy, right?
How to Curve Text in Silhouette Studio
Sometimes you don’t want your text to just follow a straight line. So, can you bend fonts in Silhouette Studio? Yes! You absolutely can curve text to fit along any path or shape and it is so easy to do. Here are the basic steps for curving text with your Silhouette.
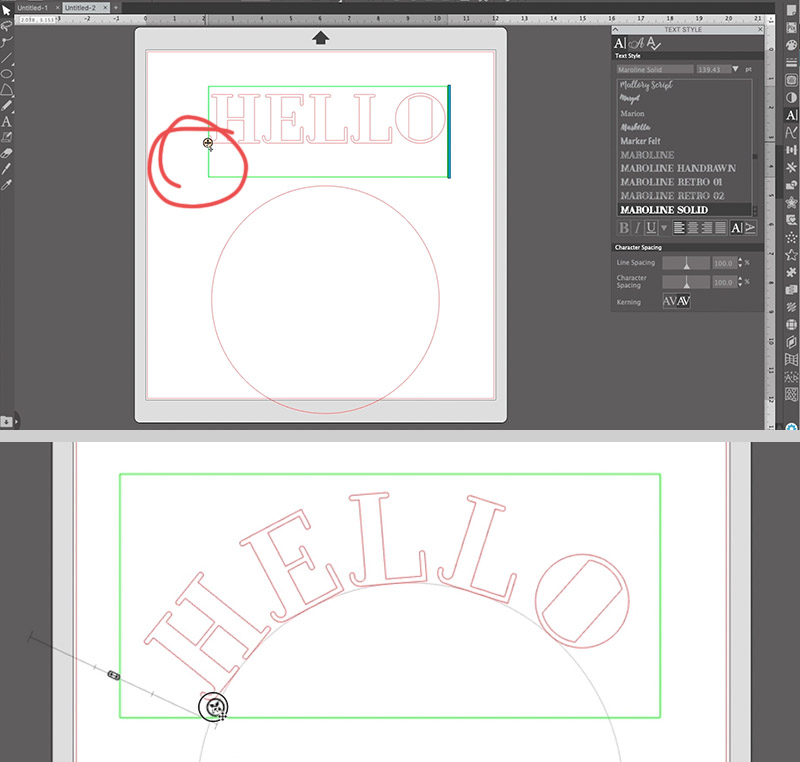
- Use the Ellipse Drawing tool to create a circle or ellipse with the curve you want your text to follow.
- Double click your text to make it editable. When you do this, a green box will appear around your text with a little four-sided arrow in a circle.
- Click on the four-sided arrow and drag your text onto the ellipse until the text snaps to the curve.
- You can now adjust the curve of the text using the slider to adjust the height of the text along the curve or by sliding the four-sided arrow on the curve. You can also use the Text Style window to adjust Character Spacing.
That’s it! I love how easy it is to curve text! You can use this same basic process to make your text follow the lines of any shape in Studio. You can place text both along shapes you create or draw in the Studio software as well as shapes you import into the software. Simply double click the text and then drag it onto any shape you like! See the image below for more ideas.

How to Use Font Glyphs in Silhouette Studio
Another awesome font-related feature in Studio is the ability to access font glyphs right within your Silhouette software. If you aren’t familiar with the term “glyphs,” certain fonts come with alternate styles for letters and extra characters that you may need a specialized design software to access. Silhouette Studio now has the ability to access these glyphs! It is important to note that Glyphs are only available in the Designer edition of the Studio software and above, version 4.1 and later.
To access glyphs in Studio, just click on the second tab in the Text Style panel (it looks like a fancy script letter “A”).
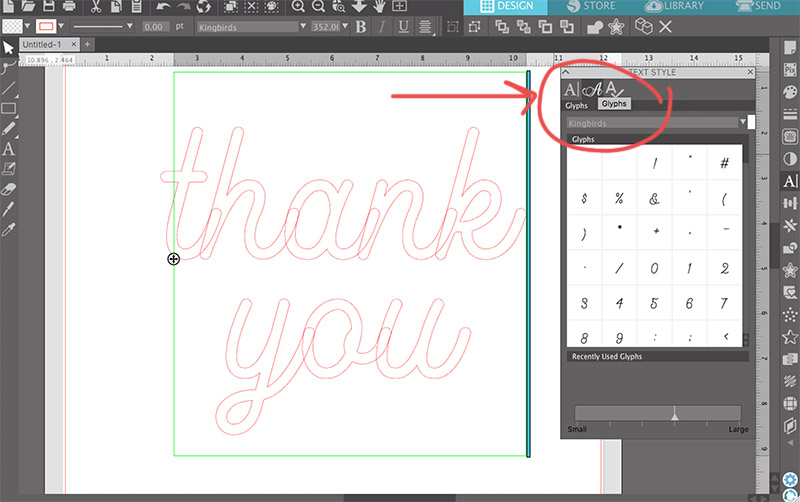
When you are in the glyphs panel, you can scroll through and see all of the different characters available with that font. To insert the glyphs into your design, simply double click on your text to make it editable, and then click on the glyph you want to insert in the glyphs panel. In the image below you can see how I used the awesome glyphs of the Kingbirds font to create a pretty text design.

Glyphs are great for getting a really custom look with your fonts.
Making Your Own Font with the Silhouette Studio Font Creator
Okay, we have covered a lot of Silhouette font information today, but there is one more thing I have to mention. Did you know that you can now actually create your own font in Silhouette Studio?? It’s true!
This new feature is called the Font Creator and it is only available for users who have the Business Edition of the software or higher. The Silhouette Font Creator allows you to turn your handwriting into a custom font super easily. I have a whole post and video explaining how the Font Creator works that is coming soon, so stay tuned!

Okay, friends! That’s all I have today about working with fonts and your Silhouette! If you have any other font-related questions, please drop them in the comments, and I will do my best to answer them.
Until next time, Happy Making!

Check out more Silhouette posts here:
[the_grid name=”Silhouette Crafts Footer”]


Comments + Project Love
Amanda Spellman says
I love your site but cannot even make it past 2 minutes of your videos as every 10 seconds or so a new ad starts playing. Is there a way to view with less ads?
Alexis says
Thanks for letting me know you are having that problem. I am really sorry about that! I am going to speak to my ad manager about it. Thanks again.
Royanna T. Williams says
So much great info. Tysvm
Chris says
To be honest, this was no use to me in how to find out how to use professional fonts with weights other than just regular and bold. I suspect Silhouette Studio is simply not capable of this, and that I would have to import graphics from a professional application instead, but it would be nice to know.
Chris says
Oh wait! I found it. Hidden in the Bold Italic dropdown of the Text Style Panel. Not available in the menubar at the top.