Learn how to make your own awesome DIY advent calendar with the Silhouette Advent Kit. It’s fun and easy to customize your advent using your favorite colors, treats, and holiday themes! A big thank you to Silhouette for sponsoring this post.

I know it’s still early for Christmas projects, but I hope you guys will forgive me since this is not just any Christmas craft, but an advent calendar, which really needs to be ready early, you know? Plus this thing is just so cute I can’t keep it to myself and need to share it with you all right away!
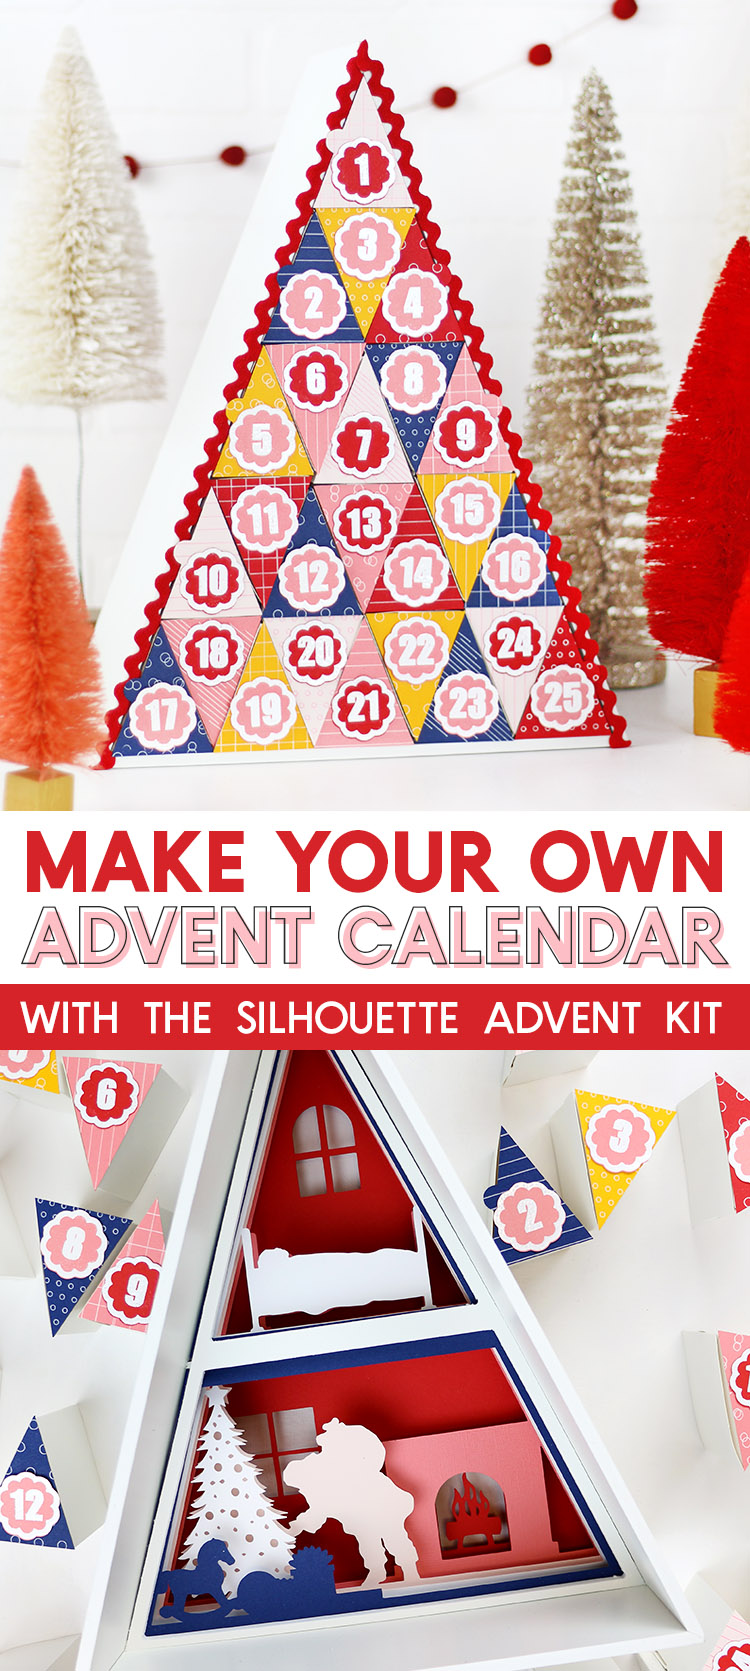
This awesome advent calendar was made with Silhouette’s Advent Calendar Kit, which you can get on super discount (only $24.99) through the end of October by entering the code PERSIA at check out. It’s just one of this month’s great Silhouette Elite Deals.
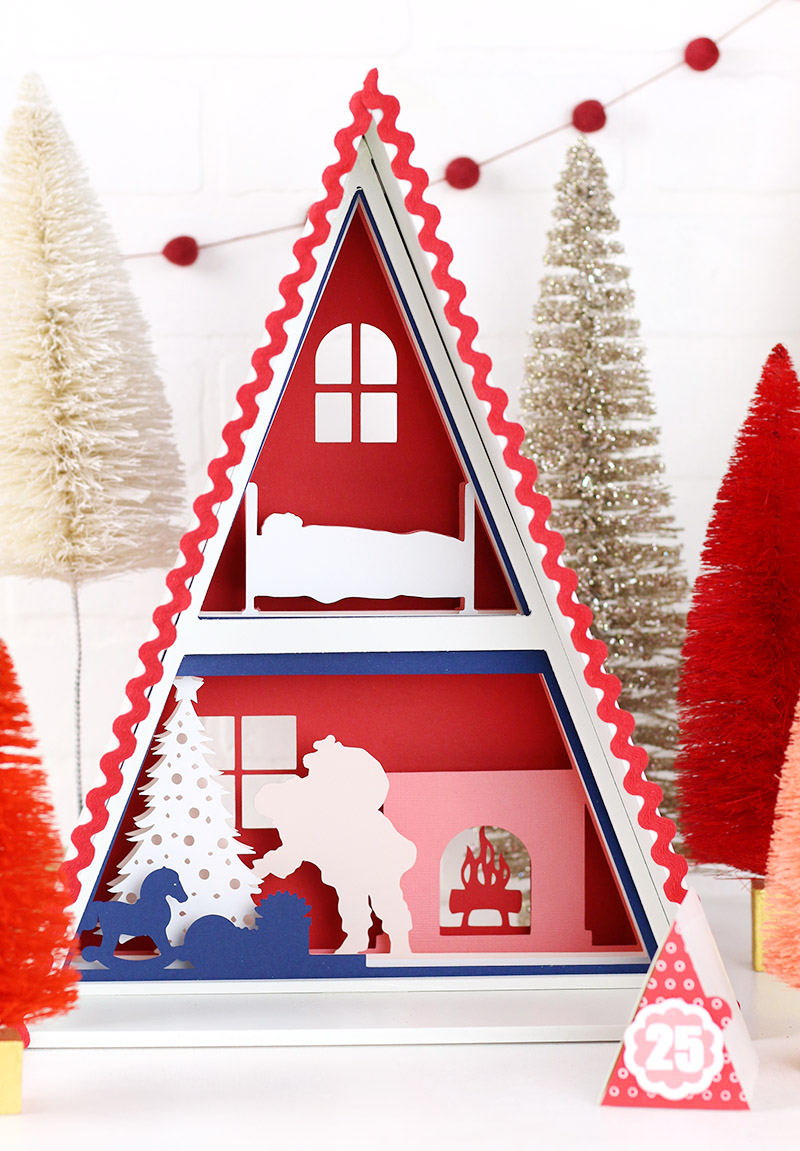
Okay, let’s talk about why I’m digging this cute advent so much. This kit comes with a large, blank triangular shadow boxes that is filled with 25 little triangular boxes (which come preassembled with the kit) that can be filled with any small treat, gift, scripture, quote, or activity you like, and THEN (my favorite part) is that as the boxes are removed, you reveal an awesome Christmas scene (there are four different scenes included for you to choose from!).
Is that not the cutest? I love it so much!
If you want to make your own amazing custom advent calendar, then first you need to go grab your kit right HERE (don’t forget to enter the code PERSIA at checkout for that big discount!), and then I will walk you through all the steps of making it your own right here. Ready to get making?
How to Make A Custom Silhouette Advent Calendar
1. Design in Silhouette Studio
One of my very favorite things about my Silhouette is the fabulous Silhouette Studio software. The software that comes with your Silhouette cutting machine is actually really powerful design software, and I really put it to work when working on this advent calendar.
The Advent Calendar Kit comes with a code to download all of the cut files you need to customize your calendar including triangles to cover the box faces, frames, numbers, cut files for the interior scene, and more. To download the free designs that come with your kit, open the Silhouette Studio software on your computer and click on the “Store” tab in the upper right corner. Then, either sign in to your account or create a new account if you don’t have one. Next, click on your account name in the upper right corner of the Store and then select “Redeem a Promotional Download Card.” Finally, enter the code from the card that came with your kit, and all of the advent designs will be added to your library.
I decided to create a little mockup of how I wanted my finished calendar to look. To do this, I simply used the Fill Panel to change the colors of the triangles to match the colored cardstock I had chosen. This allowed me to play around with the arrangement and figure out how many pieces I needed to cut from each color.
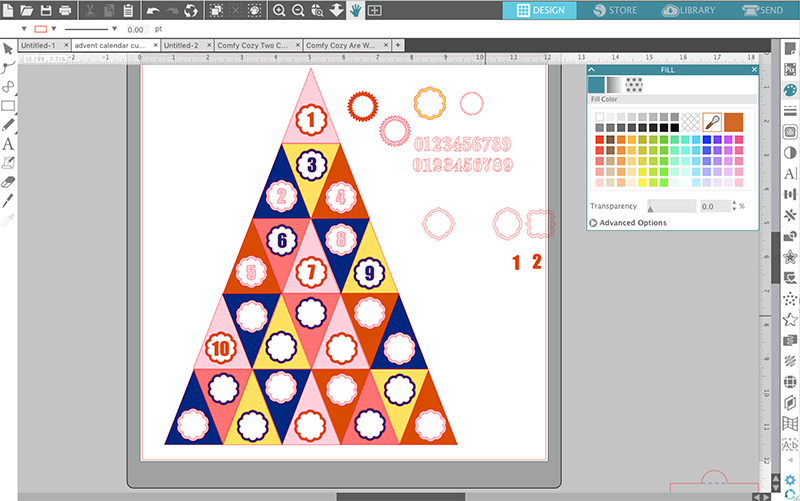
I also referred back to this mockup regularly as I was assembling my calendar. I found this to be really helpful and definitely recommend taking some time to come up with an arrangement in the software before you start cutting and gluing.
2. Sketch and Cut Box Faces and Numbers
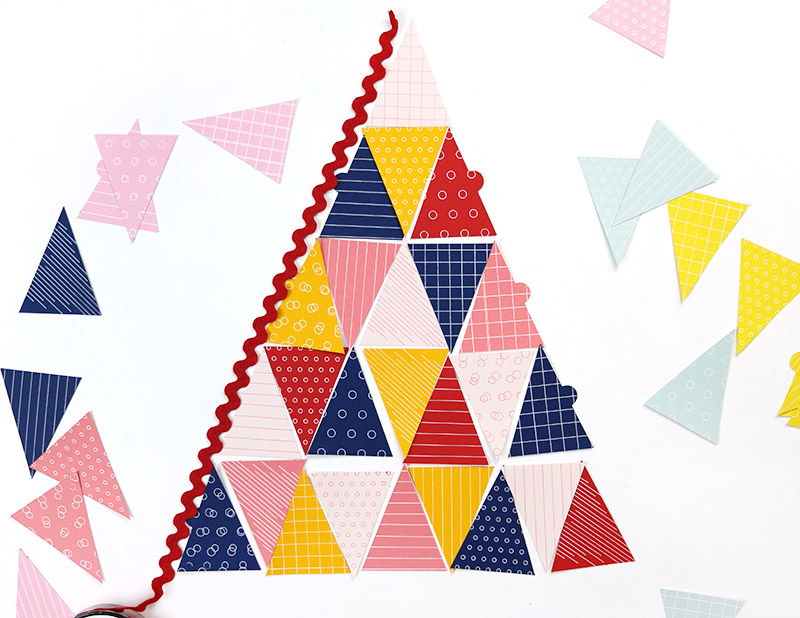
I wanted to add a little visual interest to my plain colored cardstock, so I decided to add some designs to the paper using my favorite white gel pen and my pen holder. You can read more about how to sketch and cut with your Silhouette HERE (there’s a video tutorial too), but basically, I created some simple line designs in the software using the line and shape tools and arranged them on top of my triangular box face shapes. I changed the colors of my lines using the Line Style panel and then chose “Action by Line” in the Send Tab. You can read more about how to cut by color with your Silhouette HERE.
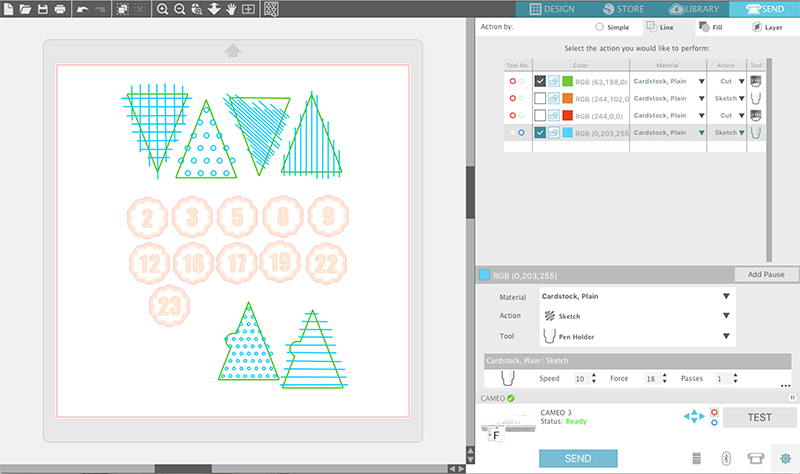
Basically, this made it really easy for me to sketch designs on to my box faces and cut them out at the same time (you need a machine with a dual carriage like the Cameo 3 or Curio to sketch and cut at the same time).
I used this same technique to create the numbers except I used a glue pen instead of my white gel pen to sketch out the numbers and scalloped frames. (Psst – Get my best tip for easily filling in fonts in Studio right HERE.) Then I was able to use embossing powder and my heat gun to get awesome glossy, embossed numbers.
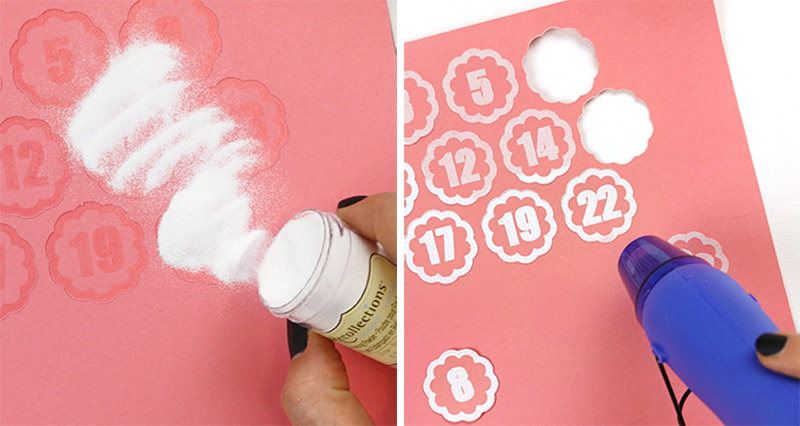
I love the look you can get with heat embossing and it is so easy to get that look with this sketch and cut technique. BUT – you could totally do your numbers by cutting and layering cardstock or even by using vinyl or foil too. So many possibilities!
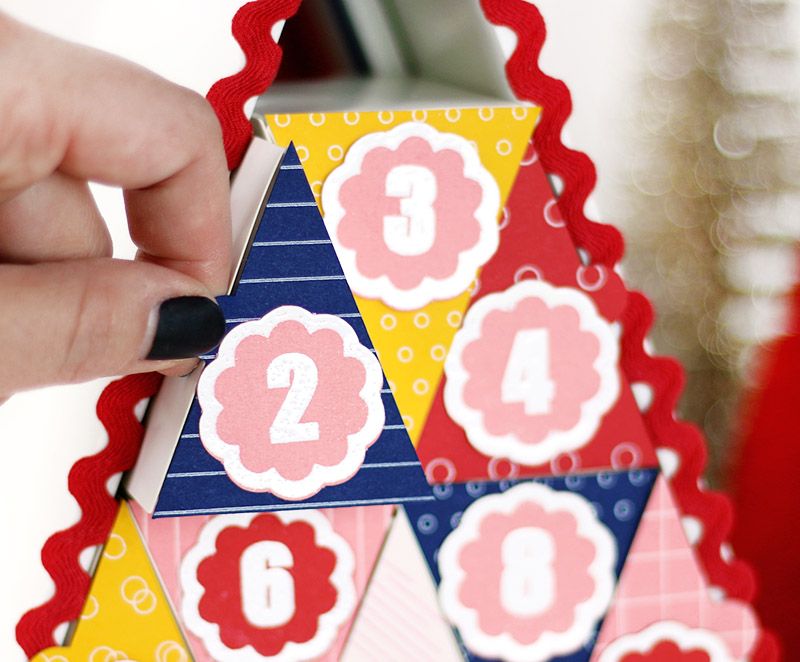
3. Assemble Boxes
Once I had all my box faces and numbers ready, I laid them out to make sure I was still happy with the arrangement.
Looks good! If you change anything at this point, it’s a good idea to snap a picture to help you keep the order straight, because next it’s time to attach the box faces and numbers to the boxes.

I recommend using a strong permanent adhesive for this. Just attach the box faces to one of the triangular sides of each box and then add the number on top of that.
4. Cut and Assemble Interior Scene
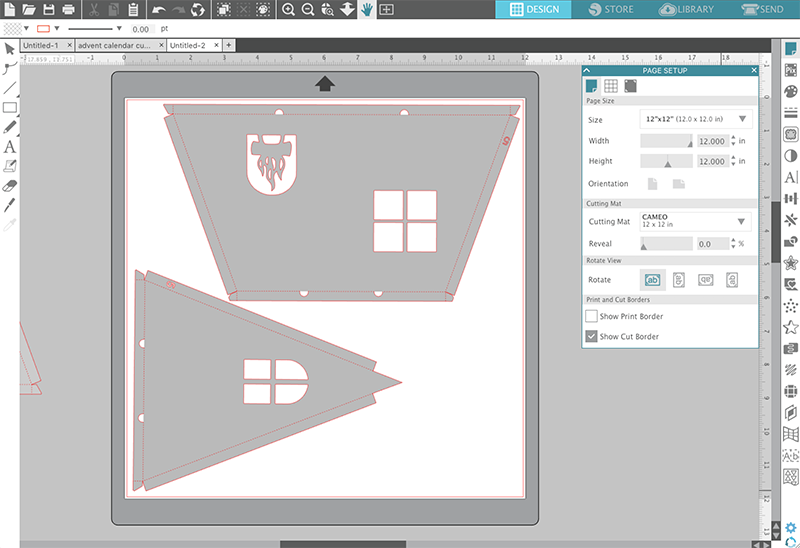
The Silhouette advent calendar kit comes with four different layered scenes you can choose from for your calendar. Since I was doing a bright and playful design, I decided to go with the Santa scene, but you can also choose a pretty winter scene, a cozy snowman scene, or a lovely nativity scene.
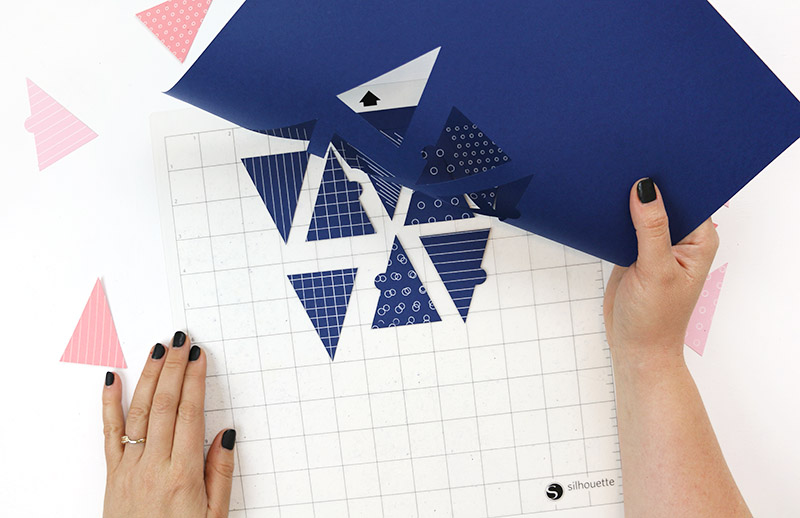
Simply open up the cut files in the Silhouette Studio software, ungroup them, and then arrange them on the cutting mat. If you arrange them like the image below, you can cut both pieces for each layer on a 12 x 12 piece of paper.
After the pieces are cut, it’s time to assemble them in the box.
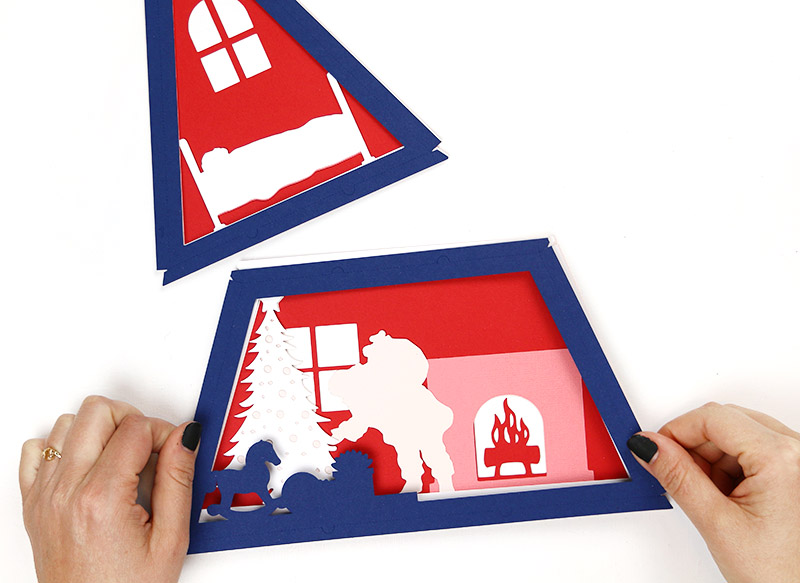
First, start by folding along the perforated lines along the edge of each piece. Next use a little bit of adhesive to attach the tabs on each corner. Then, starting with the piece that will be on the front of the finished scene, insert them into the frame, fitting the tabs into the slots provided.

Easy peasy! It’s amazing how simple this is with how great it looks when finished.

Finally, if you like you can decorate the frame. I decided to glue on a bit of red ric rac around the boxes. I love how it looks! You can also add bows, holly, or stars (there are cut files for all of those included with the kit). Then just fill your boxes and stack them up inside the frame!

You are all ready to countdown the days til Christmas!

I am so happy with the way this cute little advent calendar turned out, and I hope you guys love it too! If you are thinking about making your own, then be sure and grab one before the end of October to get that great deal (remember you need to use the code PERSIA at checkout!).
Happy Holidays and Happy Making!


Comments + Project Love
Indya | The Small Adventurer says
It’s never too early for Christmas in my opinion, and I think is super gorgeous so I definitely don’t mind you sharing it now ? I think making your own advent calendars is such a fun idea! I’m hoping to make one for my partner as there just isn’t any in stores that really suit him. Wouldn’t mind making this one for myself, though ☺️
Reese @ DIY Reese says
This advent calendar is amazing! I have been looking for one that I could make for a long time and now I have finally found one 🙂
Alexis says
Thanks Reese!