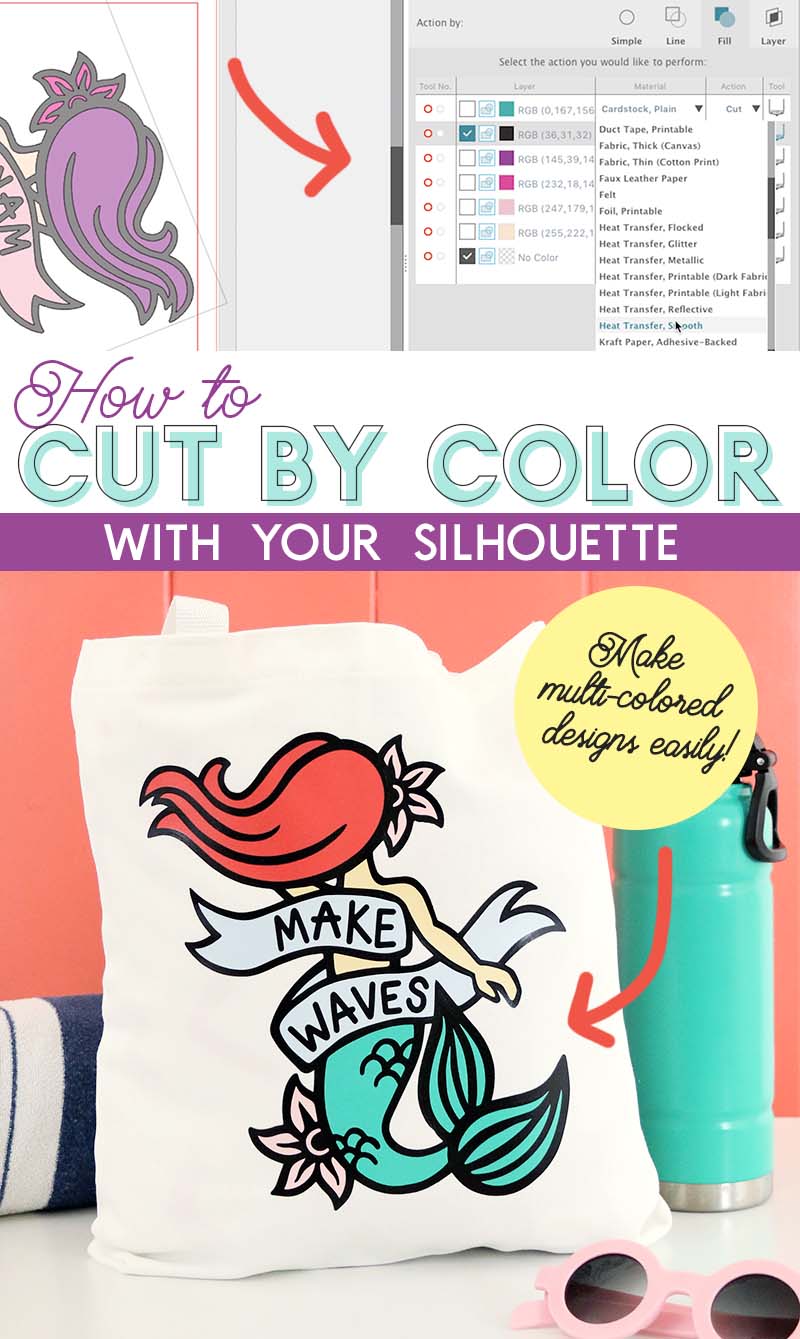
Learn how to cut by color with your Silhouette and make this cute multi-colored DIY mermaid bag even easier to make! I guarantee this will be your new go-to technique for cutting and layering multiple colors of vinyl with your Silhouette, and the video tutorial will walk you through each step in the Silhouette Studio software. This post contains affiliate links, which help to support this site. Thanks!

I am super excited to share this cute project and tutorial with you all today. I love the way this cute mermaid bag turned out, and I can’t wait for it to warm up enough for me to take it to the pool!
Today, I wanted to do a little step by step tutorial on how to cut by color with the Silhouette, and also share another method for layering heat transfer vinyl. Last month I shared a post on how to layer heat transfer vinyl in which I used what I called the cut out method. For this bag, I did things a little bit differently, and I wanted to show you both methods for making those multi-colored iron on vinyl designs.
But before we get into the nitty gritty, can we talk about this mermaid for a second? I am so in love with this cute little Make Waves mermaid design, which is available to purchase in my shop. I am a fan of that old school tattoo aesthetic, and this design definitely reflects that.
Okay, ready to make a cute bag and learn all about cutting by color and layering heat transfer vinyl? Let’s do this!
DIY Mermaid Bag Supplies:
- Plain Tote Bag (similar here)
- Heat Transfer or Iron On Vinyl (I used Siser Easyweed)
- Silhouette Cameo, Cricut, or other cutting machine
- Weeding Hook
- Multi-Use Paper (or parchment paper or thin piece of cotton fabric)
- My Make Waves Mermaid Cut File
Silhouette Cut by Color Video Tutorial
I made a whole step by step video tutorial walking you through the process of cutting by color in the Silhouette Studio software and layering heat transfer vinyl using the method I used for this bag (which I am calling the top down method). You can check out the video below, and I would love if you subscribed to my youtube channel so you don’t miss any of my crafty videos.
If you prefer written instructions, just keep reading. 🙂
How to Cut by Color with the Silhouette
When I first learned that you can cut your designs by color with just a few clicks in the Silhouette Studio software, it kind of blew my mind. It makes it SO much easier to cut multi-color or complex designs. If you have never tried this feature before, you are going to love it!
So when would you want to use the cut by color feature?
Really any time you are working with a design that includes multiple colors or layers, cut by color is a great option. For this DIY mermaid bag, my design was made up of six different colors – five solid color shapes and one black outline design that goes on top.

If I was going to cut this design using the regular cut settings, I would have to click on each element of the design I did not want to cut from that particular vinyl and then click “No Cut.” Instead, with cut by color, I simply select the color I want to cut and THAT’S IT. Here’s how to do it.
Cut by Color Silhouette Studio Settings
- In the “Send” tab, click on “Fill” at the top of the settings menu (See the image below). This will open a list of all of the fill colors in the design. You can also chose to cut by line color or layer.
- Uncheck the colors you don’t want to cut right now. Only the layers that you want to cut from the current material should be checked.
- Finally, make sure you have the correct material chosen from the material drop down menu. You can adjust the cut settings for the material at the bottom of the menu.
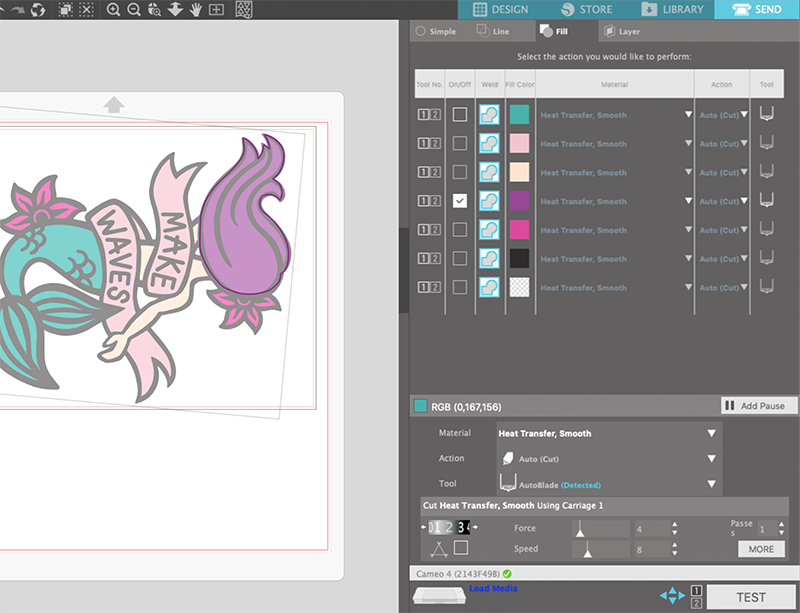
So easy! When you are ready to cut the next layer, uncheck the one you just cut, and select the next color.

When all of your pieces are cut, you are ready to iron them on to your final project.
How to Layer Iron On Vinyl (Top Down Method)

Psst – If you are brand new to working with heat transfer vinyl, it might be helpful to first review my beginner’s guide to iron on vinyl.
Recently I shared a post all about layering heat transfer vinyl, and in that post I shared what I called the “Cut Out Method.” With that technique, I cut pieces from the bottom layer of the design and then used that cut out to help me place the next layers of the design.
The technique I used for this mermaid bag kind of works the opposite way. The topmost layer works as an outline for the rest of the design, and I use that piece to help me position the other layers. Because of this, I decided to call it the “Top Down Method.” Here’s how it works.
1. Position Piece on Back Side of Top Layer

To position each layer, simply flip your top layer over so the sticky carrier sheet side is facing up. Use the top layer to help you place the next layer. The great thing about heat transfer vinyl is that the carrier sheet is sticky, which will help you to keep your pieces where you want them.
2. Flip Over and Align with Other Layers on Surface

Next, just flip the design over and again use that top layer to help you position the next piece. In the image above, I have already placed one piece (the hair), and now I am using the top layer to help me get the positioning aligned for the arm and torso pieces.
3. Peel Off Top Layer

Then, making sure the piece you are positioning stays in place, peel off the top layer.
4. Iron On Perfectly Positioned Layer

Finally, press down with your iron for just 3-5 seconds to apply the piece (for detailed information on applying heat transfer vinyl check out my complete guide to working with heat transfer vinyl here). Because the vinyl will get more heat with each additional layer, it is important to not give each layer too much time under the iron at first. You just want enough heat to get the layer to stick. Be sure to cover any previously applied pieces with a piece of multi-use paper, parchment paper, or a thin piece of cotton to prevent it from melting or sticking to your iron.
5. Repeat for Each Layer
Repeat this process with the remaining layers until they are all applied and it will look something like this.

Finally, place the top layer and iron it on. With the final layer, you will give it the full 10-15 seconds of heat and pressure. And after that layer is applied, your cute new bag is already for a trip to the pool!


And that’s it! What do you think? Have you tried cut by color or this method for layering heat transfer vinyl? If not, will you give it a try? Do you need a cute mermaid bag too?? If you do, go snag that cut file!
Happy Making!

Check out more Silhouette projects here:
[the_grid name=”Silhouette Crafts Footer”]


Comments + Project Love
Kristine Atiyeh says
Hey there!
To get Silhouette to read each of the colors do you need to upload each color or layer of your artwork? I can never get it to read colors besides black
Love your posts they’re fantastic!
Alexis says
Hi Kristine! What type of file are you using? I find that my SVG files usually import the colors. If you have a layered file without color, you can always add color to the different sections in Studio. If it’s an SVG file, you may have to ungroup it first. I hope some of that might be helpful!
Markelle says
THANK YOU!! I know you didn’t invent this technique, but thank you for sharing it!! So so simple, and makes cutting and layering different color vinyl SO much easier!
Gammy says
This is fantastic! Thanks. I can’t wait to try cutting by color and your layering technique!
Alexis says
I think you will love it. 🙂 Have fun!
Liz says
Which program are you using. My Design Studio looks nothing like this?
Alexis says
Hi Liz. This is not a Cricut tutorial. This is the Silhouette software. 🙂
Carol Carruthers says
Great tutorial! You made it look very easy. Thanks for sharing.
Jordan says
When this cuts does it cut out on the vinyl in the same shape as the original design or does it group the pieces up to save vinyl? I’m doing 9 projects with the same design and I’m wondering how I can save vinyl by cutting as many pieces on the same sheet of vinyl. 🙂 Thanks! Love this project!!
Kerri says
I’ve been using my Silhouette for close to 6 months and only now, after watching your layering video, did I realize I could cut by color! You’re a lifesaver! Thanks so much.
Tiffany says
I am following your video step by step on how to print each color but when I click my “fill” tab there are NO colors that pop down it is ONLY the black. I don’t understand why since I pause your video after each step to do it myself but the fill will not drop down any colors. Please help!!!
Tina mackie says
How can I find files to download and layer please
Jodie Tauscher says
I have been trying to do a cut by color. When I go to the cut portion there are no colors that show up and I don’t know how to fix it.