Learn how to make this mystical glowing pumpkin with this step-by-step tutorial and free cut files! This magically luminescent pumpkin will add an otherworldly element to your Halloween decor, plus it’s so much fun to make! This post contains affiliate links, which help to support this site at no extra cost to you.

It’s officially October, and I’m kicking this month of spooks off with a fun little pumpkin project!
I have been into all kinds of witchy designs and mystical elements for Halloween this year – crystal balls, astrological elements, etc. – and I wanted to incorporate some of that vibe into this project.
I’m really happy with the way this pumpkin turned out, and I hope you guys will love it too! If you want to make your own, keep scrolling for the full instructions (I even made you guys a video!) and to get the free cut files.

I’m also joining up with 12 of my favorite crafty blogger friends to bring you a bunch of ideas for making pumpkin crafts using vinyl! Our friends at Expressions Vinyl gave us all some vinyl to play with, and you just have to see all of the cute pumpkins my friends made. The. Cutest.
But for now, let’s check out these sparkly, shiny, glowing pumpkin I made. Ready to get crafting?
DIY Glowing Mystic Eye Pumpkin Supplies:
- Carvable Craft Pumpkin (I used this one from Hobby Lobby)
- Purple Color Shift Paint
- Gray Craft Paint
- Glitter Paint
- Clear Laminating Pouch or Cellophane
- Glossy Black Vinyl
- Holographic Metalized Vinyl
- Transfer Tape
- Cutting Machine (like a Silhouette Cameo or Cricut Explore Air)
- Craft Knife
- Battery Powered Rice Lights
- My Mystic Eye Cut Files (<– Click the link to download a ZIP file containing SVG, DXF, and PNG versions of the designs. These designs are free for personal use only. If you would like to use them for commercial purposes, you may purchase a commercial use license HERE.)
How to Make a DIY Glowing Mystic Eye Pumpkin
I have put together a little video so you guys can see exactly how to make your own DIY mystic eye glowing pumpkin, but I will also write out the basic steps below for those who prefer to read. (If you do not see the video below, it may be because of an ad blocker.)
Step 1. Paint Pumpkin.
Start off by painting the pumpkin in whatever color you like. I used Plaid’s Color Shift in Purple Flash, and I love the way it turned out, but it did take a few coats to get a nice opaque finish. I also painted the stem gray, and then topped it off with a super chunky glitter paint (I used DecoArt Galaxy Glitter).
Step 2. Cut Pumpkin.
When the paint is dried, cut a hole in the bottom of the pumpkin large enough to fit your rice lights. I used a craft knife to cut my holes. Be sure to cut carefully!
Then, cut a hole in the front of the pumpkin. Use the smaller oval included in the cut files in the supply list above as a template to cut the hole to the right size.
Step 3. Cut and Weed Vinyl.
Open the cut files included in the supply list above in your cutting machine software. The design includes two layers that are designed to be cut from two different pieces of adhesive vinyl. If you want to keep things simple, you could skip the top layer that I cut from holographic vinyl on my pumpkin.

To line up the two layers of the vinyl design, I used registration marks, which I explain how to use in this post all about layering adhesive vinyl. If you are working with a Silhouette, you may find this post on cutting by color with the Silhouette useful as well.
I used a laminating pouch for the clear sheet that covers the hole in the front of the pumpkin. You could also use a piece of cellophane. Cut the laminating pouch or cellophane using the larger oval in the cut files as a template.
Use transfer tape (I use and recommend this clear, flexible transfer tape) to first pick up the holographic top layer, then the black under layer, and finally the clear plastic oval.
Step 4. Apply Design to Pumpkin.
Very carefully position the layered decal over the hole in the front of the pumpkin. Because of the curves of the pumpkin, you will have to play with it a bit to get the vinyl to lay down smoothly. Stretching the transfer tape as you work can help. When the vinyl is firmly attached, carefully pull off the transfer tape.
Step 5. Add Lights.
Finally, insert the rice lights through the hole in the bottom of the pumpkin and turn them on. And that’s it!

Ooh… pretty and spooky, yes?
13 DIY Vinyl Pumpkin Crafts
Ready for more vinyl pumpkin craft ideas? Check out all of these adorable pumpkin crafts made by my talented friends!
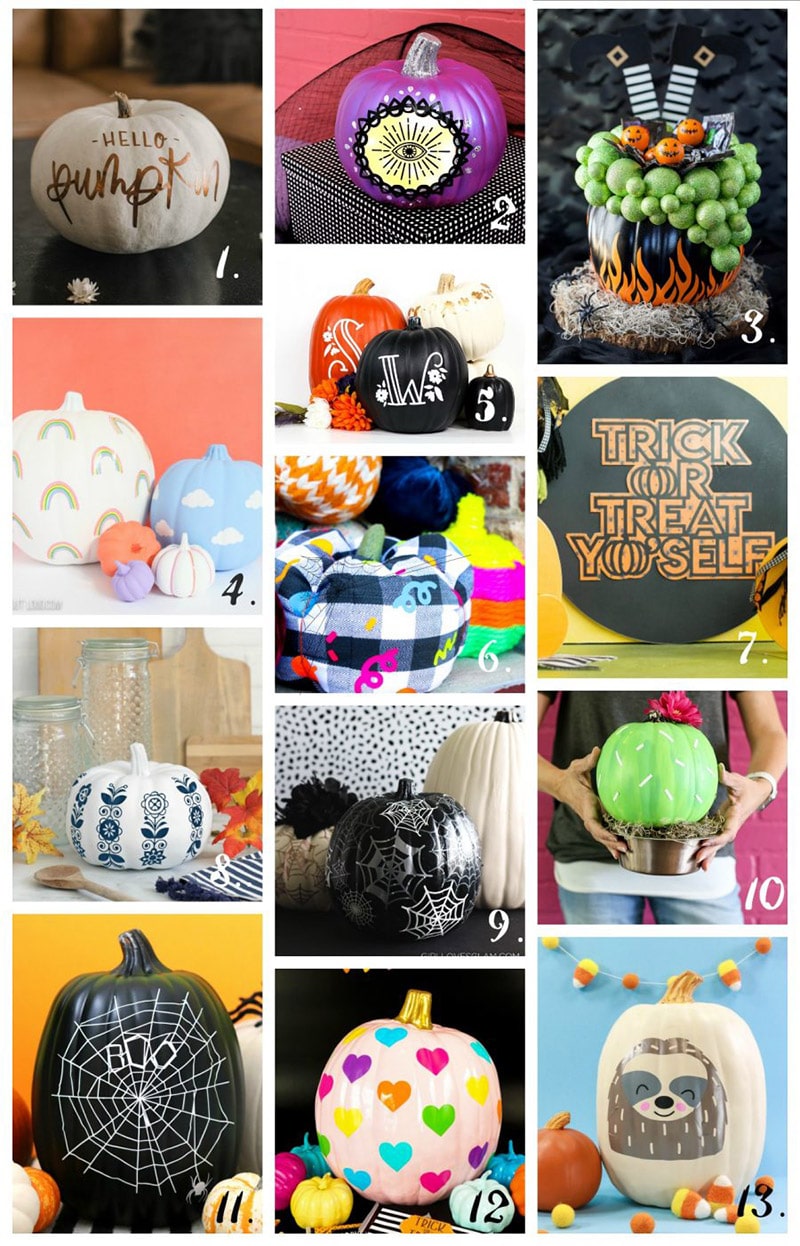
- Hello Pumpkin from Lemon Thistle
- Glowing Eye Pumpkin from Persia Lou
- Cauldron Candy Holder from A Pumpkin and a Princess
- Rainbow and Clouds pumpkin from Lydi Out Loud
- Monogram Pumpkins from Printable Crush
- Fabric Pumpkins from Sew What Alicia
- Trick or treat yourself from See Lindsay
- Folk art pumpkin from The Craft Patch
- Spiderwebs pumpkin from Girl Loves Glam
- Cactus pumpkin from Sugar Bee Crafts
- Boo Spiderweb from a Girl and a glue gun
- Rainbow hearts from Happiness is Homemade
- Sloth pumpkin from That’s What Che Said
Okay, that’s it for today! Happy Halloween and Happy Making!

Check out more Halloween crafts:
[the_grid name=”Halloween Projects Footer”]

