Learn how to make your own custom honeycomb Christmas ornaments using your Silhouette, Cricut, or other electronic cutting machine. You can customize these DIY 3D paper ornaments to match any color scheme, and my free cut files and step by step instructions will make it extra easy! This post may contain affiliate links, which help to support this site at no extra cost to you.
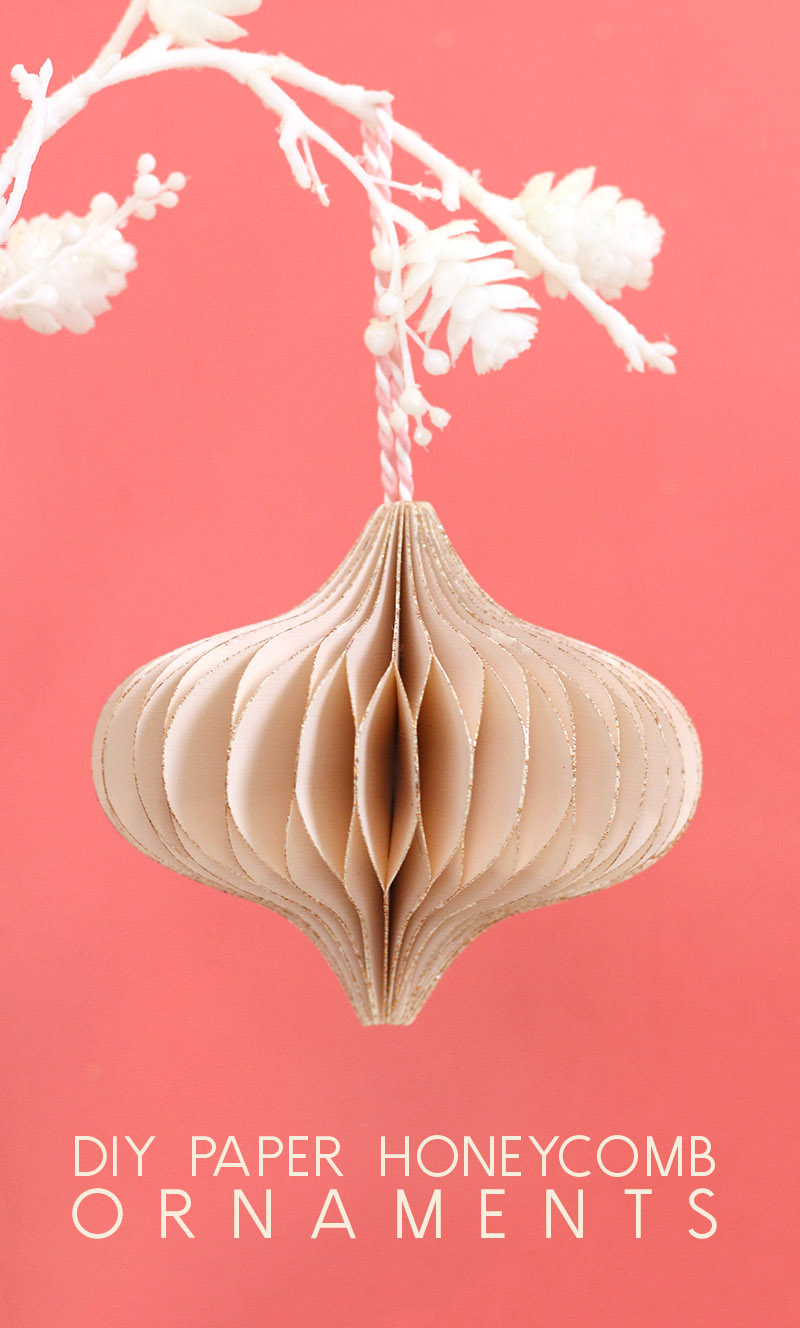
A few years ago I picked up some beautiful blush colored paper ornaments from West Elm, and this year when I was decorating my tree, I just knew that I needed more of them to bring some more of that pretty pink into my tree. Unfortunately, I couldn’t find them at the store anymore, so it was time to do a little DIY detective work and make my own version.
I am so, SO happy with the way my DIY version came out that I know I will be using this technique a lot in the future for all kinds of holiday and party decorations. Aren’t they pretty?

Probably my favorite thing about these ornament is that they close with a powerful magnet. And that means that at the end of the season, you can fold your ornaments flat and store them for next year. Awesome, right??
Okay, ready to learn how to make your own 3D paper ornaments? I even put together some free cut files for you all to make it extra easy for you to make your own. Okay, let’s get crafting!
DIY 3D Paper Ornament Supplies:
- 12″ x 12″ Colored Cardstock (A lighter weight card works fine for this. You will need at least 3 sheets for each ornament.)
- Silhouette Cameo or Cricut Cutting Machine
- Glue – I used both Super Glue and PVA glue, and I will talk a bit about the pros and cons of both below.
- Small, Strong Magnets (These are dangerous for pets and small children, so keep that in mind when crafting with them!)
- Twine or Cord
- PVA Glue
- Small Flat Brushes
- Fine Glitter Paint
- My Ornament Cut Files (<–Click to download a ZIP file of the SVG, DXF, and PNG cut files.)
How to Make 3D Honeycomb Paper Ornaments
I put together a quick little video of the process of making these ornaments, but if you are more of a reader, keep scrolling for the full written instructions.
Step One. Cut Ornament Pieces.

Start by downloading the cut files from the supply list above. (The SVG, DXF, and PNG files will download in a ZIP file that you will need to unzip first to access the files. Read more about using different file types with your Silhouette right HERE.)
The cut files are already set up to cut from a 12″x 12″ sheet of cardstock. For the rounder ornament shape, you will need to cut at least 60 total pieces (3 sheets of cardstock), but you may want to cut more if you are having a hard time getting your honeycombed pieces to stretch around into a circle. The longer ornament has a smaller diameter (it’s not as wide at the widest part when finished), so you may not need as many pieces, but I would recommend starting with 60 for that one too.
Step Two. Stack and Glue Pieces Together.
This part is the trick to getting that awesome 3D honeycomb look.
First let’s talk about glue for a second. I started off making these with my favorite super glue, which is great because it dries quickly and is super strong, but the problem I was running into is that if you get any excess glue where you don’t want it, it can kind of make a mess and tear your paper. Next, I tried PVA glue in a small fine tip applicator bottle, and I was pretty happy with the results. It’s not quite as strong, so you may have to do some fixes, but I didn’t have the problem with little extra glue blobs causing tearing. I think either works pretty well, so take your pick.
Here’s how to assemble the ornaments. Start by applying a thin line of glue down the middle of your first ornament piece perpendicular to the flat edge (see image below).
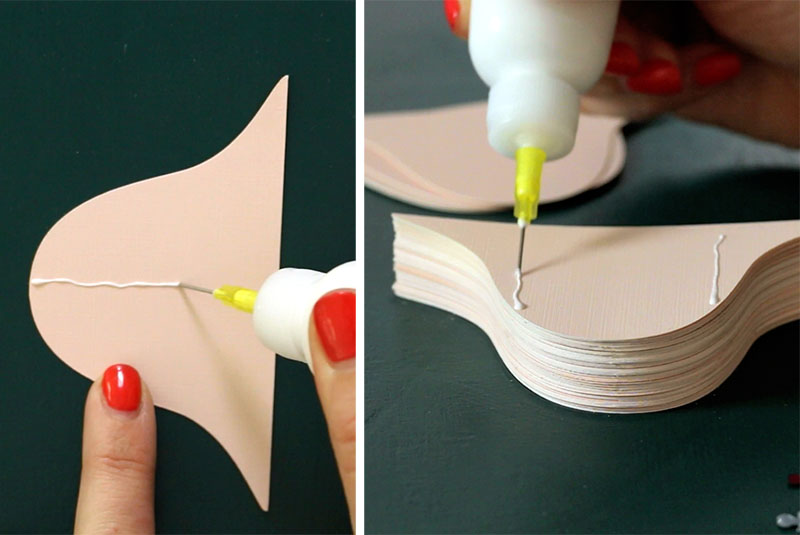
Then, place the next piece of paper on top of that, taking care to line up all of the edges. Then apply two thin lines of glue on either side of where you placed the first line of glue leaving some space between them (see the image above).
Next, cover with another piece of paper, and add another line of glue in the middle where you placed the first line of glue. Keep adding glue and paper alternating between one glue line in the middle and two spaced around that middle line until you have used all but two of your paper pieces (we will use these in the next step).
Step Three. Add Magnets.
By this point you should have a nice thick stack of honeycombed paper pieces that should kind of stretch out like an accordion if you pull them apart. Now, it’s time to add our strong magnets to keep the ornament open in it’s pretty rounded shape.
Start by gluing one of the magnets to one side of your stack of papers. Then cover that end piece of paper with glue and apply one of the two pieces of paper you reserved from the previous step. This sandwiches the magnet between two pieces of paper.

Next, you will glue another magnet to the other side of the stack using the same technique. Make sure to glue the magnet on the right side so it will attract and not repel the magnet on the other side.
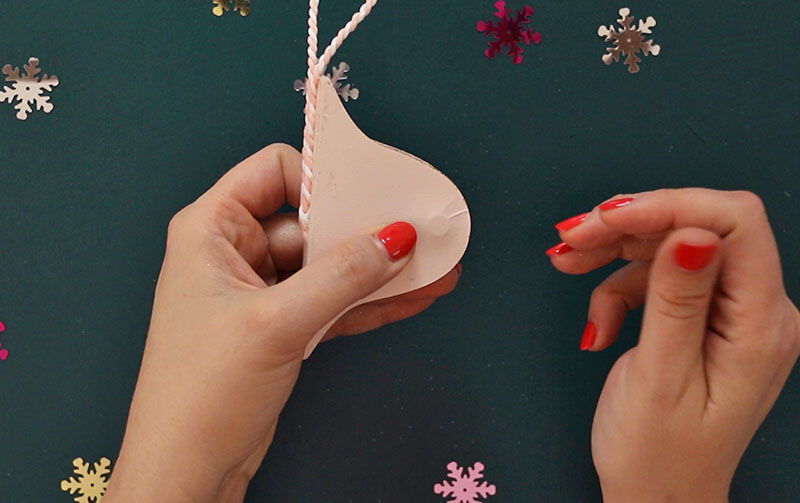
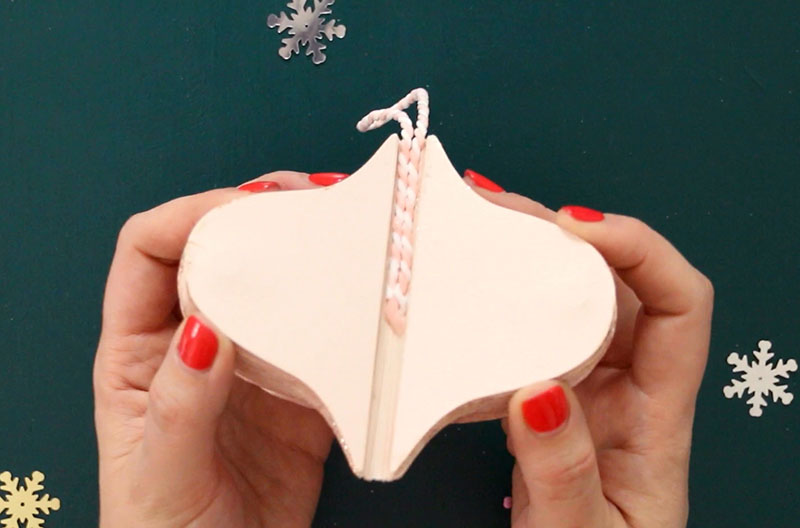
Step Four. Add Twine and Seal Inner Edge.
Now that our basic honeycomb structure is created and the magnets are in place, it’s time to finish off that inner edge and add a piece of twine from which to hang our lovely ornament. For this step, I used PVA glue and a small flat brush.
Start by squeezing the flat edges of your stack of papers together. Then, use your brush to apply PVA glue to that edge. This will work like the binding on the edge of a notepad. PVA glue is great for this because it is flexible, so it will hold the edges together even when the ornament is in it’s round shape.

After applying a couple of coats of glue to the edges, place a loop of twine over the edge and glue that in place as well. Once this has dried completely, the loop of twine will be held in place in the center of your open ornament.
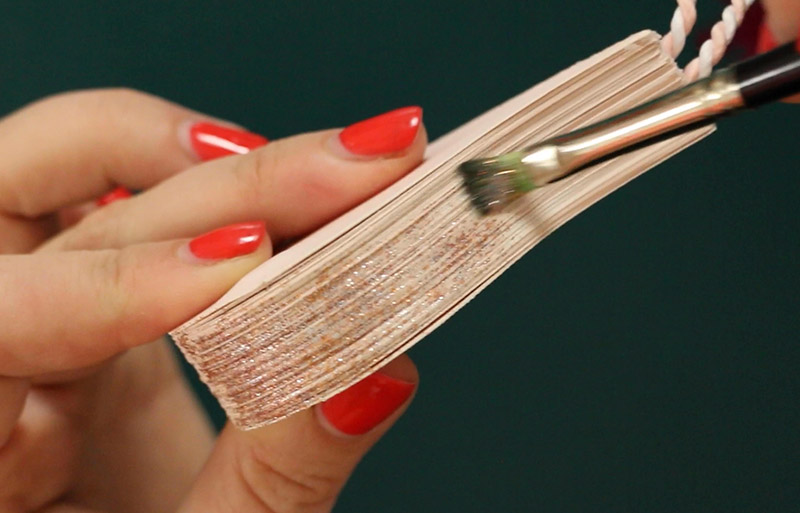
Step Five. Add some sparkle!
This final step is optional, but recommended. Give your ornament a beautiful finished look with a little bit of glitter paint. I used the Martha Stewart Multi-Surface Glitter Paint for this and it worked perfectly. Simply brush a thin coat of the glitter paint on the curved edge of the closed ornament.
Then open it up to reveal your beautiful sparkly ornament! I am so, so happy with the way these pretty little things turned out.

You could try this same basic technique to create ornaments in different colors and shapes, and like I mentioned, the best part is they fold flat to be stored for next year!
If you make your own 3d paper ornaments using this method, then I want to see them! Share your photos to my facebook page or tag me on instagram or twitter (@persialou).
Happy Holidays and Happy Making!


Comments + Project Love
Maritza says
So pretty and clever, Alexis! xo
Alexis says
Thanks, Maritza! <3
Victoria Collinsworth says
These are really pretty love making ornaments….
Alexis says
Me too! Thanks so much! 🙂
Efi says
Wonderful!! So pretty! I want to make these ornaments, but I don’t have this cutting machine! Is it difficult to cut it with a scissor? Thanks for the beautiful tutorial ! Kisses from Greece!
Annie says
Just saw her step to step on Pinterest too and ordered all the things necessary – I gotta say, copying and cutting 60 pieces of paper is some nerve rubbing job. I think I’ll get the machine next year, otherwise you could just buy them because the workload is rather immense when doing everything by hand. Also the edges will never be as neat as the pictures :/
Magda says
These ornaments are beautiful! I have a question, what size are the magnets that you used? Thank you for the tutorial.
SniffleParty says
Not sure what I’m doing wrong but the pieces are all glued together. Like, I can’t pull it around into a circle, the pages are all stuck together. I used just the tiniest amount of glue, so I’m not sure what went wrong.
Kat Rovang says
This template is so disappointing. I thought your tutorial is beautiful so I purchased the template, but the PDF template is not suitable for someone without a cricut that wants to do this by hand. They are silhouettes and not outlines and there is only one shape on each page. I’m not going to print 60 pages of 1 cutout… I thought the 8.5×11 templates were sized with multiple cutouts on each sheet. Leaving my comment here, so other crafters won’t be disappointed.
Tally says
Your files arent working on the cricut design space. There are no svg files.
Alexis Middleton says
Hi Tally, there are SVG files in the download. You need to unzip the file, and then you should see the different file types. The SVGs are working in design space for me, so I’m not sure what is wrong there.