• Skip to primary navigation
  • Skip to main content
  • Skip to primary sidebar
  • Skip to footer
  • Craft & DIY
    • DIY Art Projects
    • DIY Home Decor
    • Free Printables
    • Kids Crafts
    • Paper Crafts
    • Silhouette Crafts
    • Vinyl Crafts
      • Vinyl 101
    • Friday Craft Club!
  • Celebration
    • Party
    • Gift Ideas
    • Halloween
    • Thanksgiving
    • Christmas
    • Valentine’s Day
    • St. Patrick’s Day
    • Easter
    • Fourth of July
  • Crochet
    • Crochet Patterns
      • Crochet Accessories
      • Crochet for the Home
      • Crochet for Kids
    • Crochet Stitches
  • Silhouette
    • Silhouette Studio
    • Silhouette Mint
    • Silhouette Curio
    • Silhouette Alta 3D Printer
    • Silhouette Deals
  • SVG Cut Files
  • SHOP
  • Nav Widget Area

    • Facebook
    • Instagram
    • Pinterest
    • YouTube

Persia Lou

Creative. Crafty. Fun.

Staining and Updating Bathroom Cabinets

This was actually one of the first projects we finished in our bathroom renovation. In fact, we did this before I was really back into a blogging state of mind, so I don’t have tons of in-progress photos, but I think it’s still worth sharing if just for the transformation.
This was a project where I really had to convince my husband to give it a go. He often likes to complain to our friends that I want to paint or stain every piece of wood in our house. That is not entirely true. I just kind of hate the honey-colored wood tone of all the built-in cabinets in our home. Here’s a crappy MLS before shot of the bathroom, but you get the idea. Boring, builder-grade cabinets.

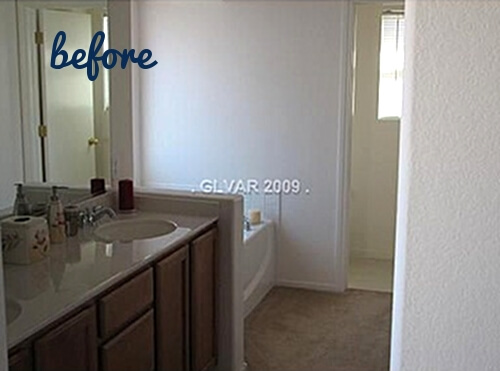
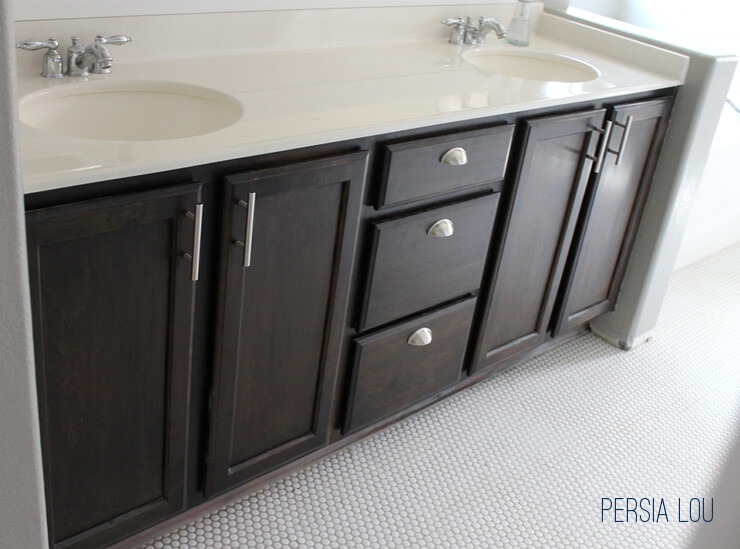
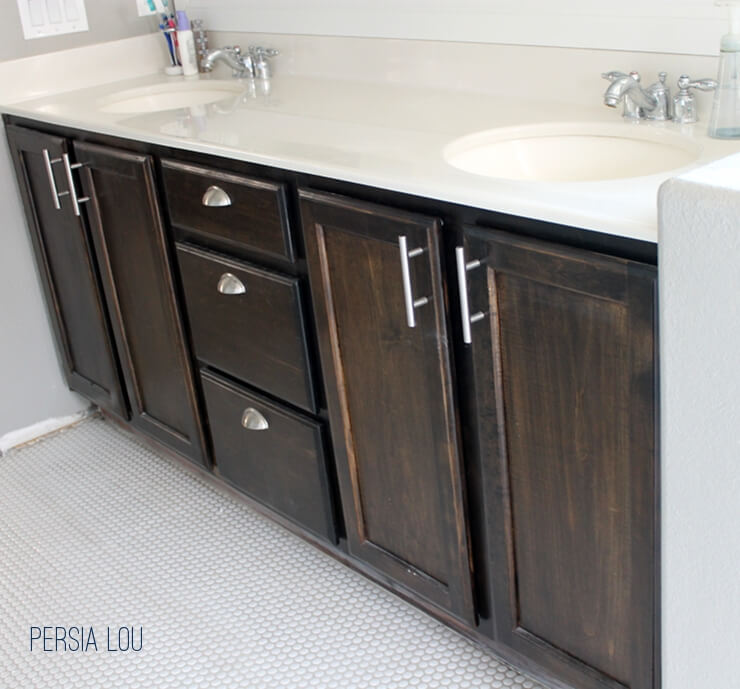
Our bathroom was sad, and those cabinets were just bringing the whole place down. But I knew that with a little work, they could be oh so much better. There are some good tutorials around about staining your bathroom cabinets using gel stain, and that is probably a really good idea. We like to blaze new trails and generally make things harder on ourselves so we just picked up a can of Miniwax in a dark brown tone at our local home improvement store.

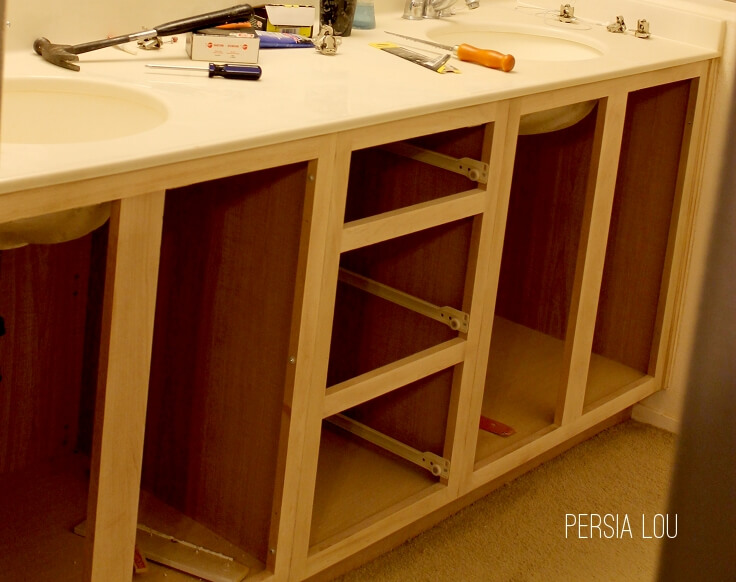
Apparently, with gel stain, sanding everything down is not such a big deal. You really just need to rough it up. Not so, with a regular stain and especially with the type of wood we were working with. If we missed any little bit of stain when sanding, the new stain we were laying down WOULD NOT take. At all.

So we did this fun thing where we sanded, stained, got frustrated, and sanded again. Not recommended.

Even with very thorough sanding, there were some areas where the wood just wouldn’t fully take the stain. After doing some research, it sounds like some types of wood just don’t take stain evenly. I decided that it gave the cabinets some interest and a slightly rustic look.
After a couple coats of stain and poly, we added the new hardware, and – whaddyaknow? – a whole new look!
You can see some of the lighter areas in this photo.
One problem area that still needs some attention is the kick board under the cabinets. It isn’t real wood, so it didn’t take the stain at all. (Then it also got grouted a bit… Hmm…) I’m thinking I may try painting it with some watered down black paint. What do you guys think? Suggestions?
Overall, I’m really happy with the way the project turned out. It took a lot of time and sanding, but it was cheap and makes a huge difference in the room. I am currently trying to convince my husband to help me tackle some of the other honey cabinets in the house. Don’t you think we should? (Come on, I need some support here)


July 25, 2013 6:33 pm Alexis Middleton Filed Under: Home Decor

Reader Interactions

Comments

  1. Selene @ Restoration Beauty says

    July 26, 2013 at 5:27 pm

    Your cabinets look lovely! Love the dark stain!

  2. ChristaQuilts says

    July 26, 2013 at 5:33 pm

    This looks fantastic!

  3. Kelly Dixon says

    July 29, 2013 at 2:54 pm

    Stunning transformation! <br />XO<br />Kelly

    • Alexis Middleton says

      July 29, 2013 at 5:06 pm

      Thanks so much, Kelly!

  4. Rose Lee says

    August 14, 2013 at 8:47 am

    Nice information dear. I have More stuff about <a href="http://homeinteriorgellery.blogspot.com/2011/12/washroom-cabinets-designs.html&quot; rel="nofollow"> Washroom Cabinets Designs</a> and ideas to share<br />

  5. Bryan Johnson says

    September 19, 2013 at 6:17 am

    Have a very good master bathroom blog. I really appreciate you for this good work keeps it up. You can also find a very good blog at <a href="http://www.prodigg.com.au/sense-800-double-drawers.html&quot; rel="nofollow">Prodigg asia pacific</a>.

  6. Sharon Lane says

    September 25, 2013 at 2:59 am

    Wow, they turned out great! I never noticed the &quot;flaws&quot; until you pointed them out. Those penny tile floors are to die for! Great job. :)<br /><br />Sharon at Desert Willow Lane

  7. Bobs Furniture says

    November 26, 2013 at 7:05 am

    Beautiful bathroom cabinets and fantastic tutorial! I love it. Nice description you have provided here regarding staining bathroom cabinets. I like the way you explain the things.<br /><br /><a href="http://en.wikipedia.org/wiki/Bob's_Discount_Furniture&quot; rel="nofollow">Bobs Furniture</a> | <a href="http://www.linkedin.com/company/bob's-discount-furniture&quot; rel="nofollow">Bob&#39;s

Primary Sidebar

Looking for Something?

FAVORITE POSTS

Make your own emoji lapel pins from shrink plastic. So fun to make, wear, and gift! Free printable cards for gifting.
crochet feather and fan baby blanket - free crochet pattern

Footer

Content Sharing Policy

First off, thank you so much for being here! I would be so honored if you would like to share one of my projects, but please only use one or two photos and be sure to link back to the original post. Thank you!

If you see anything here that has been improperly credited, please let me know and I will fix it right away. You can email me at persialou@gmail.com.

  • Home
  • About Me!
  • Disclosures and Privacy Policy

© Copyright 2016-2019 persialou.com · Theme by: PDCD