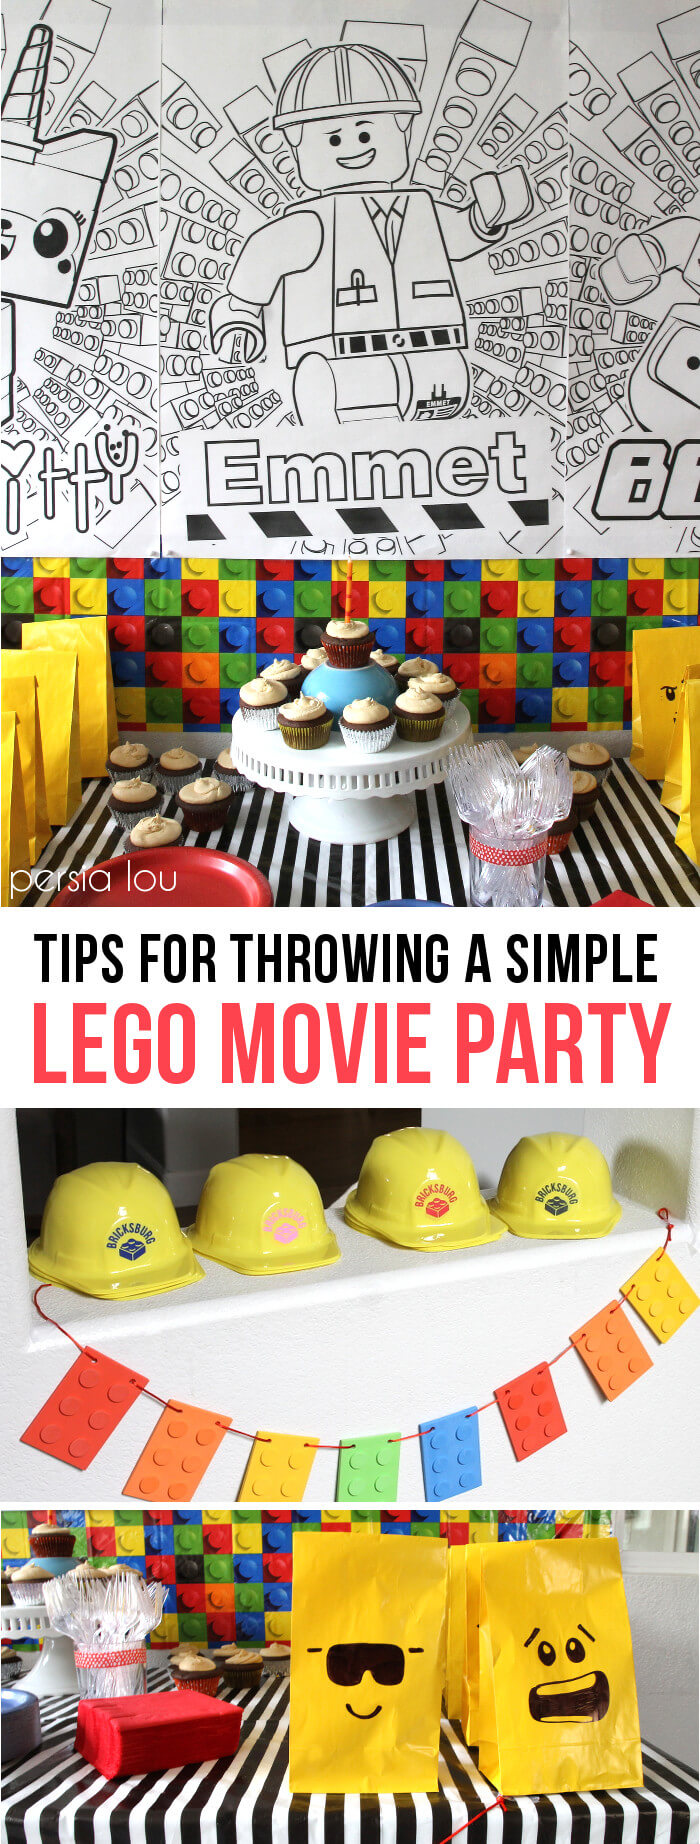
Learn how to Make Text Look Like the Lego Logo. I will walk you through the steps of turning your kid’s name or whatever you like into a lego lookalike.
Welcome to Persia Lou! If you are new here, you may want to sign up for my newsletter to keep up to date on new posts.
When preparing for my son’s Lego birthday party, I used a great free font, Legothick, which is available for free here. You can see how I used it in the invitations:
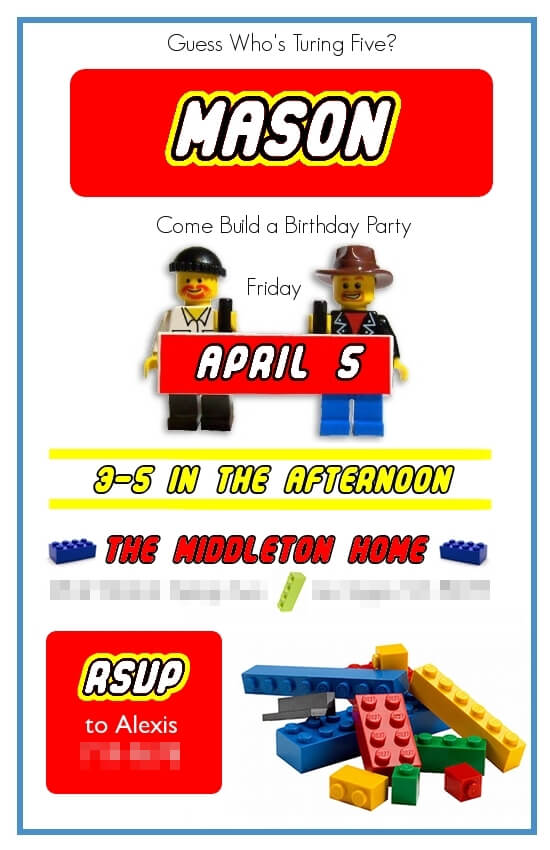
Fun, right? The font is great, but to Make Text Look Like the Lego Logo, you need to go through a few more steps than just type it into your word processor. I have laid out the basic steps for you, in case you need help getting the same look.
I used the free photo editing software GIMP, but you should be able to follow the same basic steps in other photo editing software. I will try to walk you through all of the steps, but having some experience in using photo editing software is definitely helpful.
How to Make Text Look Like the Lego Logo:
1. Use the text tool to type out your text. The font color should be black and you should type in all caps.
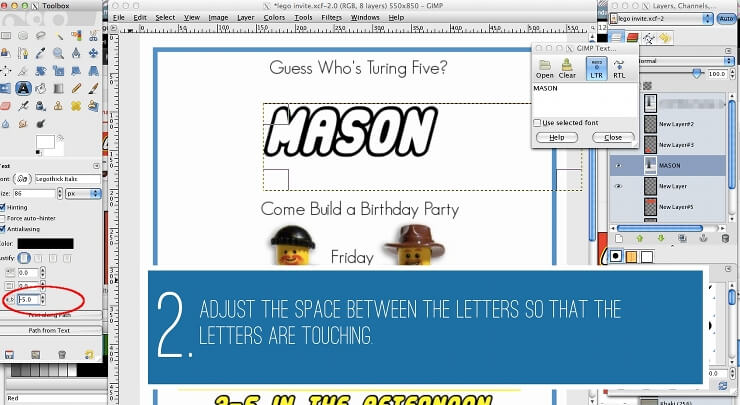
2. Adjust the space between the letters (kerning) until the letters are touching.
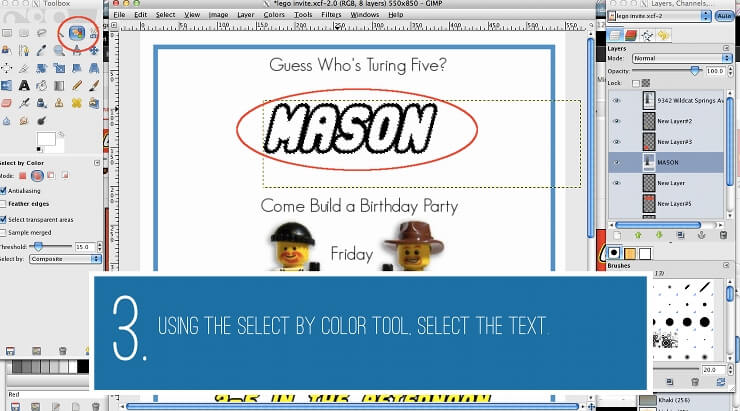
3. Select the text using the color select or magic want select tool.
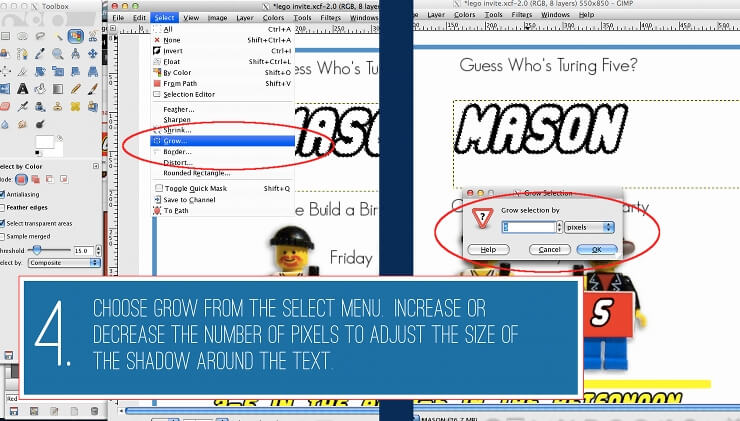
4. Grow (or expand) the selection by the desired number of pixels to create an outline around your text.
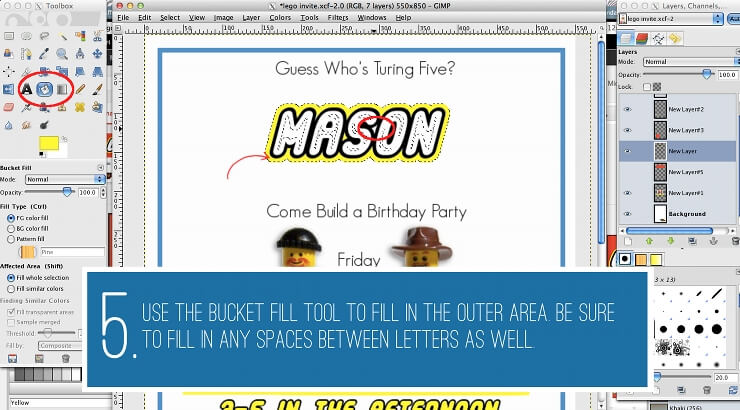
5. Fill this new selection with yellow.
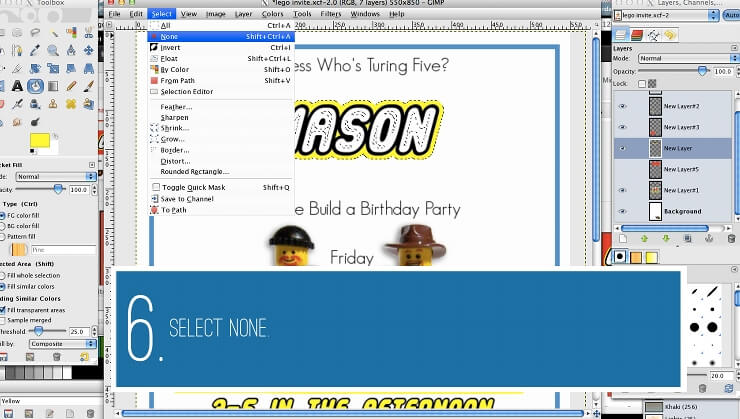
6. Select None or Deselect.
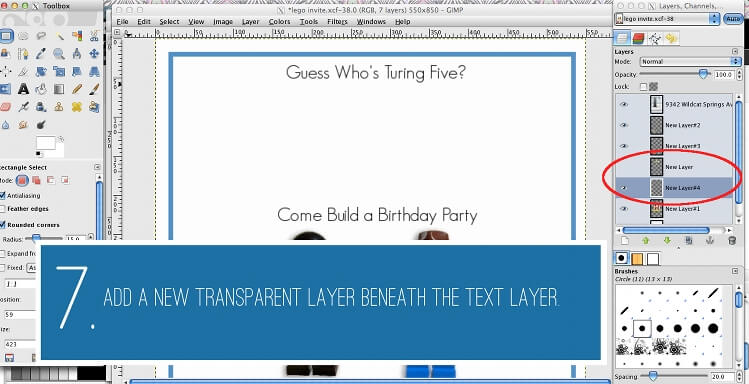
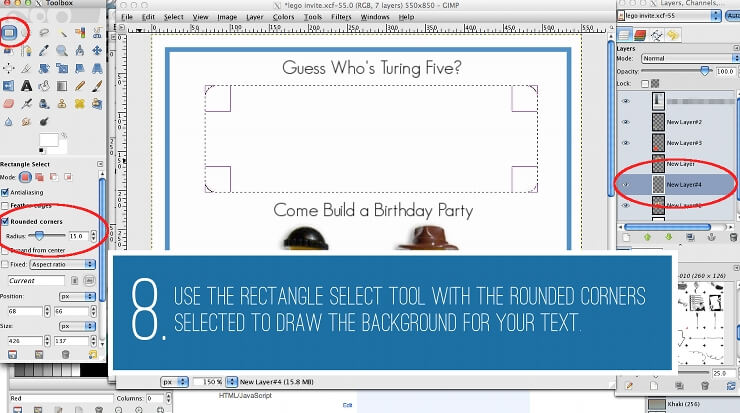
7. Add a new transparent layer beneath the text layer.
8. Draw a rectangle with rounded corners on this new layer you created.
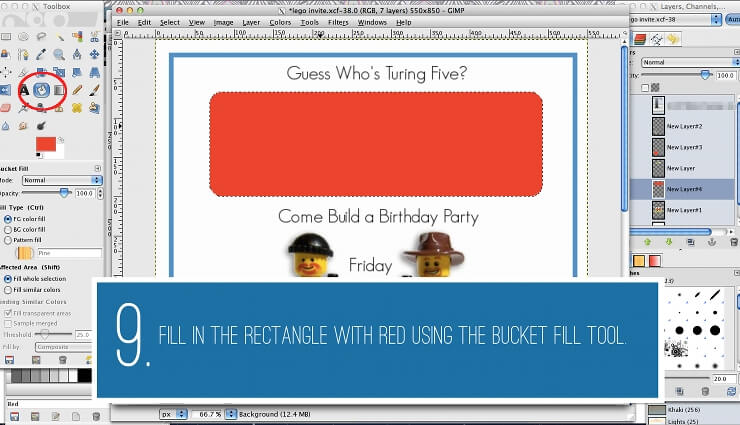
9. Fill your rectangle with red.
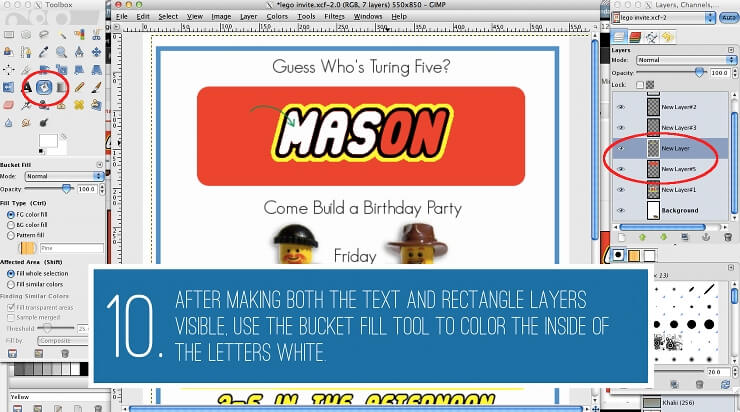
10. Finally, fill in the center of the text with white.
I hope that helped you Make Text Look Like the Lego Logo!

If you like this post, you may also like:


Comments + Project Love
Punky says
THANK YOU for this tutorial! So visual and well put together. My LEGO party planning just got a lot easier! 🙂
Michelle Covington says
This comment has been removed by the author.
Michelle Covington says
How did you get the outline of Mason to mirror the letters? When I do step 4, it just outlines it in a rectangle.
Alexis Middleton says
Hi Michelle – I think what is probably happening is when you are clicking on the text with the select by color tool, you are clicking on the white part of the text (the middle of the letter), which is not really the text. Think of the letters are hollow. You need to click on the black outline part of the text with the select by color tool, then when you "grow" the selection, the new
Jill Ferrell says
Can you help me with something please? I'm stuck on the first step. LOL. I can't figure out where to start typing the child's name. Thanks!!
Alexis Middleton says
Hi Jill! To enter text, you need to first select the text tool. In the toolbox window, click on the button that looks like a capital letter A. After you click on that button, when you click in your image or document, it should open up a text box. After that you can just type! Hope that helps. Your version of GIMP might look a little different than what is pictured, but the buttons should still be
Jill Ferrell says
Well, as I read your instructions, it dawned on me that I had not created a new document, so I was trying to type into nothingness basically! LOL. Thanks for your help. So far so good!
Jill Ferrell says
Oh Rats. I'm stuck on the grow part. Nothing is happening when I increase or decrease it. 🙁
Alexis Middleton says
Hi Jill – Are you possibly having the same problem Michelle was (comment above)? If it's not that, then make sure you have clicked on the Apply button after you adjust the number of pixels. If its not that, then make sure you have selected the text before you grow the selection. Good luck!
Jill Ferrell says
Okay, yes it was the same problem as Michelle. Sorry I missed that. :-/ So now we have the yellow around the name BUT the top part of the yellow is cut off because the name is against the top of the box. Is there any way to move it down? To center it from top to bottom? When we make the red box around the name, it doesn't go above the name. Instead of answering question after question and
Jill Ferrell says
Good news! I finally figured it out! Thanks SO much for posting this. The gift I'm making for my nephew looks SO much better, so much more like the real lego logo!!<br />
Laura Zinter says
Thanks for posting this tutorial. I need help. When I fill the first area by making it grow, some of the growth area is beyond the canvas and won't let me fill that area. I can get off of it besides what extends out in the bottom left and upper right due to the italics. I think I'm having the same problem as Jill's second set of posts<br />.
Denise says
This comment has been removed by the author.
dibbkd says
I just used this tutorial to make a new Facebook cover photo that looks "AWESOME"! 🙂 https://www.facebook.com/TherapyPlayground
Alexis Middleton says
That is awesome! Thanks so much for letting me know. 🙂
Adrieanne says
I am completely confused…lol ! My text is pixelated and doesnt look right 🙁
Rogue Mislead says
I have a question. I basically downloaded gimp just for this & I do not have LEGOTHICK Italics on my font list…in fast some of my gimp features don't looks the same as yours. I need help with this so bad i'm trying to make the name BRENNAN like this for his 8th Birthday and i'm printing a picture big enough to frame for him. His birthday is in 2 weeks I gotta get this done ASAP.
Alexis Middleton says
Hi! First make sure you have actually installed the font on your computer. If you installed it while Gimp was open you will need to restart the program before it will show up. If you have a different version it may look different but all of the basic tools should be the same. Good luck
tianna batson says
How do I get both layers in step ten to be visible?<br />
Carl&JulieFamilySite says
I also can't figure out step # 10. Can you please give more detail on how to make text and rectangle layers visible? When I try to make the inside of the letters white, it causes all of the red background to be white. Help!! Thanks! 🙂
Alexis Middleton says
To make layers visible, you need to click on the little eyeball next to the layer on the layers tab. Hope that helps!
Carl&JulieFamilySite says
THAT WORKED!!! Thank you soooooooooooooo much!!! 🙂
exemplar says
Hi, thanks for this tutorial. When I use the yellow colour to get the border, i loose the black. Any ideas where I am going wrong?
Sarah Kerstetter says
I'm not sure if you are still answering any questions but when I try to do step ten everything turns back to white again. I'm not sure what I'm doing wrong.
Meaghan Bihun says
I had to paste my lettering into a new image to fill it – I couldn't figure it out either! But I got there. <br /><br />Thanks so much, OP, for these instructions!
Sey says
How did you do this? This is the only step Im having issues with. Maybe you can help me with detailed steps? Thank you.
Alexis Middleton says
Hi Sey – I think most of the problems come from having the wrong layer selected. Make sure you have the text layer selected. Good luck!
Spoon Family says
I cannot figure out how to even start! I figured it out at one point, but I had more problems, so I deleted it to start again and cannot figure out how to create a text box! I clicked on the text icon "A" on the left, but nothing appears. This Gimp program is so confusing – is it just me? Any help would be appreciated. Thanks in advance!
Denise Larson says
Hi Alexis! I am having some major difficulty outlining the text in yellow. I am unable to tell if the text has actually "grown." There is no indication if it has or not. Once I go to the next step, either the text box fills yellow or the entire page does and covers the text as well. I originally was trying to do three words for this but if I have to do this without spaces, I can do
Alexis Middleton says
Hi Denise – When you "grow" the selection, the dotted line that indicates the selection will move out around the outside of the letters. Make sure you are working on the right layer (the layer with the text), and that you have selected the text. If the text has been selected it should have a dotted outline around it. I hope that helps! Good luck!
Juliana says
Hello, greatings from Brazil. I am working on my son's 5 th b-day and lover this tutorial. Downloaded gimp and the font but i am stuck on step 5! when I color the grow part it colors both the outer and inner part! Also I cannot seem to be able to color the font as it is hollow! HELP please!
Dianna Hostettler says
For those having trouble with the final step of coloring the font white, make sure the layer you have chosen is the foreground layer, not the background.
Abby Boyce says
Help! I cant seem to get my yellow to hug the letters like yor does. What am I doing wrong?
jodiduck says
This comment has been removed by the author.