Learn how to make DIY window clings using liquid polymer clay! This simple technique makes it easy to create beautiful, stained glass inspired decorations for your windows. Thank you to Sculpey for sponsoring this project!

Did you know that you can make your own DIY window clings?? It’s true! And probably a lot easier than you think.
Today we are going to be making these beautiful stained glass inspired butterfly window clings! They are really fun to make and incredibly easy to customize and make your own.
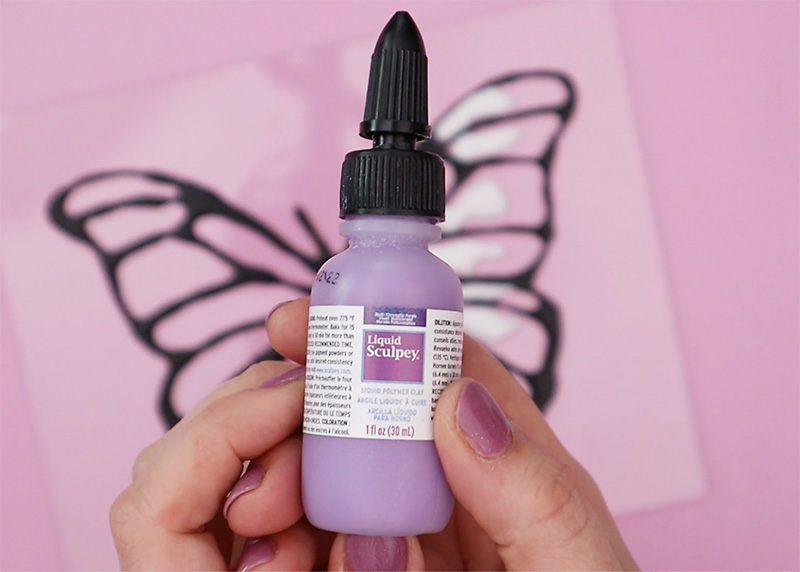
The secret ingredient for DIY window clings is liquid polymer clay. Liquid Sculpey is perfect for this project and comes in lots of beautiful colors including the beautiful new Multi-Chromatic Purple, which is a beautiful, sparkly shade with a purple-blue shift.
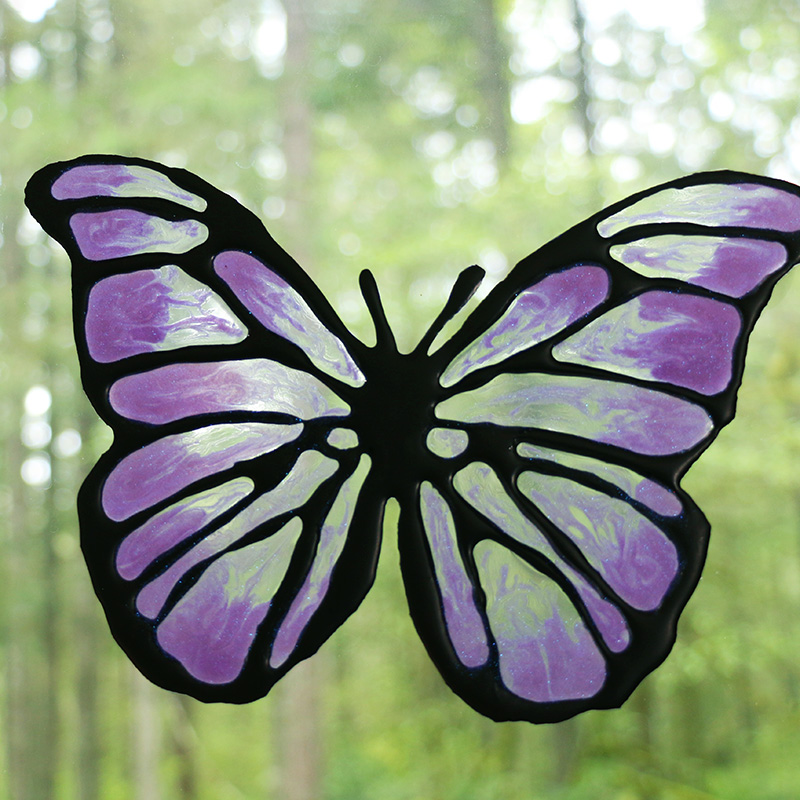
So pretty, right? I love that marbled, transparent sparkle!
More Clay Projects
Ready to make some window clings?
DIY Stained Glass Butterfly Window Clings
You only need a few supplies to make your own window clings. The key ingredients are Liquid Sculpey, glass, and an oven.
DIY WINDOW CLING SUPPLIES:
- Liquid Sculpey (Get the new Multi-Chromatic Purple here!)
- My Free Printable Butterfly Coloring Pages
- Glass Sheets
- Sculpey Silicone Mixing Set
- Mica Powder
- Flaky Glitter
HOW TO MAKE DIY WINDOW CLINGS
Ready to get making? The video tutorial below will walk you through all of the steps for making your own sparkly window clings, but if you are more of a reader, just keep scrolling for the written instructions.
How to Make DIY Window Clings

It's easy to make beautiful DIY window clings with liquid polymer clay!
Materials
- Liquid Sculpey (I used Black, Clear, and Multi-Chromatic Purple)
- Printable Butterfly Coloring Pages
- Glass Sheets
- Mica Powder
- Flake Glitter
Tools
- Sculpey Silicone Mixing Set
- Oven
- Cotton Swabs
- Needle, Toothpick, or Stir Stick
Instructions
- Print off my butterfly coloring pages on regular white copy paper.
- Place a glass sheet over the top of your chosen butterfly design and trace over the butterfly outline using black Liquid Sculpey. (To add a subtle metallic shimmer to your outline, you can first mix some mica powder into your black Liquid Sculpey using the Silicone Mixing Set.) To get clean, smooth lines when tracing the butterfly outline, allow the Liquid Sculpey to fall onto the glass and gently pull it in the right direction rather than pushing it down onto the glass.
- Use your stir stick or a toothpick to pop any bubbles in the outline.
- After tracing the butterfly outline with the black Liquid Sculpey, bake the outline according to the instructions (15 minutes for thicknesses under 1/4" in a 275° oven).
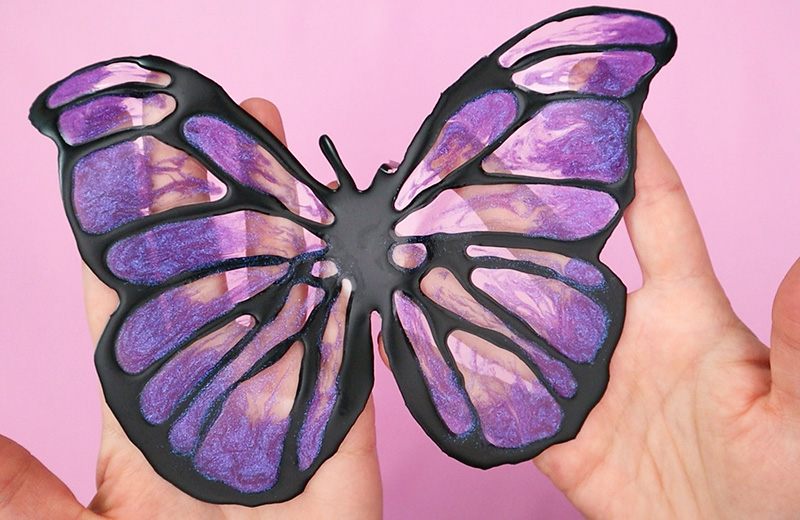
- Once the outline has baked and cooled, you are ready to fill in the butterfly wings. Put a little bit of Clear Liquid Sculpey and Multi-Chromatic Purple Liquid Sculpey into each wing section.
- Use your stir stick or a toothpick to spread out the Liquid Sculpey and swirl the clear and purple colors together. (If you like, you can add glitter at this point for even more sparkly texture.) Pop any bubbles before baking.
- Bake according to directions. For Clear Liquid Sculpey, bake 15 minutes for thicknesses under 1/4" in a 300° oven.
- After cooling, carefully peel your butterfly off of the glass sheet.
- Apply your new DIY butterfly window clings to your windows and enjoy!


I’m so happy with how these window clings turned out! That marbled mix of the Clear and the Multi-Chromatic Purple is just so good!

My daughter loved making these butterflies with me and has lots of window cling making plans. There are so many ways you can put this technique to use!

That’s it for today, friends! If you make your own butterfly window clings, I would love to see them! You can tag me on instagram or share to my facebook page.
Until next time, Happy Making!


Comments + Project Love
Paul says
If left on a window for a very long time,, will the clings made using Liquid Sculpey become permanently bonded to a window like many other gel-type clings do?
Sarah Whitlock says
Can you use sculpy without the oven
Alexis Middleton says
Liquid Sculpey requires baking. Hope that helps!