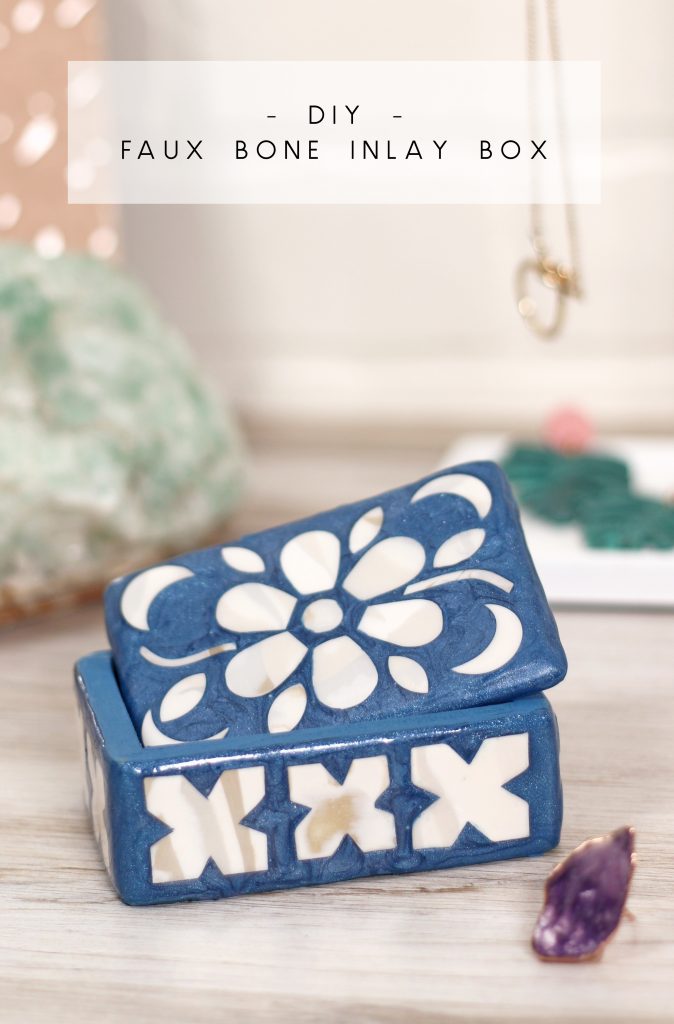
Learn how to get the look of beautiful bone inlay using Oven Bake Clay and Liquid Sculpey! Use this fun technique to create beautifully intricate designs. I will walk you through the process with my step-by-step video tutorial. A big thank you to Sculpey for sponsoring this project!
I am really excited to share this project with you all today! I have been playing around with a new-to-me product and just having a lot of fun with it. Liquid Sculpey is a liquid version of bakeable polymer clay that is super versatile and opens up so many crafting possibilities!
You can bake Liquid Sculpey in silicone molds to create custom shapes and cabochons, or use it to create colorful window clings, and accents for other clay projects. When I saw that Liquid Sculpey can be used as grout in mosaic projects, it got my wheels spinning.
I have loved the look of bone inlay home decor objects for a long time, and I knew I could get a similar look with Liquid Sculpey. The finished project turned out even better than I expected, and I hope you will love it too!
To show you how to create this faux bone inlay look using liquid polymer clay, I have created a step-by-step video tutorial, which you can watch below, or if you want more details or prefer to read, keep scrolling.
How to Make Your Own Faux Bone Inlay Box with Liquid Sculpey

You will need to gather a few other supplies and tools in addition to your Sculpey clays for this project.
Faux Bone Inlay Box Supplies:
- Sculpey III in White, Translucent, Buried Treasure, and Silver
- Ceramic tile or Baking Mat
- Rolling Pin
- Popsicle Sticks
- Small Round and Tear Drop Cutters
- Craft Knife
- Sand Paper
- Liquid Sculpey in Navy Metallic, Peacock Pearl, Pearl, and Clear
- Heat Gun
- Acrylic Craft Paint and Brush
Step One. Make Faux Bone Inlay Mosaic Pieces.
The first step of this project is to create the mosaic pieces you will use to decorate your piece. I searched for images of bone inlay boxes, trays, and picture frames online to give me pattern ideas and inspiration.
To create the tonal look of the bone inlay pieces, I mixed a few colors of Sculpey III oven bake clay in whites, tan, and silver. I included translucent and metallic clays to help give the mosaic pieces the luminescent, dimensional quality of real bone inlay.
Next, I layered pieces of the different colors, flattened them, and rolled them out to the thickness of a popsicle stick. This created a subtle marbled sheet of clay.
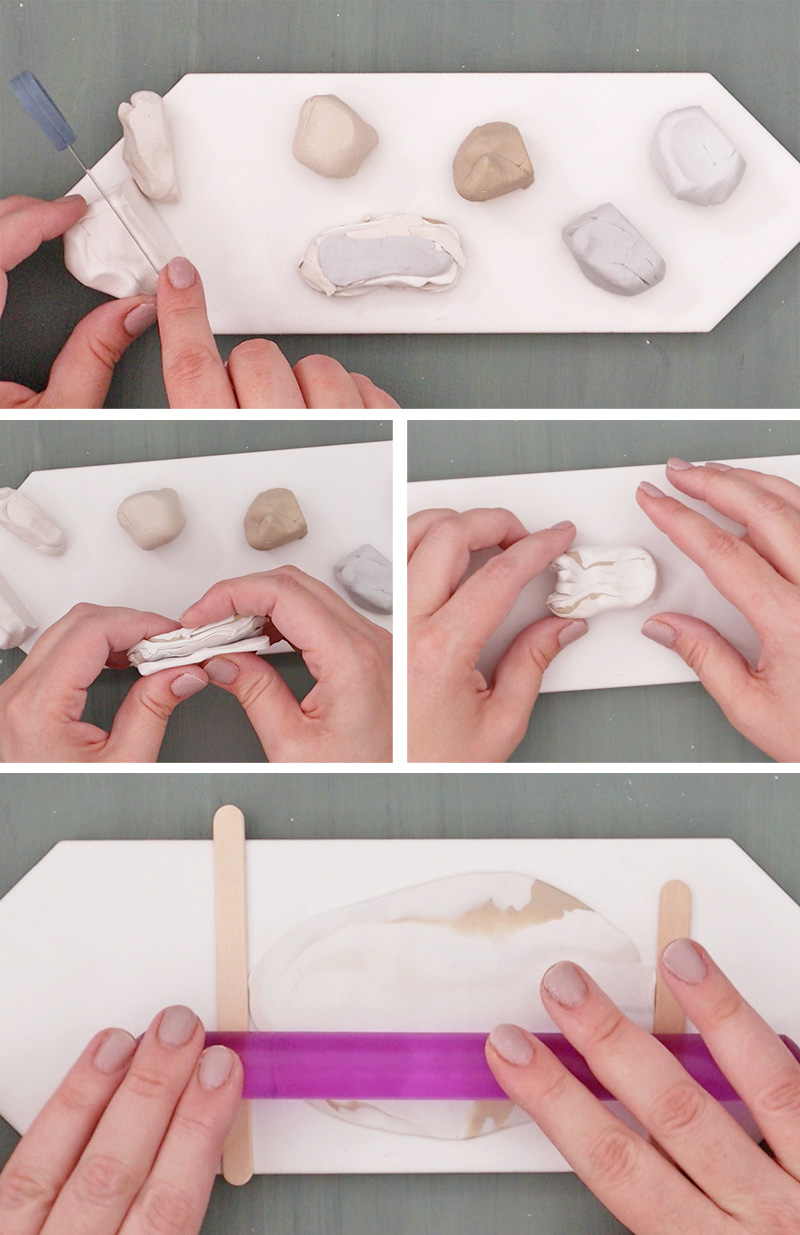
Using small tear drop and circle cutters, I cut out petal and crescent shapes for the top of my box. Then I used a craft knife to cut notched 1″ squares for the sides of the box and baked the mosaic pieces for 15 minutes per 1/4 inch of thickness in a 275˚ oven.
After the pieces were done baking and cooling, I used sand paper to smooth out any rough edges.
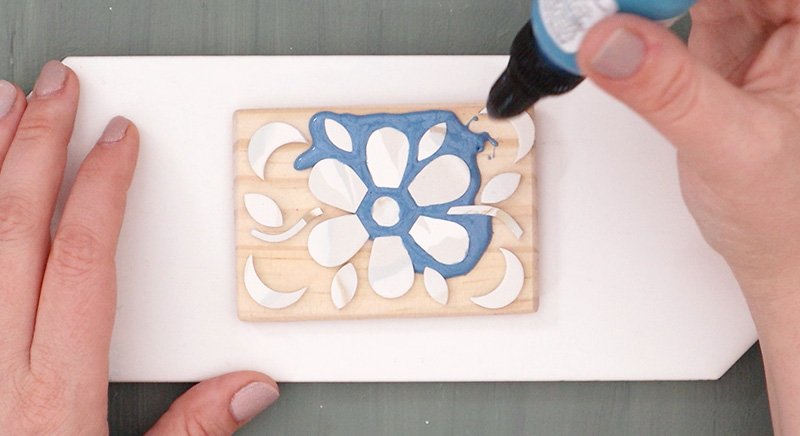
Step Two. Surround Mosaic Pieces with Liquid Sculpey.
First, I mixed a couple of colors of Liquid Sculpey together to create the color that would surround my mosaic pieces. This step isn’t necessary, but since I wasn’t sure I had enough of just one color to cover my box, I decided to mix Navy Metallic, Peacock Pearl, and Pearl together. Together they made a lovely, shimmery blue.
You can also tint Liquid Sculpey with alcohol inks, so there is no limit to the colors you can create!
When you have your desired color of Liquid Sculpey ready, simply squeeze the product out around the mosaic pieces onto the box. Try to get the Liquid Sculpey to be about the same height as the mosaic pieces to give your finished box a smooth surface.
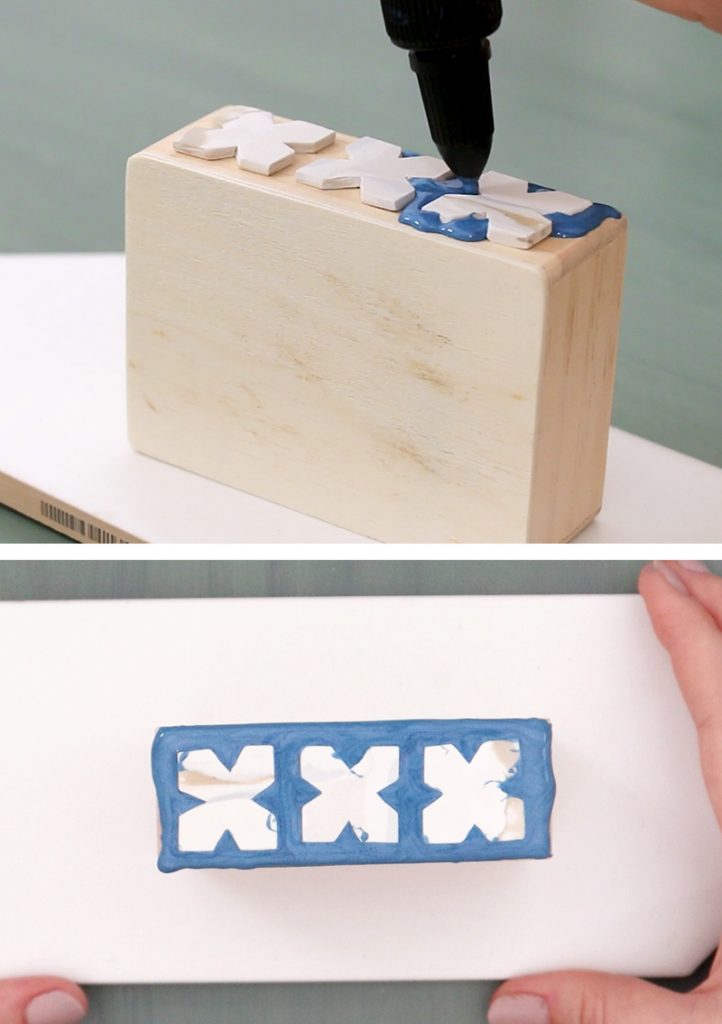
As the Liquid Sculpey settles, it will level and smooth itself out, so you don’t need to be too fussy with this step. After the Liquid Sculpey has had a minute to settle, use a pin or your craft knife to pop any bubbles.
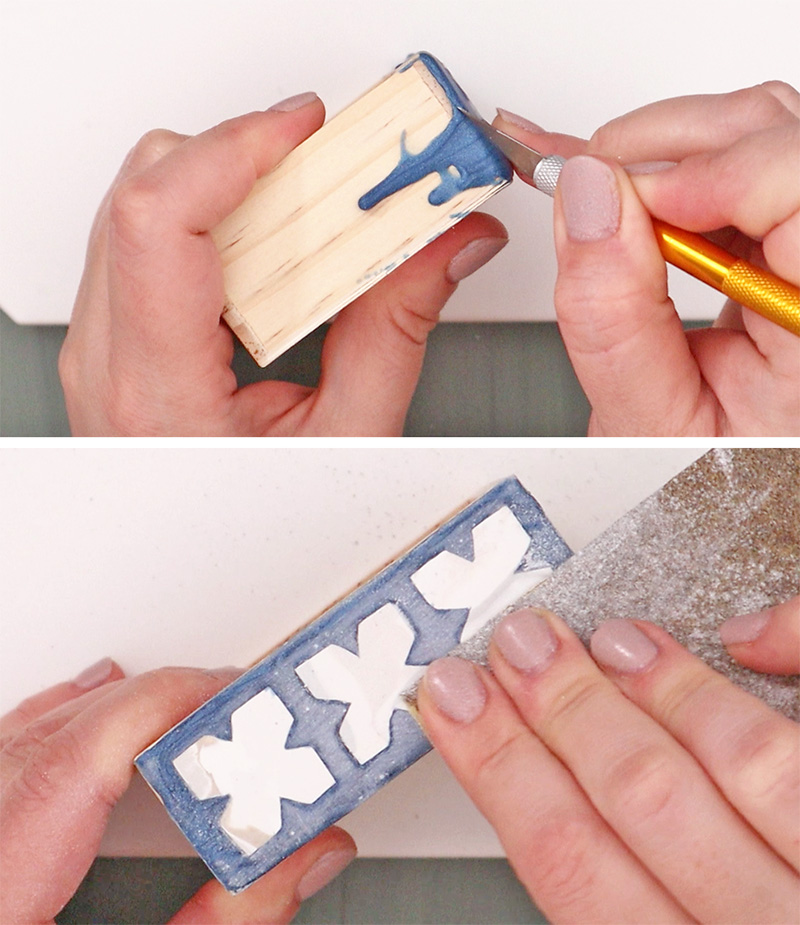
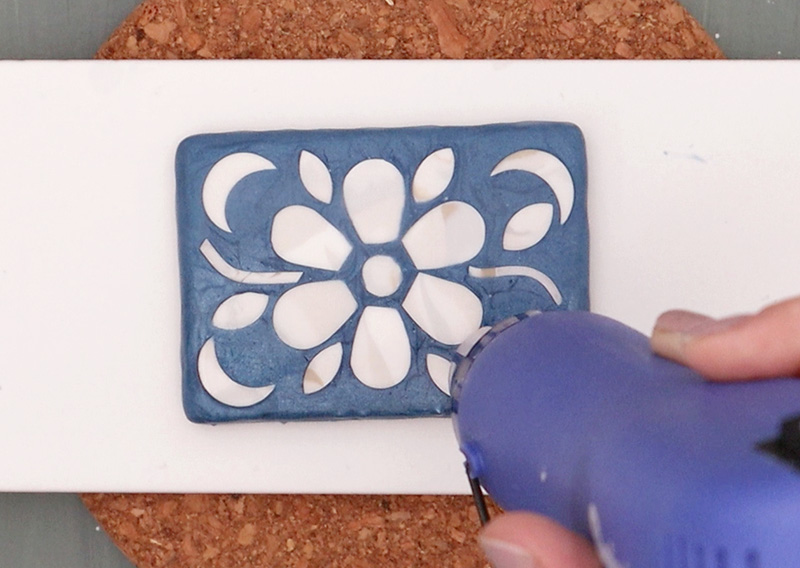
Next, bake your box in a 275˚ oven for 15 minutes per 1/4″ of thickness. After the box has cooled, use your craft knife to cut off any drips and even up edges. Then, use sand paper to smooth out the surface.
Repeat this process for each side of the box as well as the box lid.
After baking and sanding each side of the box and lid, I used a damp cloth to wipe the surface down and remove dust.
Step Three. Cover with Coat of Clear Liquid Sculpey.
Finally, smooth a thin layer of Cleary Liquid Sculpey over the baked and sanded surfaces. I just used my finger to get a thin, even coat.
Then, bake the box again in a 300˚ oven for 15 minutes for thicknesses less than 1/4″.
When the box covered in Clear Liquid Sculpey comes out of the oven, use your heat gun to apply heat until the Liquid Sculpey become glossy and shiny and then immediately remove the heat. Be sure protect your hands from the heat by using heat resistant gloves or tongs.
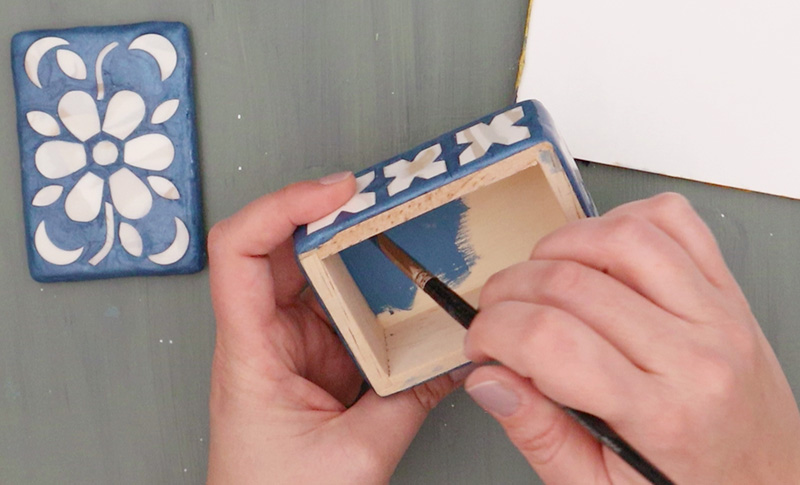
At this point, your box is pretty much all done! If you like, you can paint the interior of the box to match with acrylic craft paint like I did.
This little trinket box has so much sparkle and depth from the pairing of the pearlescent Liquid Sculpey and the tonal mosaic pieces. I am so happy with it!
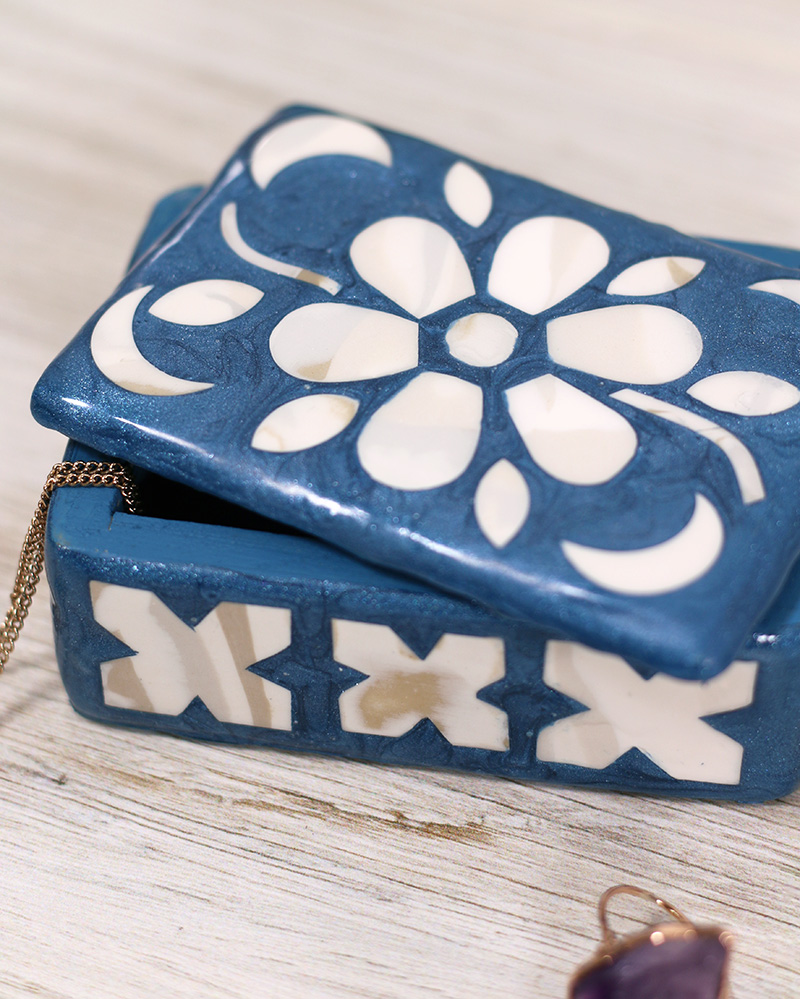
This technique could be used to make beautiful picture frames, trays, jewelry, and so much more! What do you think? Will you give this a try?
Until next time, Happy Making!


Let's Chit Chat!