Learn how to make your own adorable felt Christmas tree advent calendar to count the days til Christmas and celebrate all season long! I am sharing free printable templates, cut files, and a step by step instructional video to help you make your own DIY advent calendar that you can use year after year. This project was made in partnership with VELCRO® Brand, and includes affiliate links, which help to support this site at no extra cost to you.

As a kid, one of my favorite Christmas traditions that we had was a felt advent calendar that my mom had made. The main feature of the advent calendar was a big green felt Christmas tree and beneath that were pockets filled with beautifully decorated handmade felt ornaments. My siblings and I each had our favorite ornament and we would take turns adding a new one to the tree every day of December leading up to Christmas morning.
I loved that simple advent calendar so much, and I made a similar wood version years ago for my kids, but this year was felt like the right time to recreate my own take on the felt advent calendar of my childhood.
DIY Felt Advent Calendar

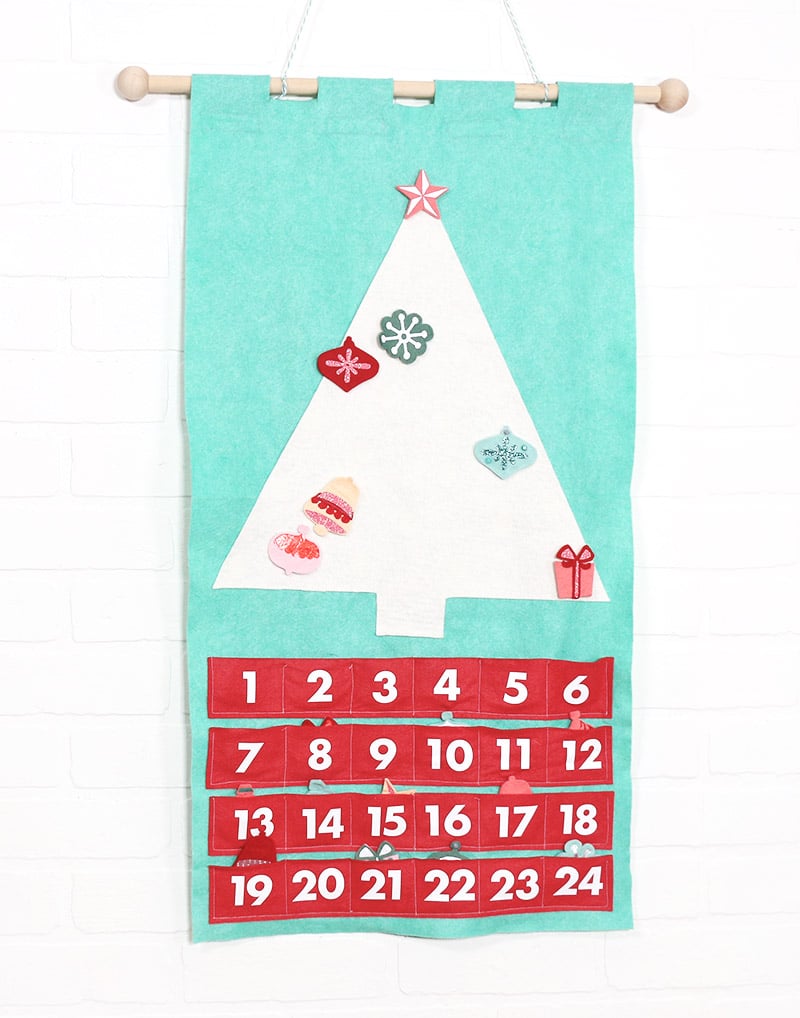
The DIY advent calendar that I created has a cleaner, more modern look than the one from my childhood and a bit of an updated color scheme, but other than that, it is really similar to the one I grew up with. I used an electronic cutting machine and heat transfer vinyl to make it easy to put together, and I’m sharing the cut files and printable templates here to help you make your own easily!
I am so happy with how my Christmas tree advent calendar turned out! If you want to make your own, you will find everything you need below.
DIY Felt Advent Calendar Supplies:
- Colorful Felt (I bought my felt from the adorable felt shop Benzie Design. They sell beautiful, high quality felt in gorgeous colorways. They also offer beautiful color palettes, which make it easy to create a coordinated advent calendar. I mostly used colors from their Winter Mint Color Palette. You will need Benzie Design also has an Amazon shop.)
- You will need a 1/2 yard each of the background color (I used Benzie’s Julep), the tree shape color (I used Benzie’s White), and the pocket color (I used Benzie’s Strawberry).
- You will also need several sheets of felt in coordinating colors for your ornaments. I recommend choosing a color palette to work with. I used the Winter Mint palette, but or would be beautiful too.
- Cutting Mat and Rotary Blade
- VELCRO® Brand For Fabrics Sew On Tape
- VELCRO® Brand Sticky Back for Fabrics White Ovals
- Sewing Machine and Thread
- Cricut Maker or Silhouette Cameo 4 (optional, but really nice to have!)
- Fabric Glue or Hot Glue Gun
- 1/2″ Dowel Rod cut to 21″ long
- 2 Dowel Caps to fit Dowel Rod
- Heat Transfer (Iron On) Vinyl (I dug through my vinyl stash and grabbed any coordinating colors I had on hand. I especially loved how the glitter and metallic HTVs worked for this.)
- I used a lot of Siser Glitter Heat Transfer Vinyl in White Rainbow and Jade.
- I also loved the look of Siser Electric HTV. I used Cherry and Peacock Teal on several ornaments.
- Happy Crafters Shine HTV is another great option.
- Iron or Easy Press
- Small Rhinestones, Embellishments, or Sequins (optional)
- Thin Rick Rack, Ribbon, or Pom Pom Trim (optional)
- My Free Printable Ornament Templates and Cut Files (When you click the link to the left, a ZIP file containing a PDF file of the printable templates as well as the SVG, DXF, and PNG versions of the cut files will download. You will need to unzip the file before you will be able to use the individual templates or cut files. Please note that these downloads are free for personal use only. If you are interested in a commercial use license, you may purchase one HERE.)
How to Make Your Own DIY Felt Christmas Tree Advent Calendar
I have created a full video tutorial to help you create your own DIY advent calendar. If you do not see the video below, it may be because of an ad blocker. You can also see the video on my youtube channel here. If you prefer written instructions, keep scrolling!
- Cut the felt for the background of your advent calendar. Start off by cutting a large piece of felt 34 inches long by 17 inches wide. (If you want your calendar to be thicker and sturdier, you can sew or glue two pieces of felt together for your background.) Next, it’s time to cut tabs at one end of this piece that you will use to attach the banner to your dowel rod. I cut four tabs 3″ wide and 4″ long about 1.5″ apart.
- Sew on VELCRO® Brand fasteners to close tabs. Cut off pieces of sew-on hook and loop tape to fit each tab. Wrap the tabs around the dowel rod to position the hook and loop tape. Pin the fasteners in place and then sew onto the back of the banner and the tabs.
- Create the felt tree shape. Start with a piece of felt cut down to 18 inches by 15 inches. Fold in half lengthwise, and then cut out a 1.5″ x 6.25″ rectangle on one open corner (this creates the trunk shape at the bottom of the tree). Next cut a diagonal line from the outer bottom corner up to the opposite corner of the folded edge. Unfold to reveal your large tree shape. You can glue or sew your tree shape onto the background leaving space at the bottom for your ornament pockets.
- Create the felt pockets. Start off by cutting our 15.5″ x 2.75″ strips of felt for your ornament pockets. Pin them in place on your felt background. Sew around the sides and bottom edge of each strip 1/4″ from the edge to attach the felt to the background. Mark every 2.5″ from the stitch line across each felt strip and then sew at your markings to create six pockets on each strip.
- Add numbers to your felt pockets. The cut files in the supply list above include numbers for the pockets. I cut my numbers from Siser Easyweed in White. (You could also cut numbers from felt or try pre-cut numbers like these cute felt numbers.) After cutting the designs from heat transfer vinyl, you will need to remove the excess vinyl from around the design and then iron the numbers onto the pockets. If you are new to working with heat transfer vinyl, check out my beginner’s guide to working with heat transfer vinyl here.
- Cut out felt ornament shapes. Next, it’s time to cut out the felt shapes for your ornaments. The cut files and printable templates are available in the supply list above. I used a Cricut Maker to cut the felt ornaments out, but you can also use a Silhouette Cameo 4 with a rotary blade. (My friend Alicia has a good tutorial on cutting felt with Cricut here.) Or, if you don’t have an electronic cutting machine, you can use the printable templates and cut the shapes by hand with a pair of sharp scissors. You will need to cut 2 felt shapes for each ornament, and you want a total of 24 ornaments. Glue the two pieces together to create a more sturdy ornament.
- Decorate ornaments. The cut files in the supply list above also include a decorative layer or design for each ornament. Cut these designs from a coordinating or contrasting heat transfer vinyl and apply them to the ornaments with your iron. Have fun decorating each ornament! Add rhinestones, trims, paint, or whatever other embellishments you like to personalize each one.
- Add Hook and Loop Ovals to Tree and Ornaments. Next, you will need 24 sets of VELCRO® Brand Sticky Back for Fabrics white ovals. I cut apart all of the hook ovals and positioned them on the tree to make sure they were evenly spread out before peeling off the backing and sticking them on. Next, I applied a loop oval to the back of each ornament. It is important to put the loop pieces on the back of the ornaments so they don’t get stuck to the felt when they are in their pockets. When storing your advent calendar, place a piece of scrap felt over the tree to protect the hook fasteners.
- Finish Dowel Rod and Hang. Finally, use a bit of glue to attach the dowel caps to the end of the dowel rod, wrap the tabs around the dowel, fill the pockets with your ornaments, and hang!
And that’s it! Your DIY felt Christmas tree advent calendar is all done and ready to be enjoyed all season long!
If you make your own advent calendar, then I want to see it! Share your photos to my facebook page or tag me on instagram (@persialou).
Happy Holidays and Happy Making!

Check out more Christmas craft ideas:
[the_grid name=”Christmas Footer”]


Let's Chit Chat!