Learn how to create embossed clay earrings using stencils made with your Cricut or Silhouette machine. This simple technique allows you to easily make beautifully textured clay projects. I will walk you through the process with my step-by-step video tutorial. A big thank you to Sculpey for sponsoring this project!

You guys know I love using my cutting machines. Of course, cutting paper and vinyl is always great, but maybe the thing I love most is finding new ways to create with my Cricut and Silhouette machines. And that’s exactly what we are doing here today – bringing the power of Cricut to the world of polymer clay with some really beautiful results.
In this post (with video tutorial!), I will walk you through the process of creating intricately embossed clay earrings using custom stencils cut with your electronic cutting machine.

I just LOVE the texture and pattern these earrings have. Aren’t they fun??
For this project (and truly for all of my clay earring projects), I used Sculpey Soufflé Polymer Clay. Soufflé has a beautiful suede finish after baking, and it is great at retaining fine details, which makes it perfect for this embossing technique.
Ready to make some earrings?
DIY Embossed Polymer Clay Earrings

As pretty as these earrings are, they are actually really easy to make, especially if you have some experience crafting with polymer clay. Before beginning, you will need to gather up some supplies.
Textured Earring Supplies:

- Sculpey Soufflé
- Cricut Maker or Silhouette Cameo
- Cricut Knife Blade or Silhouette Kraft Blade
- Craft Foam
- Acetate Sheets
- Clay Roller
- Circle and Tear Drop Cutters
- Craft Knife
- Rotary Tool or Drill
- Jewelry Pliers
- Jump Rings and Earring Posts
- Super Glue
- My Stencil SVG Cut Files or Your Own Design (You can download a ZIP file containing SVG, PNG, EPS, and DXF versions of my stencil designs by clicking HERE. These designs are free for personal use only. If you would like to use these designs for products you make and sell, you can purchase a commercial use license in my shop here.)
How to Make Embossed Clay Earrings
I have a detailed video tutorial to walk you through my process of making these earrings below, or you can keep scrolling for written instructions.
Step One. Create the Embossing Stencil.
The first thing you will need to do is cut your embossing stencils. If you like, you can download my free stencil designs from the supply list above, or you can create your own stencil patterns.
Open up your stencil design in your cutting machine software, and scale the design to the size you like. (My stencil designs need to be cut at a minimum of 4-5 inches wide.)
I used two different materials to create my stencils – craft foam and acetate sheets. Both work well, but there are some pros and cons to each. A craft foam stencil will give you a deeper imprint in the clay, but the lines may not be as crisp as the lines you get with an acetate stencil.

Place your chosen material on your cutting mat (I recommend a strong grip or high tack mat if using craft foam), adjust the cut settings accordingly, and send your design to cut.

After the machine has finished the cut, carefully remove your stencil from the cutting mat.
Step Two. Cut the Earring Pieces.
When your stencil is ready, it’s time to get kneading your Sculpey Soufflé! Take a few minutes to knead and condition your clay so it’s ready to work with, and then roll it out into a thin, even slab on your work surface.
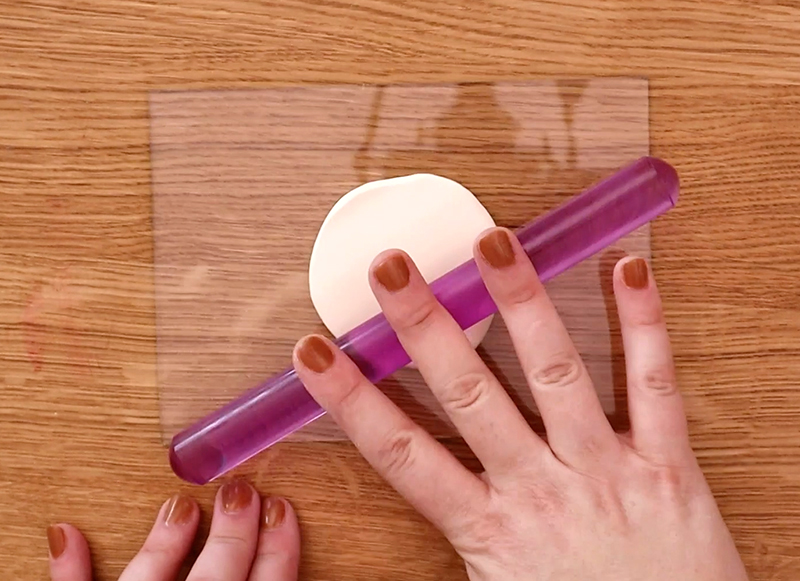
Next, place your embossing stencil on top of your slab, and use your roller to press the stencil down into the clay. At this point, you can brush on mica powder or paint to add color to the raised elements of your design if you like.

Carefully remove the stencil to reveal your embossed design.
Now, it’s time to cut out your embossed clay earring pieces. I used clay cutters and a craft knife for my cutters, but you can also use templates to cut any shape that you like.

If you do not want to drill holes for joining your earring pieces after baking, then be sure to use a needle to punch holes through the pieces now before baking.
Finally, use a blade to carefully lift your earring pieces off of your work surface and place them on a baking sheet lined with parchment paper.

Step Three. Bake.
When you have rolled, embossed, and cut all of your pieces, you are ready to bake! Sculpey Soufflé bakes in a 275° oven for 30 minutes per 1/4″ of thickness.

After removing your baked pieces from the oven, let them cool before moving on to assembly.
Step Four. Assemble the Earrings.
Next, it’s time to put all the pieces together into some cute new earrings!
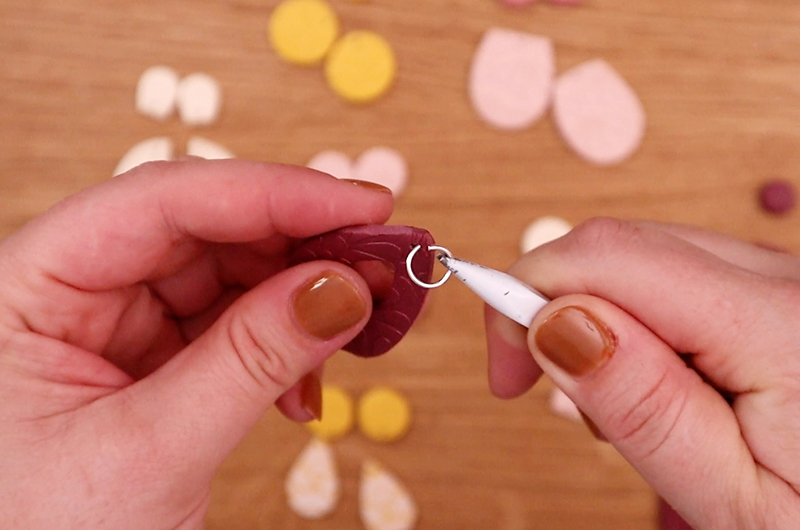
First, you will need to drill small holes in each piece to allow for jump rings to join them together. I used a small rotary tool for this and it worked just fine.

Next, use your pliers to open a jump ring and join two pieces together. When all of the earring pieces are linked to their partners, it’s time to add earring posts.
Just add a drop of super glue to the back of the top earring pieces to adhere the earring posts.
After the glue has dried, your earrings are all done and ready to wear!

So, what do you think? Aren’t the cute? Have you tried any Cricut clay projects yet? Do you need to make yourself some embossed clay earrings??
Until next time, Happy Making!

P.S. This is actually not the first time I have used an electronic cutting machine in my clay crafts, I have a whole post explaining how you can cut and emboss clay using a Silhouette Curio machine.
Check out more jewelry DIYs below:
[the_grid name=”Jewelry Footer”]


Comments + Project Love
ROSANGELA GARCIA says
Por Favor Aonde posso comprar esta maquina ?
Alexis Middleton says
Aqui: https://amzn.to/3bVFkER