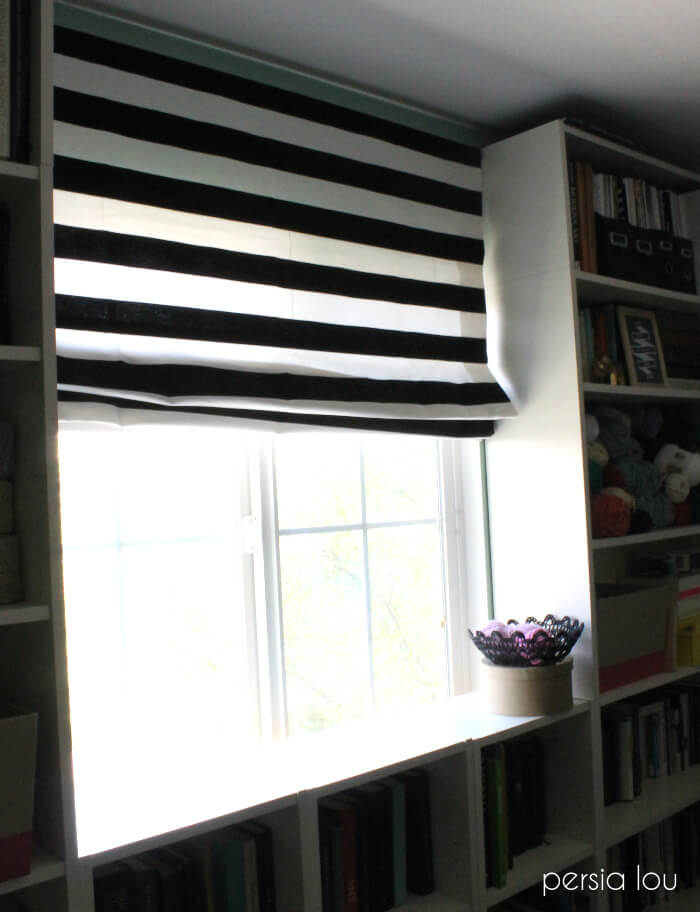
• Skip to primary navigation
  • Skip to main content
  • Skip to primary sidebar
  • Skip to footer
  • Craft & DIY
    • DIY Art Projects
    • DIY Home Decor
    • Free Printables
    • Kids Crafts
    • Paper Crafts
    • Silhouette Crafts
    • Vinyl Crafts
      • Vinyl 101
    • Friday Craft Club!
  • Celebration
    • Party
    • Gift Ideas
    • Halloween
    • Thanksgiving
    • Christmas
    • Valentine’s Day
    • St. Patrick’s Day
    • Easter
    • Fourth of July
  • Crochet
    • Crochet Patterns
      • Crochet Accessories
      • Crochet for the Home
      • Crochet for Kids
    • Crochet Stitches
  • Silhouette
    • Silhouette Studio
    • Silhouette Mint
    • Silhouette Curio
    • Silhouette Alta 3D Printer
    • Silhouette Deals
  • SVG Cut Files
  • SHOP
  • Nav Widget Area

    • Facebook
    • Instagram
    • Pinterest
    • YouTube

Persia Lou

Creative. Crafty. Fun.


Mini-Blind Shades

About a year ago we installed some Ikea Billy bookshelves in our little loft. We chose units to fit around the window, but it left an awkward foot or so of wall above the window that I didn’t like.
 
I had decided that I wanted to mound a roman shade to the wall that would cover up that space and make the window look taller. I had read through a few tutorials on how to make roman shades, and they were a bit intimidating. Then I saw this easy, clever idea, but I really wanted a functioning shade, so that was a no-go. Solution: turn my yucky mini blinds into a pretty shade! I followed the tutorial over at the little green notebook, and I really love the color they add to the room.
I chose the Amy Butler fabric because it picked up the wall color and the color of our desk chair. Plus, it’s just an awesome print, right? I bought the fabric from my friend’s online fabric shop, Christa Quilts. Check it out!
If you are thinking of tackling this project yourself, here are a few of my tips!
1. Taking the thing apart was confusing and a bit scary for me, so I thought I would point out the important string. You want to keep the one that runs through the center, the lattice that is used to tilt the blinds can be cut off.
 
2. Measure, measure, measure! I tried to make sure everything was measured exactly right, but one of my slats seems to be a bit off.
 
3. If you want to line your shade, don’t try to do it the way I tried to do it. That totally will NOT work. I first glued the blinds to my shade fabric, and then glued my lining fabric on the back, sandwiching the blinds between the two pieces of fabric. If you do it that way, your shade will not gather the way it should.
 
If you want to line your shade, you will need to add the lining fabric BEFORE gluing on the blinds. When I realized, my mistake, I just ripped the lining fabric off the back. I may redo it later, but for the moment my shade is remaining unlined.
Anyway, overall, I am very happy with my new pretty shades! I am working on a few more projects in our loft. Coming soon!
I’m linking up at Whatever Goes Wednesday at Someday Crafts, Hookin Up with House of Hepworths, What I Whipped Up Wednesday at Sugar and Dots, Friday Flair at Whipperberry, Weekend Show Off Party at Ladybird Ln, Friday Fun Finds at Kojo Designs, Party Mindie Style at the Hungry Hungry Hypo, Pity Party at Thirty Handmade Days, Nifty Thrifty Sunday at Nifty Thrifty Things, and Hoo’s Got Talent at Night Owl Crafting (which is totally appropriate since I finished this at two in the morning).

June 30, 2011 5:15 am Alexis Filed Under: Home Decor

Reader Interactions

Comments

  1. Arlene says

    June 30, 2011 at 3:18 pm

    Fun! They look great, as usual, you've done an excellent job!! Isn't it fun how a small change like this can make the whole room look "new". Enjoy your "new" room.

  2. PMG Smith Family says

    June 30, 2011 at 11:29 pm

    It looks fantastic! I actually just used the same tutorial recently for my master. http://frostedgingerbread.blogspot.com/2011/06/new-window-treatments-at-last.html <br /><br />So fun!

  3. Amy at Ameroonie Designs says

    July 1, 2011 at 5:09 pm

    The fabric is gorgeous! What a fantastic idea and I love how you hung it to cover that empty space- brilliant!<br />xoxo,<br />Amy

  4. [email protected] Natural Nester says

    July 1, 2011 at 8:45 pm

    The fabric is so beautiful! I&#39;m off to check out that tute at Little Green Notebook…this sounds like the perfect solution for my hideous bathroom window.

  5. Suburbsmama says

    July 2, 2011 at 6:24 am

    I love it! It looks beautiful.

  6. Kim of Mo'Betta says

    July 3, 2011 at 10:39 am

    I&#39;ve been thinking about trying this since roman shades are so expensive! Glad to have your tips! Shade looks great and really adds to that space. Visiting from Bacon Time…

  7. The Autocrat: Haley says

    July 4, 2011 at 3:58 am

    Whoa! Thanks for the instructions! Lovin&#39; your fabric selection!

  8. Ladybird Ln says

    July 5, 2011 at 10:39 pm

    These turned out great! I have a project like this on my list! I am going to show this off on my blog later today!<br /><br />Carlee<br />www.ladybirdln.com

  9. cheryl says

    July 5, 2011 at 11:57 pm

    this looks fantastic. I&#39;ve seen this around a little – but your tips were great. thankyou.<br />thinking of tackling this one very soon.<br />cheers,<br />cheryl xox.

  10. [email protected] says

    July 7, 2011 at 3:44 am

    This looks amazing! Thanks for the tips…pinning this!

  11. {nifty thrifty things} says

    July 8, 2011 at 10:31 pm

    This turned out great!!<br />Thank you so much for sharing this @ <a href="http://niftythriftythings.blogspot.com/search/label/nifty%20thrifty%20sunday&quot; rel="nofollow">{nifty thrifty sunday}</a> last week!<br />I can&#39;t wait to see more from you on Sunday!<br />xoxo,<br />Vanessa

  12. Daniel says

    September 13, 2011 at 6:22 am

    Thanks for Posting!!<br />Nice Blog.<br />Window Blinds UK has become one of the leading manufacturers of blinds in the UK.<br /><a href="http://www.windowblindsuk.co.uk/&quot; rel="nofollow">Blinds</a>

  13. Waseem says

    May 19, 2012 at 6:38 am

    best fabric you choose..like it…it make the whole room beautiful.<br /><br /> <a href="http://www.worldclassco.com&quot; rel="nofollow">window shutters clayton, ca</a>

Primary Sidebar


Looking for Something?

FAVORITE POSTS

crochet cat slouch hablack cat hat - free crochet pattern (with video!) from persia lou
Make your own emoji lapel pins from shrink plastic. So fun to make, wear, and gift! Free printable cards for gifting.

Footer

Content Sharing Policy

First off, thank you so much for being here! I would be so honored if you would like to share one of my projects, but please only use one or two photos and be sure to link back to the original post. Thank you!

If you see anything here that has been improperly credited, please let me know and I will fix it right away. You can email me at [email protected]

  • Home
  • About Me!
  • Disclosures and Privacy Policy

© Copyright 2016-2019 persialou.com · Theme by: PDCD