
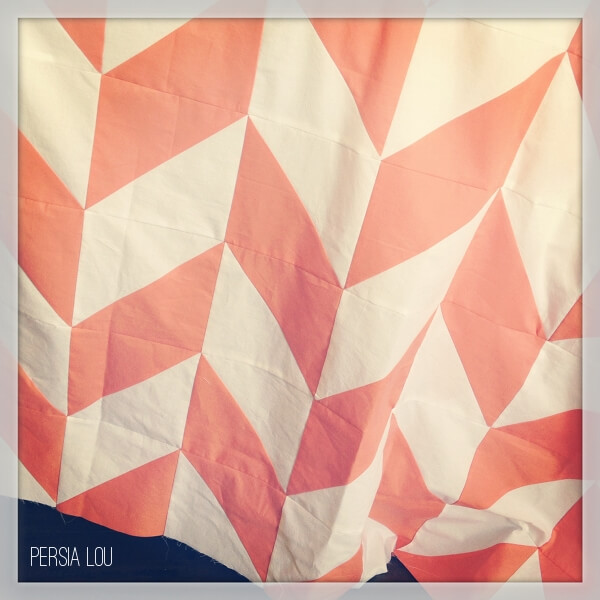
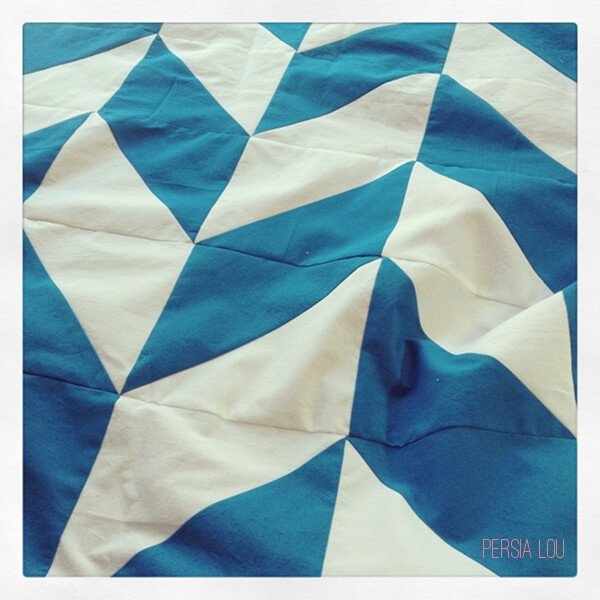
One of the big projects I have been working on as part of the larger new kids’ room project is making two twin-sized quilts. I knew that I wanted to make two quilts in the same pattern but different colors – one for my son and one for my daughter. I wanted to do something simple and graphic.
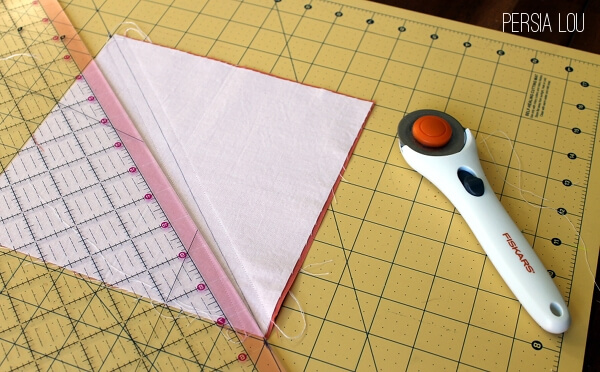
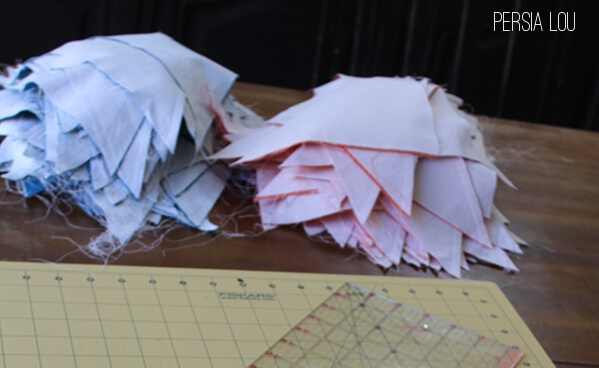
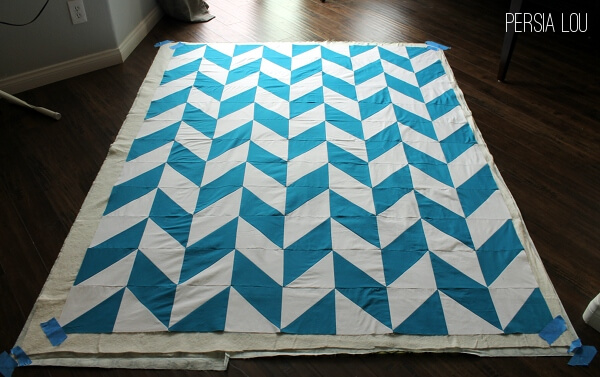
Originally, I was thinking I would do chevron or zig-zag quilts, until I saw this herringbone quilt by Craftyblossom (who makes and sells the MOST amazing quilts. Seriously, check her out.) And I immediately knew I was switching to a herringbone pattern. I had already bought fabric, but it was no big deal, because the herringbone pattern uses half-triangle squares just like a chevron pattern, but just twisted a different way.
- three yards each of the solid fabrics for your herringbone pattern (I used Kona Cotton White
 , Kona Cotton Teal Blue, and Kona Cotton Melon)
 - five yards for the backing (this needs to be pieced together lengthwise and you will have some leftover – I used Amy Butler Lark Dreamer Charisma in Midnight Blue for the backing on the coral colored quilt and Amy Butler Midwest Modern Honeycomb in a green color that doesn’t seem to be available any longer for the backing of the teal quilt.)
- 3/4 yard for the binding (I used a yellow fabric for the coral quilt and orange for the teal)


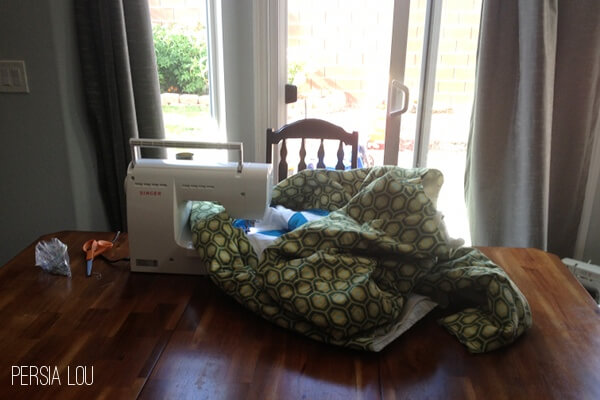
Roll her up, and you are ready to start quilting that beast. I’ve never quilted anything this big, and while it is not the easiest thing I’ve done, it is doable.

So, this is where I am spending my spare time right now:


Comments + Project Love
Brandi says
They're both gorgeous. You and your mom make a great team!
Alexis @ persia lou says
Thanks so much! I am definitely lucky to have a mom who likes to quilt!
Jenna LaFevor says
You did an AMAZING job!! They are just beautiful! I love herringbone patterns! Jenna @ <a href="http://www.rainonatinroof.com" rel="nofollow">Rain on a Tin Roof</a>
Alexis @ persia lou says
Thanks, Jenna!
Christina iGottaCreate says
Love the herringbone pattern! I just pinned it :)<br /><br />Thanks so much for linking up at I Gotta Create!<br /><3 Christina
Alexis @ persia lou says
Thanks, Christina!
Marni @ Haberdashery Fun says
Hey. Just found your blog from one of the link parties.. I can't remember which one – LOVE this!! Thanks for sharing. Super cute
Alexis @ persia lou says
Thanks so much for stopping by, Marni!
Michelle Hargreaves says
These are going to be so adorable! Quilting intimidates me a little, but I'm about to give my first one a try. :)<br /><br />xoxo<br />Michelle<br />Ya Gotta Have a Hobby
Chaney @ May Richer Fuller Be says
Thanks for stopping by my blog today! I've been having fun checking out some of your recent posts – you're so creative!! I'm so impressed by your skills! Have a great weekend :).
Alexis @ persia lou says
Thanks so much, Chaney! I've loved checking out your projects too. And I've seen them featured around blogland too! Great work. 🙂
A Momma says
Alexis, <br />I love these. I saw your finished quilting on fb. I love it! I'm totally obsessed with modern quilts right now. Excellent work!<br />Can't wait to see that finished retro Disneyland room. I LOVE 1950-60's Disney. I had a bunch of old Disney posters in my room at BYU. Nerdy to most, but you would have dug it.<br />P.S. This is random, but every time I see Alice in
ChristaQuilts says
I can't believe how fantastic these are turning out! Well.. actually I can believe it because you are so talented and crafty!!
ChristaQuilts says
These turned out so fabulous! It makes me want to make one all over again!
Sarah says
Awesome! I never thought of a herringbone pattern with triangles! I just did a sort of chevron one in my Etsy shop, but this looks fun!<br /><br />Don't you just love trying to quilt huge quilts on small machines? lol
trikatykid says
Love the quilts and I love how you used contrasting colors/prints for the backing. I just made my first herringbone, and I used much of your tutorial for guidance. I am using your quilting technique because I love the way it follows the herringbone. Anyway – I started mine this morning (it's a toddler-sized quilt) and it has already reached the point of quilting!!! I love it. 🙂 Thanks for
Alexis Middleton says
Thanks so much for your kind comments. Small quilts for kids are the best because they work up so quickly. Good luck with the quilting. I hope you just love it when you are all done. I'd love to see it!
Katy Murray says
I don't know if my last comment went through. Just wanted to make sure you knew that I absolutely love the quilts you made (I presume for your kids) – the colors and the contrasting printed backings. I just made my first herringbone quilt based mostly on your tutorial. I love the way you chose to quilt it and I am in the process of adding the 1/2 in and 1 in to it.. (already did the 1/4 in on
Random Thoughts Tracy says
Thank you so much for this amazing tutorial! My father in law was a missionary pastor, he passed suddenly 14 years ago. We stored his suits this whole time. I decided to make a quilt utilizing them. Wanting something modern yet classic your tutorial was the perfect fit! It turned out great! <br /><br />Thank you for your time to post this!!!
Alexis Middleton says
Thanks, Tracy! What a great idea for a quilt and a great way to honor your father-in-law and his work! I will go check out your instagram pics right away. 🙂
Random Thoughts Tracy says
I'll be posting to my Instagram, tracybugcreative
Bekah Boys says
Hi there, found your blog through Pinterest and LOVE this quilt. I am trying to recreate it as a toddler sized quilt. The problem I seem to be running into is my corners are not lining up. Did you have this problem at all? Any idea of what I may be doing wrong? Thanks!
Alexis Middleton says
Hi Bekah! Thanks for stopping by!<br /><br />It can be tricky to get the corners to line up perfectly. If they are just a bit off, I would say just go with it. By the time the whole thing is pieced and quilted, I don't think you will notice. If you look at my tops you will see some less than perfect corners. If it is really bugging you though, I would recommend that you make sure all of your
Celia Kynes says
I am working on a herringbone quilt after seeing your beautiful quilts. I have a question, when piecing after making all the two colored squares, did you then piece the long strips down the quilt, or did you piece across, or big squares? What was your method for attaching all the small two colored squares together?
Alexis Middleton says
Hi Celia! I pieced my squares into rows first and then sewed the rows together. Good luck!
Amy says
Hey, I was wondering where you bought your fabric! I love the ones you chose. Thanks!
Jacey Murphy says
Hi`,<br />I have never quilted before. But I am obsessed with this quilt. I am clearly missing something. Why do you need more yardage and squares of the white than of the coloured? Don't you want all the squares to have both colours on them? Or did you do a border?
Alexis Middleton says
Hi Jacey! I only had twice as much white because I made two quilts. If you are only making one you will need an equal amount of white and your other color. 🙂