If you have orange peel or textured walls, you know how difficult it can be to get perfect paint lines. Today, I’m sharing my favorite products and best tips for getting perfectly crisp paint lines the first time around. This is a sponsored post written by me on behalf of FrogTape®. All opinions are 100% mine.
We moved into a new home a couple of months ago, and since then there has been A LOT of painting going on. Paint is definitely the easiest and most inexpensive way to quickly transform a space, and we have absolutely been putting it to work in our new home. Most of the house has been getting a fresh start with a coat of bright white paint, but there are a few spaces in the house I wanted to use paint to bring in some color. One of those spaces is the powder room, which has been our most recent project. Here’s the very yellow before:
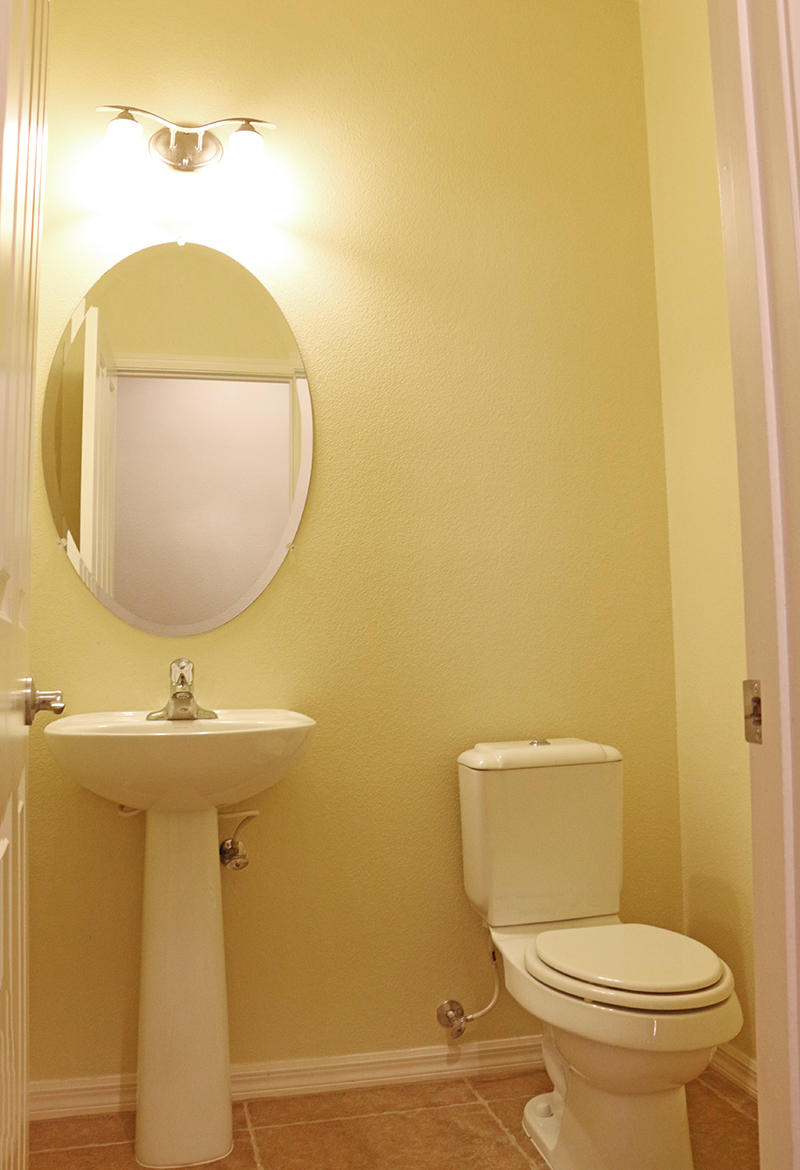
It’s a small room – about 5′ x 5′ – with no windows, pale yellow paint, beige tile, and yellow lighting that made the whole space feel a bit cavelike and jaundiced. I wanted to brighten the whole thing up and bring in more contrast, color, and storage (because where am I supposed to put toilet paper or extra towels in this bathroom??). And, guys, I really love the way the room turned out. Like really love it. Is it weird if your powder room is your favorite room in your house? Asking for a friend… ?
Anyway, I will have a full powder room makeover post coming soon with more details about the room, but today, I just want to talk about the paint in this space and share my very best tips and tricks (plus my favorite product ever) for getting perfect paint lines – even on textured walls – the very first time.
The plan was to paint the walls white and the ceiling and top foot and a half of the wall a dark navy. Because the room is so small but still has pretty high ceilings, it always felt like a tall, skinny box to me. I thought painting the ceiling dark and lowering that color down the wall a bit could combat that sensation and add some architectural feeling to the room. But to really achieve that architectural look I needed a really crisp paint line, and our house has lightly textured orange peel walls, which can make that a bit of a challenge. Time to bring in my secret weapon: 
Frogtape! Seriously – if you want perfect paint lines, you need great tape, and I love Frogtape Multi-Surface because it just works. Frogtape is treated with patented PaintBlock® Technology, which is a super cool, super-absorbent polymer that reacts with the water in latex paint to form a micro-barrier that seals the edges of the tape. All of that means that your paint won’t bleed and you can avoid extra time doing touchups. I have a few simple tips to help you get the best results. Let’s do this! 
How to Get Perfect Paint Lines even on Orange Peel Textured Walls
- Measure and Mark a Level Line. Whether you are painting stripes or just dividing up the wall, you need to start by marking off where your line will be. You can use a chalk line or laser level for this, but we went old school with a simple pencil and ruler/level. We started out by painting the walls a bright white leaving the ceiling and about the top 12 inches the yellow color. Next, I used my handy ruler/ level to mark 18 inches from the ceiling about every few inches along the wall. Then I used my level and pencil to lightly trace a level line along the marks.

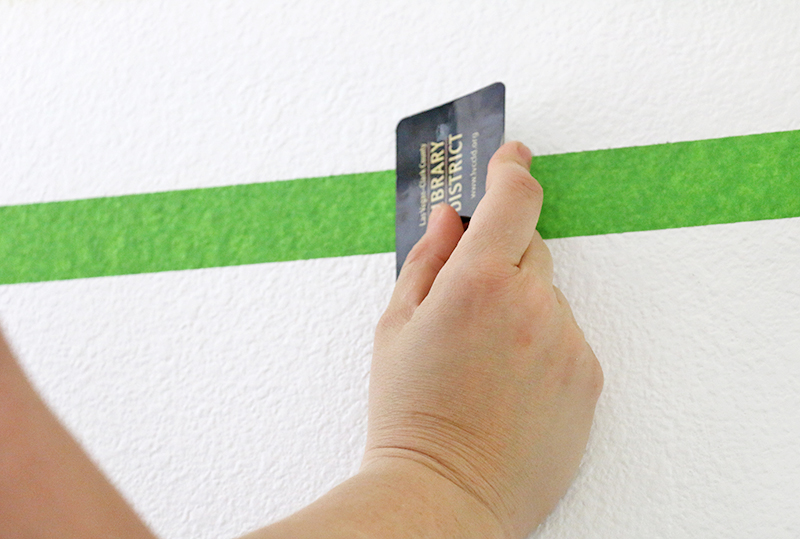
- Tape Along Your Line. Next, grab your Frogtape and apply it to the wall so the top edge of the tape lines up with your penciled line. You can apply it straight from the roll if you feel comfortable doing it that way, or rip off smaller pieces and apply them along the line. Just make sure you keep your tape lined up with your level pencil mark.

- Burnish the Tape onto the Wall. This step is really key to getting that crisp paint line. Go over the top edge of the tape and rub it firmly onto the wall. I started by using an old credit card to really bond the tape to the wall. Then I went back with my fingers and pressed along the edge to make sure I had a strong seal. I think this step is extra important with orange peel walls like these. You really want the tape to stick down over every little bump on the wall. It does take a few extra minutes, but it will be worth it when you peel off that tape! (If your walls are heavily textured, this technique may not work for you and you may want to check out FrogTape Textured Surface.)

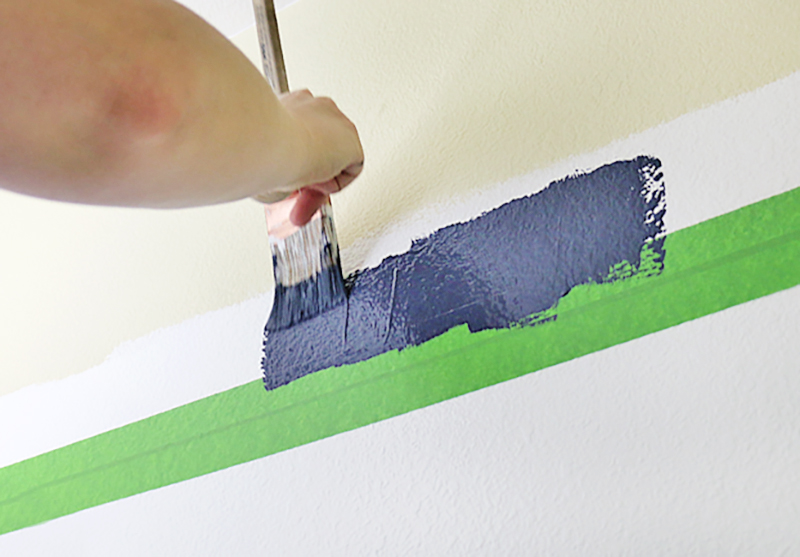
- Paint Away from Tape. When you are painting over your tape line, I recommend always pulling your brush or roller up over the tape edge rather than pushing the brush or roller down towards the tape edge. It’s a simple thing, but I think it makes a difference.

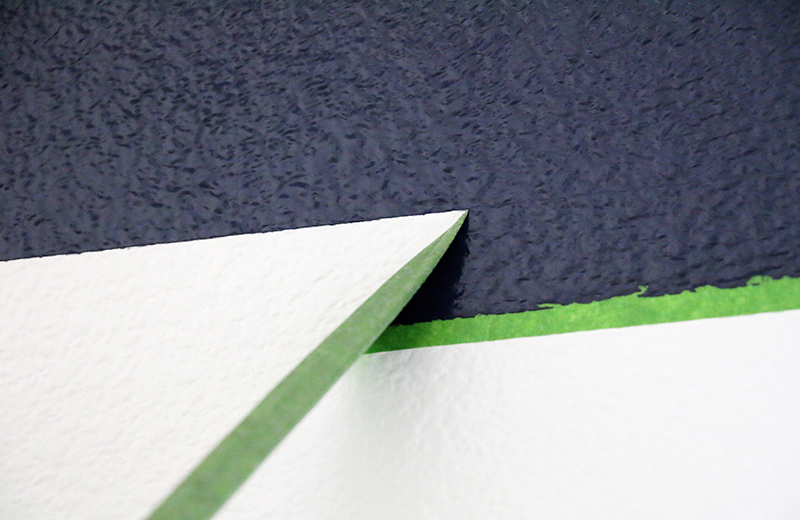
- Remove the Tape while the Paint is Wet. If you can, try to remove your tape before the paint has completely dried. This helps to prevent any paint from sticking to the tape and peeling off the wall. Remove the tape slowly to reveal your perfect line!


And that’s it! Its a simple way to add some color and interest to a room. I have never painting a ceiling before, but I really love the feeling it gives this room and can’t wait to try it in more spaces in our home. Our new powder room is seriously my new favorite space in the house thanks to it’s new paint job and all of the other little details we have brought in.  I think it really fits in perfectly with the 2017 FrogTape® Design Trends. I especially think the space emulates the Haute Handmade and Inter-Woven trends, which happen to be my favorites, so I guess I did okay. Ha! It has several DIY touches – like our two-toned walls and DIY shelves – and the space gets lots of visual texture from elements like the woven basket and patterned tile floor. Be sure to check out Frogtape on Instagram, Pinterest, Twitter, and Facebook for more DIY and decorating ideas.
So what do you guys think about the two-toned wall and the painted ceiling? Would you try it in your home? Tell me all about it!
Until next time, Happy Making!

![]()


Comments + Project Love
Arlene Harris says
Awesome job, Alexis… Looks great
Alexis says
Thank you! We are really enjoying it. 🙂
Amy | Delineate Your Dwelling says
I LOVE the idea of painting the ceiling!!! Now I want to steal if for our new house! Pinned this.
Alicia says
Beautiful! I especially love that sweet vanity–would you mind sharing the source? 🙂
Alexis says
Hi Alicia! We got it at home depot on sale, but I can’t find a link on their website. Sorry I’m not more help!
Alicia says
No worries, I’ll check my local store. Thanks for the tip!
Sandy says
You are amazing and I so enjoy the tips you give and the creative side you have. I forwarded this to my grand-daughter she is an avid DIY and feel she will love your site.
Alexis says
Thanks so much, Sandy! I really appreciate it! <3
Car Sok says
I also had the problem of a really high ceiling in a bathroom. I painted the walls a pale gray and then came down and brought the ceiling white down but also put molding around the bottom of the white. Made a difference in that the room didn’t look so cavernous anymore.
Alexis says
Yes! It feels so weird when the ceiling is so high, especially in such a small room! Sounds like your room turned out great. I love what you can do with paint! Thanks for stopping by and leaving me a comment. 🙂
Laurel says
What blue and white paint colors did you use?