• Skip to primary navigation
  • Skip to main content
  • Skip to primary sidebar
  • Skip to footer
  • Craft & DIY
    • DIY Art Projects
    • DIY Home Decor
    • Free Printables
    • Kids Crafts
    • Paper Crafts
    • Silhouette Crafts
    • Vinyl Crafts
      • Vinyl 101
    • Friday Craft Club!
  • Celebration
    • Party
    • Gift Ideas
    • Halloween
    • Thanksgiving
    • Christmas
    • Valentine’s Day
    • St. Patrick’s Day
    • Easter
    • Fourth of July
  • Crochet
    • Crochet Patterns
      • Crochet Accessories
      • Crochet for the Home
      • Crochet for Kids
    • Crochet Stitches
  • Silhouette
    • Silhouette Studio
    • Silhouette Mint
    • Silhouette Curio
    • Silhouette Alta 3D Printer
    • Silhouette Deals
  • SVG Cut Files
  • SHOP
  • Nav Widget Area

    • Facebook
    • Instagram
    • Pinterest
    • YouTube

Persia Lou

Creative. Crafty. Fun.

Felt Ruffle Pillow Tutorial

So. Here’s the second installment of my pillow fight campaign. I just love this little lady, and she was so easy to put together. I love a quick, easy project with big impact. Don’t you?
Here’s what you’ll need:
  • Wool felt cut into four pieces [two 18’x18′ squares, one 5.5’x 26.5′ rectangle, and one 8.5’x 26.5′ rectangle – If you want your pillow to be more rufflely (that’s a technical term), then make your rectangle pieces longer, maybe 30 inches long.]
  • A pillow form [17 inches square]
  • Thread in a matching color
That’s it!
Start by stacking the two rectangles on top of each other so that the center line of the rectangles matches up. You could fold the rectangles in half and mark the center line to get it exactly, but I just eyeballed it.
Next, sew along this center line using a long basting stitch (a 4 or 5 on your sewing machine). Once you have stitched down the center line, stitch another line of stitches on either side about a quarter of an inch away from the center line. This will give you a total of three lines of basting stitches running down the center of your rectangles (see the image below). The three lines of stitches will make it easier for you to gather the thick fabric without breaking your threads.

Now, you need to separate the top threads from the bobbin threads on the bottom. Once you have separated the top threads from the bottom threads, you will pull on just one set of threads (either the top or the bottom). As you pull on the threads, your rectangles will gather into a ruffle.

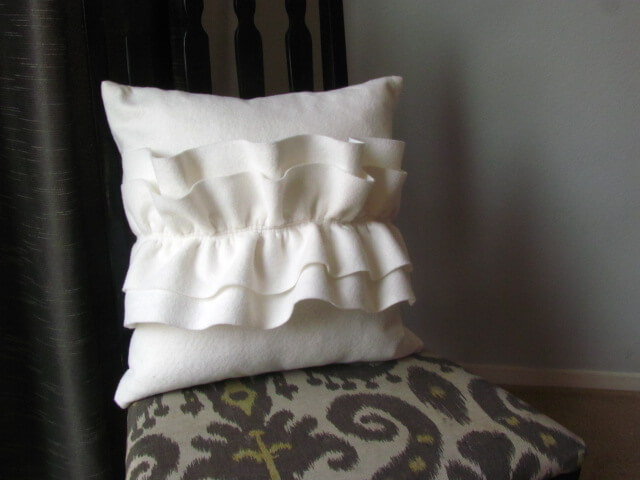
Use your fingers to move the fabric along your threads and evenly distribute your ruffles. Once your ruffles are 18 inches long (the length of the two squares), pin the ruffle to the center line of one of your two squares. Sew  the ruffle to the pillow along the center line of basting stitches using a basic stitch length (about a 2).

Pin the two squares together with right sides facing, and sew three sides together leaving a 1/2 inch seam allowance. Clip the corners, and turn the pillow right side out (For more details and images of this step see this post).

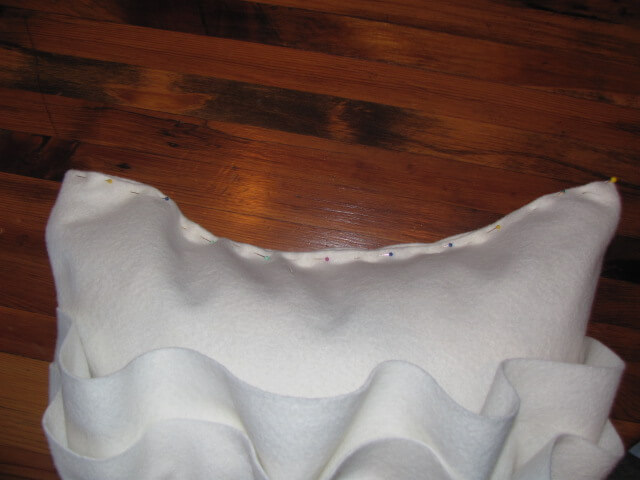
Stuff the pillow form into your case. Fold over a half inch seam allowance on the open side, and pin together. Sew shut using a slip stitch.

Enjoy your simple, pretty, ruffley pillow!

The Girl Creative

April 7, 2011 7:00 am Alexis Middleton Filed Under: Home Decor

Reader Interactions

Comments

  1. Two Shades of Pink says

    April 8, 2011 at 1:23 am

    This pillow is so understated yet incredibly pretty. 🙂

  2. Tara says

    April 8, 2011 at 4:32 am

    As soon as I clicked on this blog, I knew I was a goner. You are my crafty/interior design hero. That pillow is exactly what I've been wanting to make for a long time but I didn't know how to sew ruffles, so THANK YOU for breaking it down for me! It's gorgeous!

  3. persia lou says

    April 13, 2011 at 6:09 pm

    Thank you so much for the comments!<br /><br />Tara, I hope it is helpful!

  4. kate says

    April 14, 2011 at 12:48 am

    This is gorgeous! A perfect ruffle!

  5. Malinda Jane Sieg says

    April 27, 2011 at 5:27 am

    So beautiful!

  6. arrin says

    May 2, 2011 at 6:52 pm

    Love it!

  7. Ladybird Ln says

    June 2, 2011 at 2:10 am

    I just love this pillow, you have so many fun pillows! I am having a PILLOW FIGHT on my blog {contest for charity} as well and would love it if you would consider joining us! Link below!<br /><br />Carlee<br />http://www.ladybirdln.com/2011/05/pillow-fight-for-causepart-1.html

  8. Vicky says

    September 9, 2011 at 1:09 am

    I love it! Found you on Pinterest I&#39;m your newest follower stop by for a blog visit!

  9. Summer says

    September 20, 2011 at 9:35 pm

    Love these! I&#39;ll be featuring this on my blog on Thursday! Sumo:)

  10. Northwest Texas says

    September 29, 2011 at 3:16 pm

    Oh I do love this pillow! I am your newest follower. Your blog is wonderful and I&#39;m glad I found it via Pinterest.<br /><br />Kindly, Dana

Primary Sidebar

Looking for Something?

FAVORITE POSTS

simple crochet star Christmas ornaments - free pattern
crochet feather and fan baby blanket - free crochet pattern

Footer

Content Sharing Policy

First off, thank you so much for being here! I would be so honored if you would like to share one of my projects, but please only use one or two photos and be sure to link back to the original post. Thank you!

If you see anything here that has been improperly credited, please let me know and I will fix it right away. You can email me at persialou@gmail.com.

  • Home
  • About Me!
  • Disclosures and Privacy Policy

© Copyright 2016-2019 persialou.com · Theme by: PDCD