Learn how to make a DIY tire coffee table with this simple step-by-step photo tutorial. It is so easy to make your own beautiful upcycled tire table for your patio or outdoor space! This post contains affiliate links, which help to support this site at no extra cost to you.
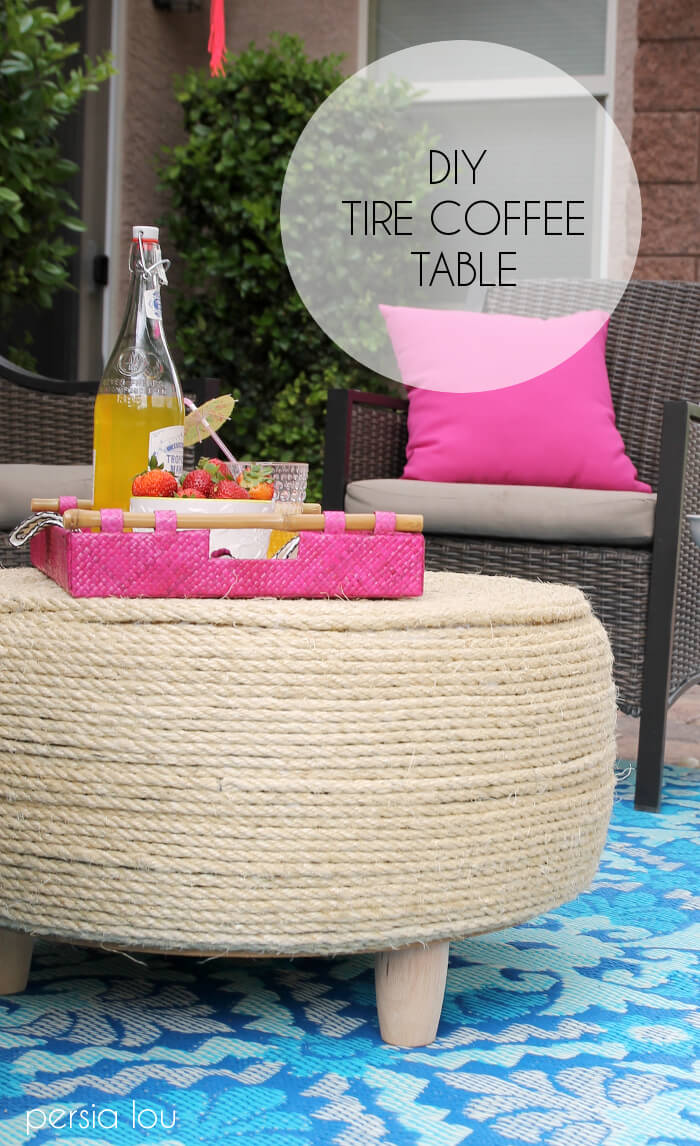
When we were working on putting together our Outdoor Living Room Update, we really needed some kind of coffee table or ottoman to make the space work. It’s kind of magical how a pretty coffee table can transform a collection of chairs into a living space.
I wasn’t sure if we wanted to buy or DIY, but then I remembered the recycled tire coffee tables and ottomans I had seen floating around Pinterest. I thought that could be a great outdoor solution, so we gave it a go!
Luckily, my dad is a borderline hoarder collector who specializes in old broken down Nissans, so coming up with a tire to recycle was pretty easy. The finished table looks great in our space and was fairly easy to put together, so I’m calling it a WIN.
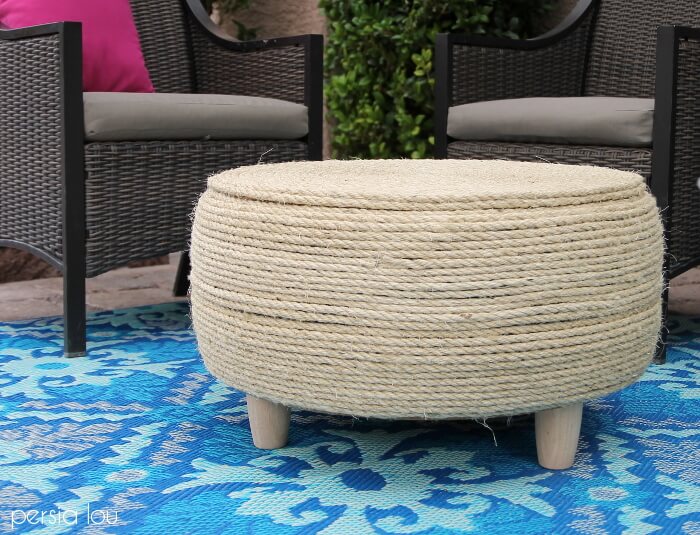
It did not turn out exactly perfectly (you can see how the rope goes a bit wonky around the indents in the tire tread), but I think it’s still pretty good. I thought about painting the feet and maybe the bottom few inches white or another color. What do you think? Should I go for a dipped look or leave as is?
DIY Tire Coffee Table
There are lots of similar tutorials out there, but here is how we put together our DIY tire coffee table. (I found this article helpful when creating our tire table.)
Tire Coffee Table Supplies:
- Old Tire
- 1/2″ Plywood (a 2’x4′ piece worked perfectly) (I actually used MDF, but plywood is better for outdoor use.)
- Jig Saw
- Drill
- Screws
- Furniture Feet
- 3/8″ Sisal Rope (I used about 250 ft)
- Construction Adhesive
How to Make your own Tire Coffee Table
Okay – who’s ready to turn a dirty old tire into a beautiful table?? Let’s do this!
Step One. Clean Tires.
The first step is to clean that tire off. Guys. Old tires are GROSS. This may be super obvious, but you do not want to be putting your hands all over a dirty tire. Plus all the dirt will make the adhesive less effective. So really hose that sucker off and let it dry before getting started.
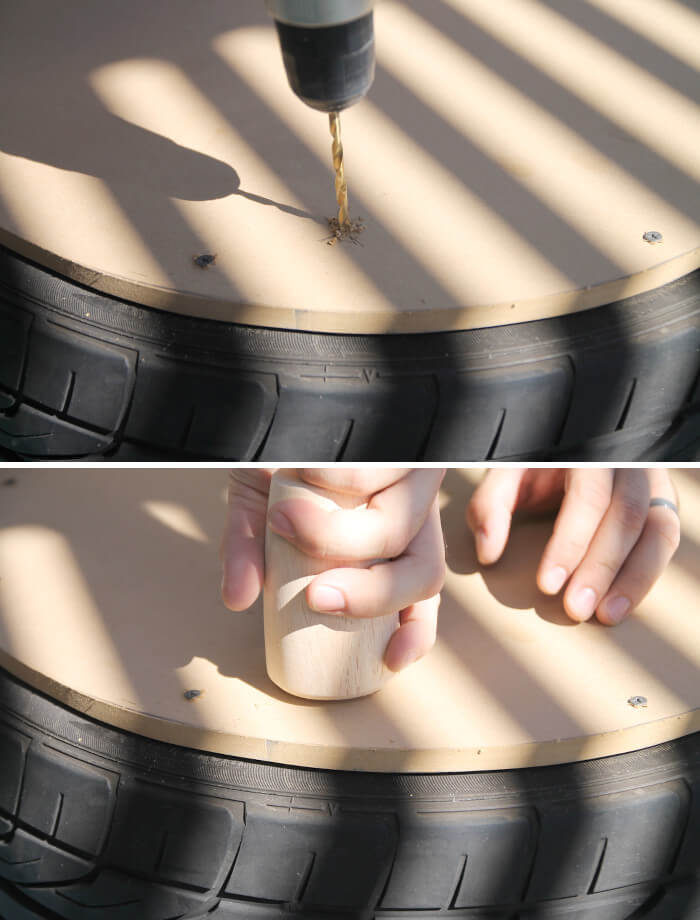
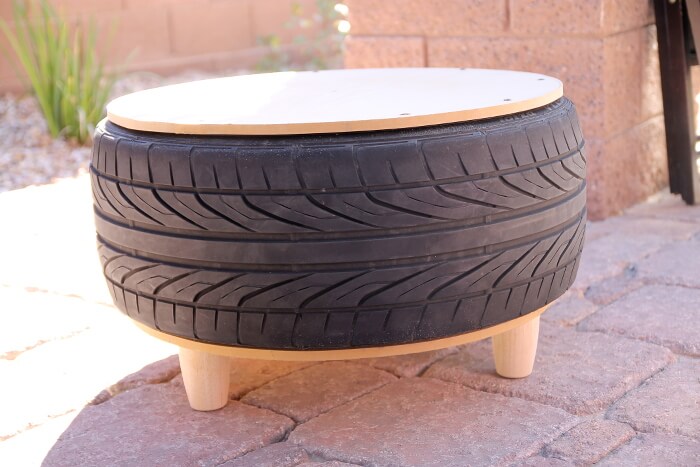
Step Two. Assemble Base.

Next use your jig saw to cut two round pieces of plywood the diameter of the tire. As you can see my circle is not perfect, so don’t stress too much if yours goes a little wonky too.
Screw one piece of plywood onto the top and bottom of the tire.

Next, it’s time to screw the furniture feet into the bottom of your table.
I only purchased three furniture feet, because I liked the look and they were sold individually at my local home improvement store and I was being cheap. 😬
To get a stable table with only three feet, you need to carefully measure out the positioning of the feet to make sure they are so evenly spaced. Next time I make a tire table, I think I would splurge on four feet to make things a little easier and more stable.
When the placement of the feet was all measured out, we drilled holes slightly smaller than the screws on the feet and thenscrewed the feet into the bottom of the table.
Ta DAAA! The base of the table is all done!
Step Three. Wrap with Rope.
Next up, time to wrap your tire table in pretty sisal rope! We spent a couple hours with some rope and glue covering that all up.
Here are a few tips to help you with your DIY table:
- It’s important to try to start your rope off in the dead center of the table top. I would recommend taking a minute to measure and find the center. We were a bit off, so the rope isn’t wrapped perfectly, but it worked okay.
- Be sure to wear gloves with this adhesive. You will have to really hold the rope in place, especially for those first few tight rounds.
- I recommend finding a buddy to help you wrap your rope. I really appreciated having two people working on this table because we could just pass the rope around to the other side.
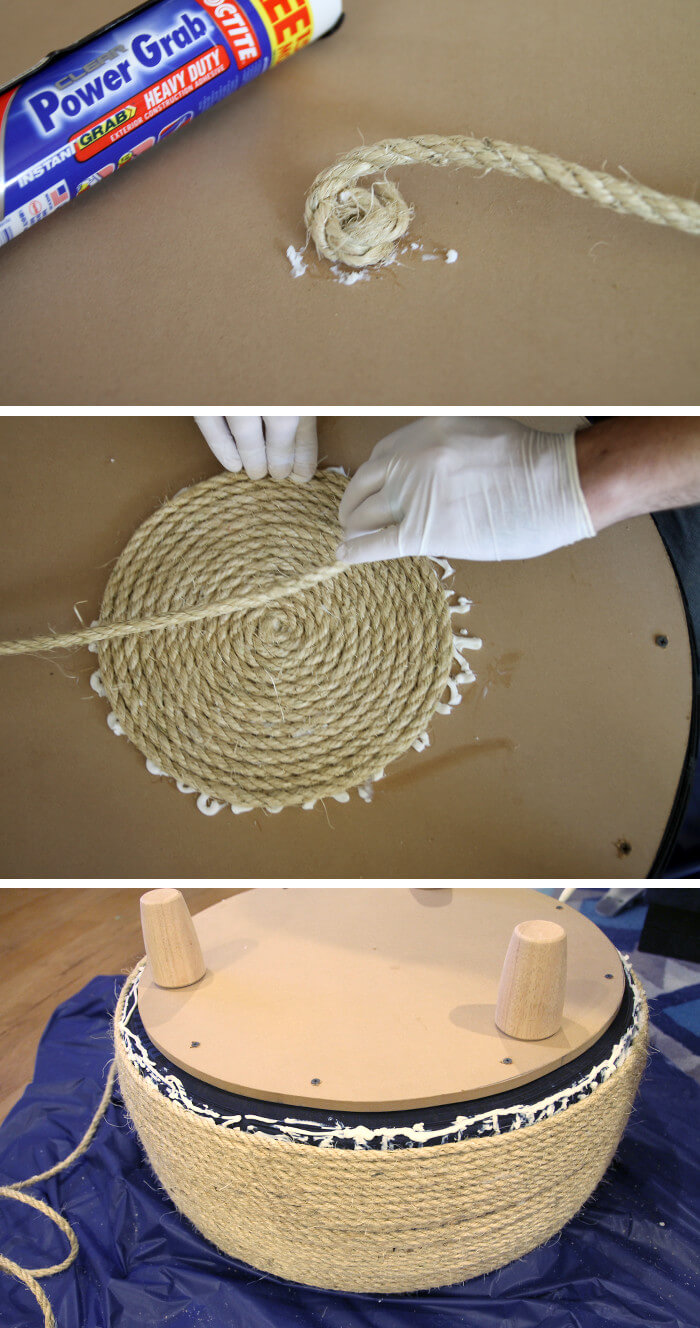
Just keep wrapping and gluing, wrapping and gluing, and pretty soon – you’re done!
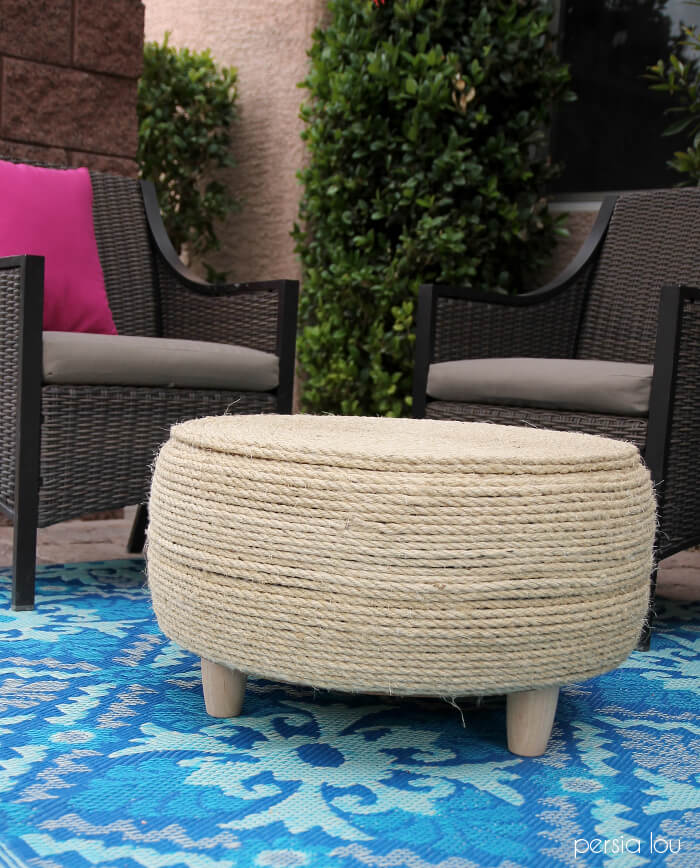
Our new table is the perfect place to put your feet up and relax at the end of a hot Summer day.

What do you think? Have you ever made any kind of recycled tire project? Is this something you would try?
Until next time, Happy Making!

Check out more of my home decor projects here:
[the_grid name=”Home Dec Footer”]


Comments + Project Love
Shirley Turley says
Boarderline Hoarder? Hahaha! Thanks for the humor… and for the awesome table. I love it and your outdoor space. I say leave it the way it is because I think it’s perfect.
Theresa @DearCreatives says
Love how this project turned out.
persialou says
Thanks, Theresa!
Rudolf says
Super-Duper blog! I am loving it!! Will be back later to read some more. I am bookmarking your feeds also.
Yvonne says
This ottoman looks great but I think you made a mistake. MDF is not suitable for an outdoor space, it will soak up rain like a sponge. I don’t know how much weatherproofing the rope adds but I have a feeling this will have disintegrated by the end of the season. The tutorial you link has it right, plywood. Plywood won’t last forever but it will have a bit of longevity. I’m not trying to be mean just thought you should know you’ll need to protect it from the elements.
persialou says
Hi Yvonne, thank you for your comment I appreciate the input and hope it is useful to others. I live in the desert where we get very little rain, and the ottoman is kept under a cover, so I’m not so worried about rain. Thanks again.
Olivia says
How rude, I think it’s a great idea just as you have done the project. Ivonne should have the intelligence that people put their patio furniture under a covered patio section or in the garage over the winters month. Common sense! Your projects are super. Keep going just as you are perfect.
Mary says
Olivia, I actually find Ivonne’s tip very helpful and not rude at all. We live in Colorado and the weather here is unpredictable and we do not have a covered patio area. Obviously it will be stored in the garage during the winter months but again it can just suddenly rain and hail during Spring, Summer and Fall.
So, thank you Ivonne for mentioning this! Your tip will help me save money, time and frustration in the long run!
wendy says
Beautiful. I might even give it a go. Great instructions. I would leave the legs natural
Janna says
Hi! I’m actually getting ready to make one of these and was wondering if the glue holds long term or should I use screws?
Alexis says
The glue holds the rope in place well long term, but use screws to attach the plywood and legs to the tire. Good luck! 🙂
Mary T says
I’m in the middle of making one of these. I should be done soon. I just put it down for a few minutes that turned into a few days, and then weeks got away. I’m half way done with mine…
Siziwe says
I have made few of these ottomans and sold them
Alexis says
Awesome!
Emily says
Where did you get the rope?
JOSEFA says
HERMOSO….!!!! LA PONDRÍA EN EL INTERIOR CON VIDRIO…GENIAL!!!
Kathy says
do you put anything on the outside to seal it? I am thinking about doing this for inside and another one for outside, however i think I am going to paint it with chalk paint – any experience with chalk paint and tires?
I have two Indy racing tires so they are smooth. =)
Louise Ulrich says
Hi
Your sisal tire ottoman looks great. How long did it take you to make?
Louise
Beth says
What size rope did you use? I was going to purchase 1/4 inch rope… is that big enough?