• Skip to primary navigation
  • Skip to main content
  • Skip to primary sidebar
  • Skip to footer
  • Craft & DIY
    • DIY Art Projects
    • DIY Home Decor
    • Free Printables
    • Kids Crafts
    • Paper Crafts
    • Silhouette Crafts
    • Vinyl Crafts
      • Vinyl 101
    • Friday Craft Club!
  • Celebration
    • Party
    • Gift Ideas
    • Halloween
    • Thanksgiving
    • Christmas
    • Valentine’s Day
    • St. Patrick’s Day
    • Easter
    • Fourth of July
  • Crochet
    • Crochet Patterns
      • Crochet Accessories
      • Crochet for the Home
      • Crochet for Kids
    • Crochet Stitches
  • Silhouette
    • Silhouette Studio
    • Silhouette Mint
    • Silhouette Curio
    • Silhouette Alta 3D Printer
    • Silhouette Deals
  • SVG Cut Files
  • SHOP
  • Nav Widget Area

    • Facebook
    • Instagram
    • Pinterest
    • YouTube

Persia Lou

Creative. Crafty. Fun.


DIY Double-Sided, Custom-Shaped Business Cards

Last week I was in Salt Lake attending SNAP!, a conference for creative bloggers. It was a great experience – I met lots of incredible people and filled my brain up with all loads of information – but, honestly, the days leading up to the conference were on the crazy side of hectic.
One of the things on my to-do list was making my business cards. As you can probably imagine, the business cards at a creative blogger conference are kind of a big deal. I could do a whole post just about all the awesome-sauce cards I collected (from coloring pages, to sugar cookies, to sand paper), but I’m just going to share what I did and how I made them.
I wanted to incorporate the new blog design into my cards, which meant I got to bust out my watercolors again. Yay! I painted a whole stack of 90 lb. watercolor paper in pretty pink and coral washes.
When the paper was dry, I stacked them up and put them under a heavy book to help flatten things out.
For my card design, I wanted to do some kind of shape. I was planning on using my Silhouette to cut them out, so I figured I might as well do something more exciting than a rectangle. Why not, right?
I designed a little abstract geometric shape, and put my logo onto of that for the front of the card.
Then I traced the outside of my shape to create the cut line, which was offset just a bit so the gray edge of the geometric shape would still be visible.
I wanted to put my contact information on the back of the card, and the trick was to print the information in the right spot on the back of the card. Here’s how I did it. I started off by saving my studio file for the front of the cards with a new file name. Then I deleted everything in the file EXCEPT for the cut lines.
I selected the cut lines, grouped them together to maintain the same spacing, and flipped them horizontally. This gave me a general idea of where to put my contact information.
Once I had my information placed, I deleted the cut lines. Since the cut placement was more important on the front of the cards, I cut from that file.
I would recommend doing a few test print and cuts on some cardstock and make adjustments if necessary. I ended up moving my contact information over just a bit to get it exactly where I wanted it.
Next up – it’s time to actually print and cut those cards! Whenever you are doing double-sided printing, it is important to be familiar with your printer so you know how to load the paper correctly. I started off by printing the backs of the cards first onto the blank side of the watercolor paper. Then, I printed the fronts onto the colored side of the paper. (My printer had no problem printing on this paper, but I can’t guarantee your printer will work exactly the same.)
When both sides of the paper are printed, smooth the paper onto the cutting mat. Since the watercolor paper goes kind of wonky after being painted, I found it worked best when I smoothed it down with the little vinyl tool to get the paper stuck down nice and flat. A credit card would totally work too.

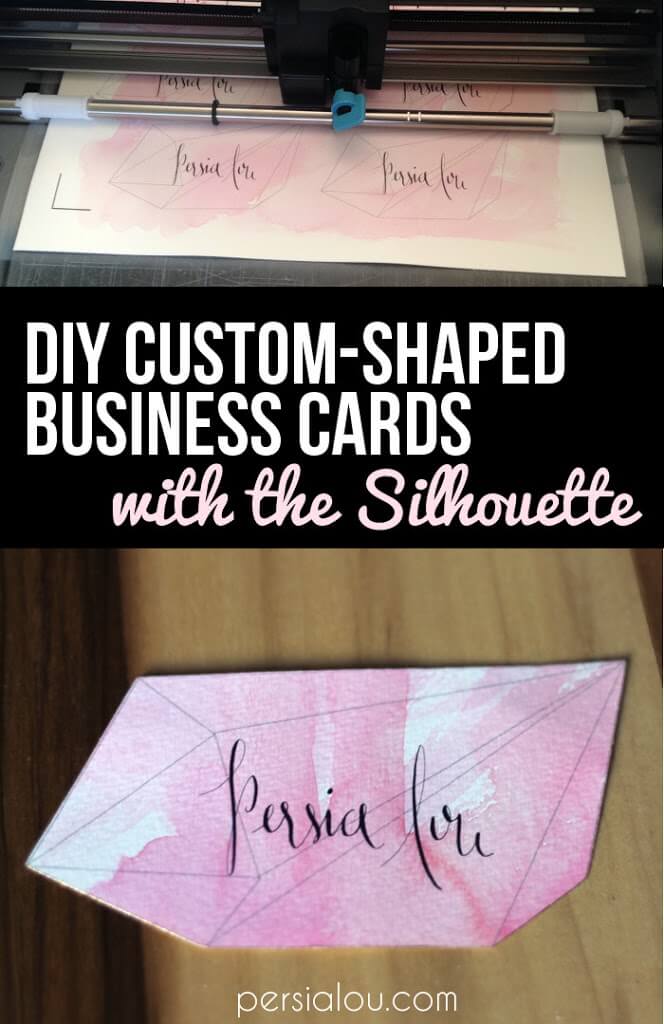
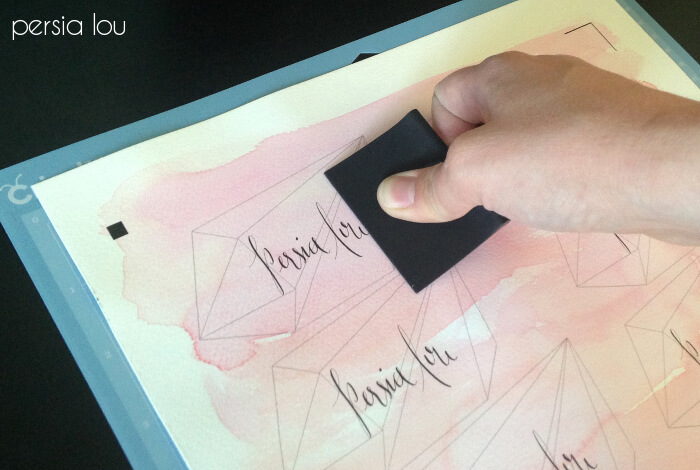
Then get to cutting!

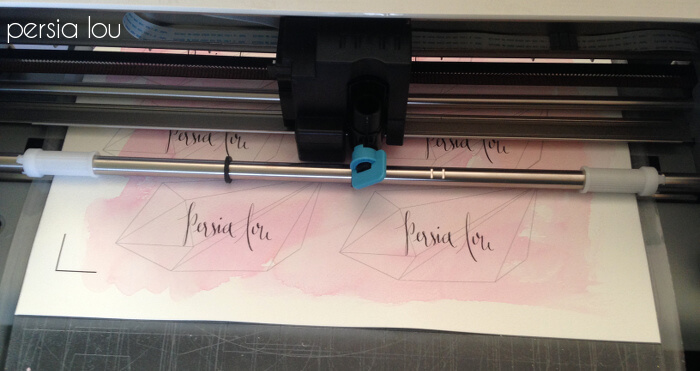
This is my favorite part of pretty much any Silhouette project. It’s like magic! And then when you flip it over, Voila!

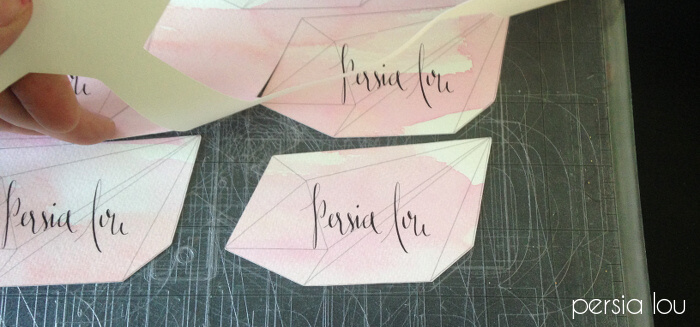
Double-sided! I was so happy these worked out they way I had pictured them in my mind. (Especially since I was making them two days before I had to leave for the conference!)

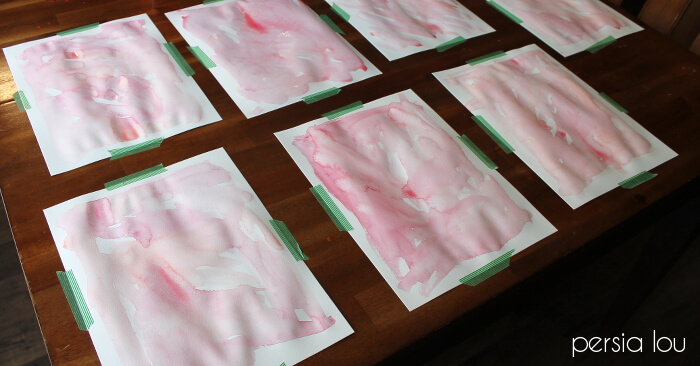
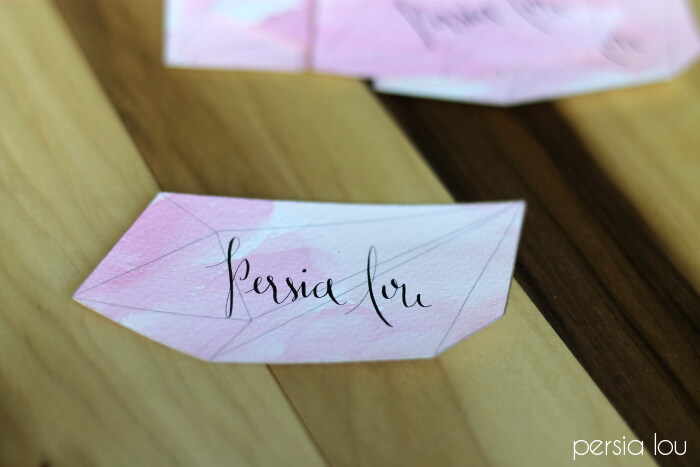
I decided to give the edges a little metallic gold touch with some spray paint.

I did that by stacking them up, pressing down on the top so they were all smooshed together, and spraying around the outside. My smooshing hand was pretty much completely gold, so this is not really a recommended technique, but it was quick and worked pretty well.

And that’s it! I kind of love them. And I think they actually were a lot easier to make than they may look. Yay!

May 1, 2014 1:34 am Alexis Filed Under: Craft

Reader Interactions

Comments

  1. Amy W says

    May 1, 2014 at 3:19 am

    I am dying. I need one of your cards now, I love them! That's like the greatest idea ever and I can't even imagine the pressure of bringing your cards to SNAP. Oh my, that would about put me over the edge!

  2. Stephanie Paxman says

    May 1, 2014 at 5:43 am

    So happy I got one of these–and that I got to hang out with you a bit 🙂

  3. RaChil Luke says

    May 1, 2014 at 6:45 am

    Jealous of you you Stephanie, I want one! These are beautiful, and so creative! I love the handmade/unique touch of the watercolor

  4. Mabey She Made It says

    May 1, 2014 at 9:54 pm

    Your cards were so fun! I'm glad I got one. And my mom was looking through all the business cards I got at SNAP and picked yours out as her favorite. 🙂

  5. Lauren Lanker says

    May 2, 2014 at 8:05 pm

    These are SO profesh! I LOVE them! Everything from the shape to the watercolor to the gold edges…they're uh-ma-zing. Any chance you'll be at Haven this summer where I can nab one of these from you…? 😉

  6. Katie Nathey says

    May 4, 2014 at 12:53 pm

    Oh my gosh Alexis this is sooooo fantastic I hope you come to Haven just so I can have one of these! {and meet you too of course, lol}. LOOOOOVE and I need a silhouetted machine!<br /><br />Best DIY business cards EVER. Pinned 🙂

  7. For My Love Of says

    May 6, 2014 at 5:27 pm

    These are so gosh darn cute! You did a really great job on them! I would have been impressed if I&#39;dgone and received one 😉

  8. Toni Barsi says

    May 7, 2014 at 1:00 pm

    These are amazing Alexis! I&#39;ve been trying to figure out the logistics of heart shaped cards lately – now I guess I know I can&#39;t put off getting a silhouette any longer.

  9. Therese Feeman says

    May 7, 2014 at 1:43 pm

    Those are awesome! Gzz I really need to use my Silhouette. Thanks for the inspiration!

  10. Krista thehappyhousie says

    May 9, 2014 at 11:07 pm

    SOO gorgeous!! Wowza – pinned for when my silhouette arrives (soon!!! yay!!)

  11. Trisha D says

    May 14, 2014 at 1:59 pm

    So glad I snagged one of your business cards!! Absolutely fabulous! Way to carry on the branding!

  12. Nancy Bandzuch says

    May 15, 2014 at 3:16 am

    So hi! You know I know your cards and I read through this whole tutorial thinking–but how did she make the edges gold–spray paint–yes! I know that&#39;s silly, but I just couldn&#39;t figure out how you did it! Hope all is well in Vegas

  13. Kelly of Simply Kelly Designs says

    May 27, 2014 at 5:06 pm

    These look amazing!

  14. Shelley George says

    September 27, 2014 at 5:56 pm

    Hi Alexis,<br /><br />I just wanted to let you know that I&#39;ve featured your business card in a round-up of my favourite creative business cards: http://shelleymakes.wordpress.com/2014/09/27/diy-creative-business-cards/<br /><br />I love the water-colour and how you&#39;ve gone for such a unique shape. Very envious of your Silhoette machine – I&#39;d love to own one of those! I also love the

  15. Shelly says

    February 28, 2015 at 12:24 am

    These turned out amazing!! I have a cricut explore so I&#39;m going to try a similar method! 😀

Primary Sidebar


Looking for Something?

FAVORITE POSTS

crochet feather and fan baby blanket - free crochet pattern
crochet cat slouch hablack cat hat - free crochet pattern (with video!) from persia lou

Footer

Content Sharing Policy

First off, thank you so much for being here! I would be so honored if you would like to share one of my projects, but please only use one or two photos and be sure to link back to the original post. Thank you!

If you see anything here that has been improperly credited, please let me know and I will fix it right away. You can email me at [email protected]

  • Home
  • About Me!
  • Disclosures and Privacy Policy

© Copyright 2016-2019 persialou.com · Theme by: PDCD