Make your own modern pillow with this simple crochet pillow pattern! This pillow has a fun graphic look, but uses only basic crochet stitches. This post contains affiliate links, which help to support this site. Thanks!
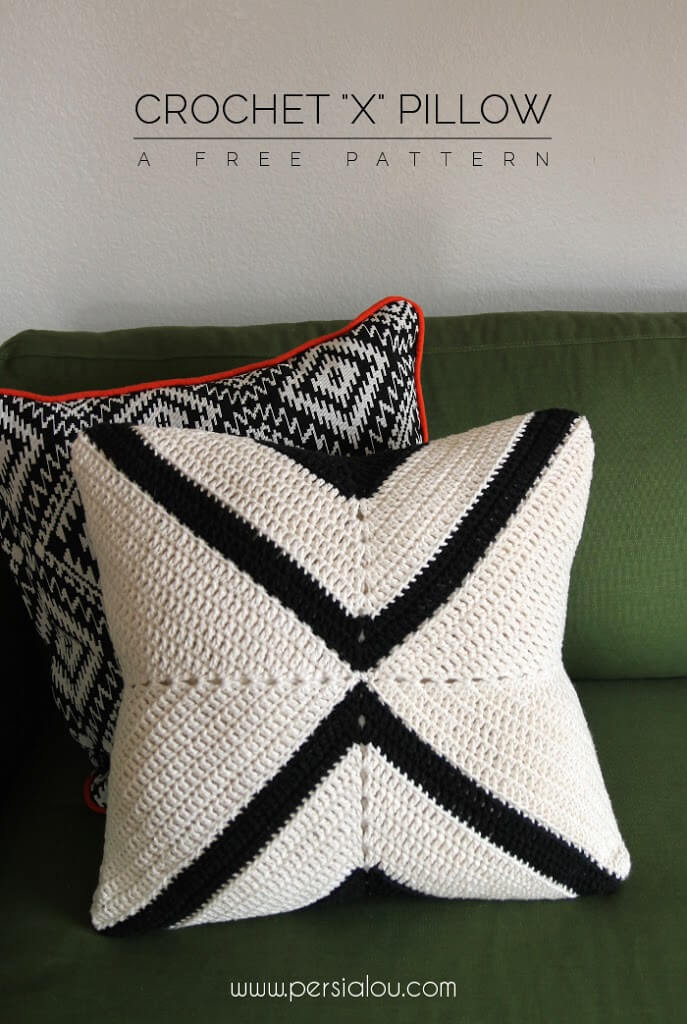
I’m really excited about this little crochet pillow pattern I have to share with you guys today. Sometimes I have these ideas pop into my head, but they don’t always work out. This one did! Woot!
My goal in my crochet projects is almost always to make something modern – maybe even something somewhat sophisticated – something that I would want to buy if I saw it in a store. This pillow is checking all of those boxes for me.

When I showed it to my husband, he said it looked expensive, which was pretty much the best thing he could have said. Yay! Totally made my day. If you like it too and want to make your own Modern X Pillow, I have everything you need to get started.
Modern X Crochet Pillow Pattern Materials
- Lily’s Sugar and Cream in Ecru (3 balls) and Black (1 1/2 balls) or other Worsted Weight Cotton Yarn in two colors. I find cotton gives this pillow nice structure and stitch definition. You could try acrylic, but I think it will lose some of the structure.
- Size H (5.00 mm) hook
- 18″ pillow form (If you use a different size pillow form or if you crochet tighter or more loosely than I do, you may need to adjust your cover to fit your form. See the note in the pattern below for more information on how to do that.)
- Scissors
- Yarn Needle
Modern X Crochet Pillow Pattern
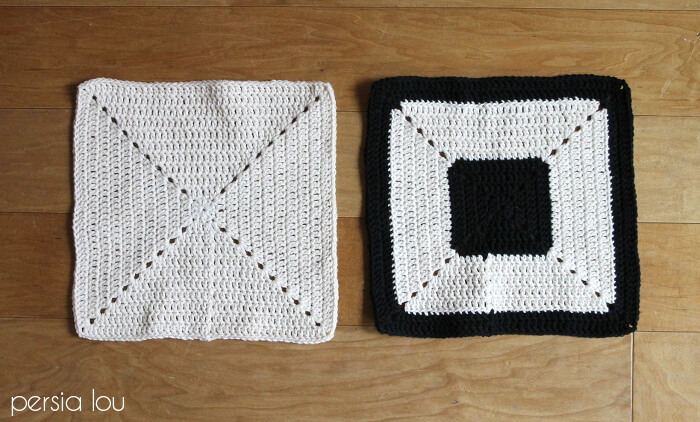
You will create four squares to be pieced together into the pillow cover. You will need two of the solid squares and two of the striped squares.
Solid Square Pattern (Make 2)
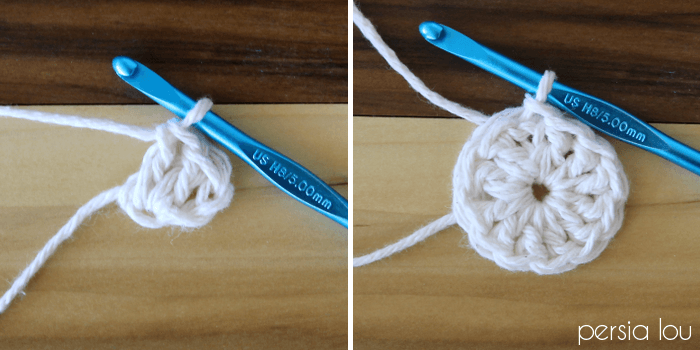
Round 1: Using Color A (Ecru for me), ch 3 (counts as first dc), work 11 dc in first beginning ch, then sl st to the top of the beginning ch 3 to join. (If you prefer, you could start with a ch 4 loop or magic loop and work 12 dcs into the loop.) (12 dc)
Round 2: ch 3, dc in same st, *dc, dc, (2 dc, ch 2, 2 dc) all in next st (forms corner space), repeat from * twice, dc, dc, 2 dc in same space as beginning ch 3 and dc, ch 2, sl st to beginning ch 3 (24 dc)

Round 3: ch 3, dc in each of next 5 sts, (2 dc, ch 2, 2 dc) in corner space, *dc in each of next 6 sts, (2 dc, ch 2, 2 dc) in corner space, repeat from * twice, sl st to beginning ch 3 to join (40 dc)
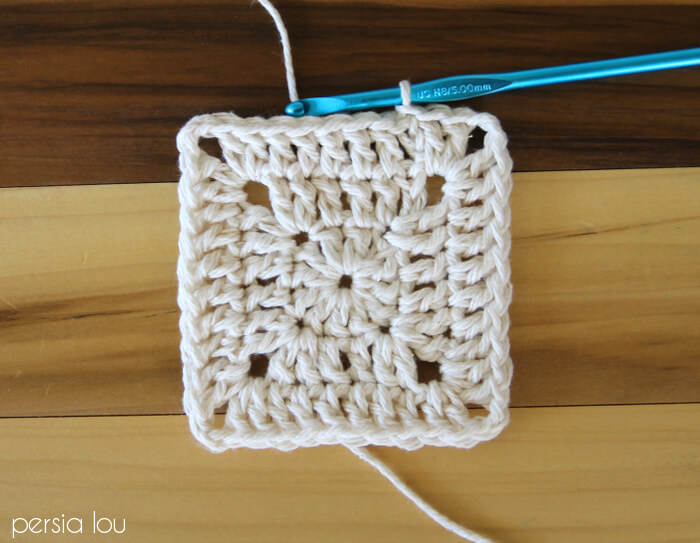
Round 4: ch 3, dc in each of next 7 sts, (2 dc, ch 2, 2 dc) in corner space, *dc in each of next 10 sts, (2 dc, ch 2, 2 dc) in corner space, repeat from * twice, dc in next 2 sts, sl st to beginning ch 3 to join (56 dc)
Round 5: ch 3, dc in each of next 9 sts, (2 dc, ch 2, 2 dc) in corner space, *dc in each of next 14 sts, (2 dc, ch 2, 2 dc) in corner space, repeat from * twice, dc in next 4 sts, sl st to beginning ch 3 to join (72 dc)
Round 6: ch 3, dc in each of next 11 sts, (2 dc, ch 2, 2 dc) in corner space, *dc in each of next 18 sts, (2 dc, ch 2, 2 dc) in corner space, repeat from * twice, dc in next 6 sts, sl st to beginning ch 3 to join (88 dc)
Round 7: ch 3, dc in each of next 13 sts, (2 dc, ch 2, 2 dc) in corner space, *dc in each of next 22 sts, (2 dc, ch 2, 2 dc) in corner space, repeat from * twice, dc in next 8 sts, sl st to beginning ch 3 to join (104 dc)
Round 8: ch 3, dc in each of next 15 sts, (2 dc, ch 2, 2 dc) in corner space, *dc in each of next 26 sts, (2 dc, ch 2, 2 dc) in corner space, repeat from * twice, dc in next 10 sts, sl st to beginning ch 3 to join (120 dc)
Round 9: ch 3, dc in each of next 17 sts, (2 dc, ch 2, 2 dc) in corner space, *dc in each of next 30 sts, (2 dc, ch 2, 2 dc) in corner space, repeat from * twice, dc in next 12 sts, sl st to beginning ch 3 to join (136 dc)
Round 10: ch 3, dc in each of next 19 sts, (2 dc, ch 2, 2 dc) in corner space, *dc in each of next 34 sts, (2 dc, ch 2, 2 dc) in corner space, repeat from * twice, dc in next 14 sts, sl st to beginning ch 3 to join (152 dc)
Round 11: ch 3, dc in each of next 21 sts, (2 dc, ch 2, 2 dc) in corner space, *dc in each of next 38 sts, (2 dc, ch 2, 2 dc) in corner space, repeat from * twice, dc in next 16 sts, sl st to beginning ch 3 to join (168 dc)
Please Note: To fit your cover to the pillow form you are using, fold your square in half diagonally, and measure the diagonal line (I think I remember the term “hypotenuse” from Geometry). This should match up with the side measurement of your pillow. Add or remove a round to get your squares to the right size for your pillow form.
Striped Square Pattern (Make 2)
Round 1: Using Color B (Black for me), ch 3 (counts as first dc), work 11 dc in first beginning ch, then sl st to the top of the beginning ch 3 to join. (If you prefer, you could start with a ch 4 loop or magic loop and work 12 dcs into the loop.) (12 dc)
Round 2: ch 3, dc in same st, *dc, dc, (2 dc, ch 2, 2 dc) all in next st (forms corner space), repeat from * twice, dc, dc, 2 dc in same space as beginning ch 3 and dc, ch 2, sl st to beginning ch 3 (24 dc)
Round 3: ch 3, dc in each of next 5 sts, (2 dc, ch 2, 2 dc) in corner space, *dc in each of next 6 sts, (2 dc, ch 2, 2 dc) in corner space, repeat from * twice, sl st to beginning ch 3 to join (40 dc)
Round 4: ch 3, dc in each of next 7 sts, (2 dc, ch 2, 2 dc) in corner space, *dc in each of next 10 sts, (2 dc, ch 2, 2 dc) in corner space, repeat from * twice, dc in next 2 sts, sl st to beginning ch 3 to join (56 dc). Finish off Color B, Weave in ends.
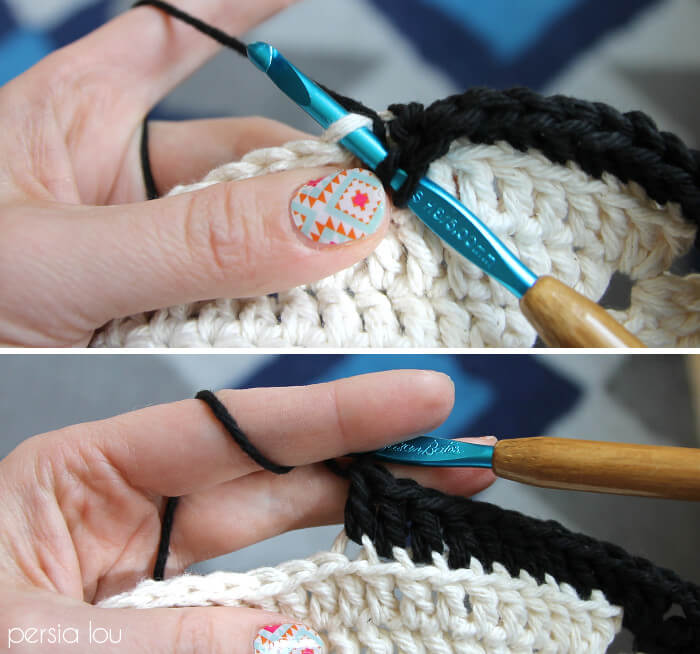
Round 5: This round is worked in the back loops only to give a nice clean line (see the image below). Join Color A (Ecru) in ch 3 of previous round. Ch 3, dc in each of next 9 sts, (2 dc, ch 2, 2 dc) in corner space, *dc in each of next 14 sts, (2 dc, ch 2, 2 dc) in corner space, repeat from * twice, dc in next 4 sts, sl st to beginning ch 3 to join (72 dc)
Round 6: ch 3, dc in each of next 11 sts, (2 dc, ch 2, 2 dc) in corner space, *dc in each of next 18 sts, (2 dc, ch 2, 2 dc) in corner space, repeat from * twice, dc in next 6 sts, sl st to beginning ch 3 to join (88 dc)
Round 7: ch 3, dc in each of next 13 sts, (2 dc, ch 2, 2 dc) in corner space, *dc in each of next 22 sts, (2 dc, ch 2, 2 dc) in corner space, repeat from * twice, dc in next 8 sts, sl st to beginning ch 3 to join (104 dc)
Round 8: ch 3, dc in each of next 15 sts, (2 dc, ch 2, 2 dc) in corner space, *dc in each of next 26 sts, (2 dc, ch 2, 2 dc) in corner space, repeat from * twice, dc in next 10 sts, sl st to beginning ch 3 to join (120 dc)
Round 9: ch 3, dc in each of next 17 sts, (2 dc, ch 2, 2 dc) in corner space, *dc in each of next 30 sts, (2 dc, ch 2, 2 dc) in corner space, repeat from * twice, dc in next 12 sts, sl st to beginning ch 3 to join (136 dc). Finish off Color A, Weave in ends.
Round 10: This round is worked in the back loops only (see the image above). Join Color B (Black) in ch 3 of previous round. Ch 3, dc in each of next 19 sts, (2 dc, ch 2, 2 dc) in corner space, *dc in each of next 34 sts, (2 dc, ch 2, 2 dc) in corner space, repeat from * twice, dc in next 14 sts, sl st to beginning ch 3 to join (152 dc)
Round 11: ch 3, dc in each of next 21 sts, (2 dc, ch 2, 2 dc) in corner space, *dc in each of next 38 sts, (2 dc, ch 2, 2 dc) in corner space, repeat from * twice, dc in next 16 sts, sl st to beginning ch 3 to join (168 dc)
Please Note: To fit your cover to the pillow form you are using, fold your square in half diagonally, and measure the diagonal line (I think I remember the term “hypotenuse” from Geometry). This should match up with the side measurement of your pillow. Add or remove a round to get your squares to the right size for your pillow form.
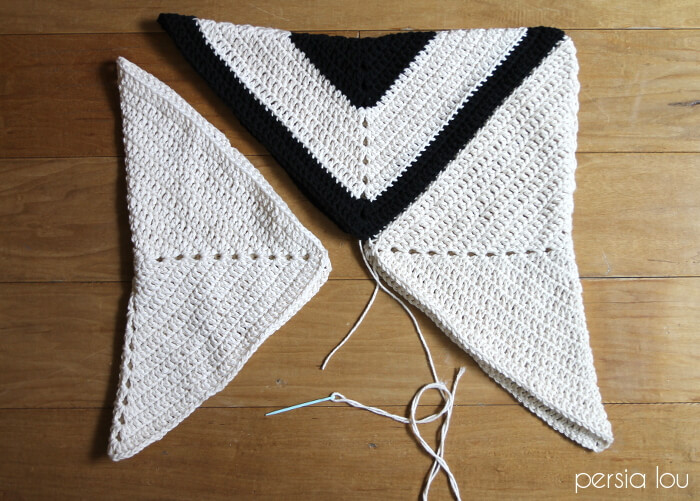
And that’s it for our crochet pillow pattern. All that’s left to do is sew our squares together. Grab a long piece of Ecru yarn (or whatever your main color is) and a yarn needle and let’s get stitching!
Start by taking a solid square and a striped square and put them right sides together. You will sew two adjacent sides together. Using the needle and yarn, sew the two pieces together only working your stitches through the back loops of each stitch (see the image below). This will make the seams nice and flat, with the stitches only really being visible on the back.

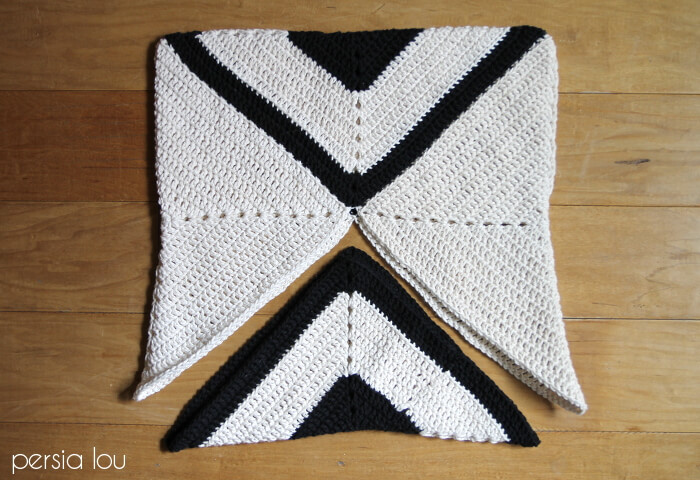
When you flip the two pieces back right side out, you will flip it so the seams go across the middle of the pillow as show below. Then fold the next square in half and line it up with the two you have just sewn together.
Place the two squares you are sewing together right side together and repeat the process of sewing the pieces together. When you get to a corner in the center of the pillow cover, be sure to sew through all three of the squares so you don’t get a hole in the middle of the pillow.
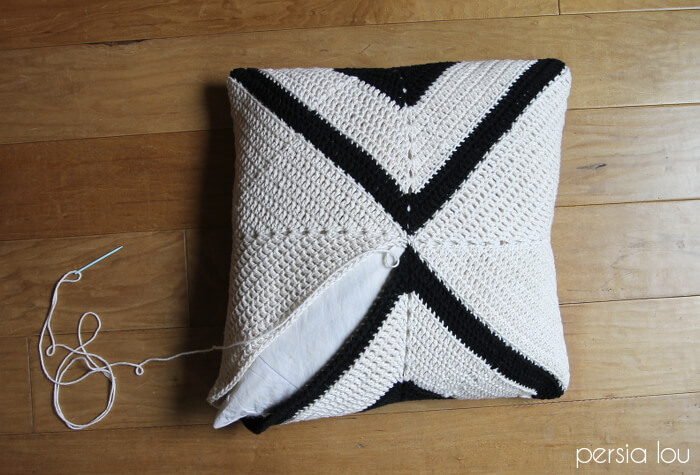
With the final square, sew three of the sides to the pillow case, leaving one side open. Stuff in your pillow form, and then finish sewing up the final seam.
And that’s it! Enjoy your new pillow!
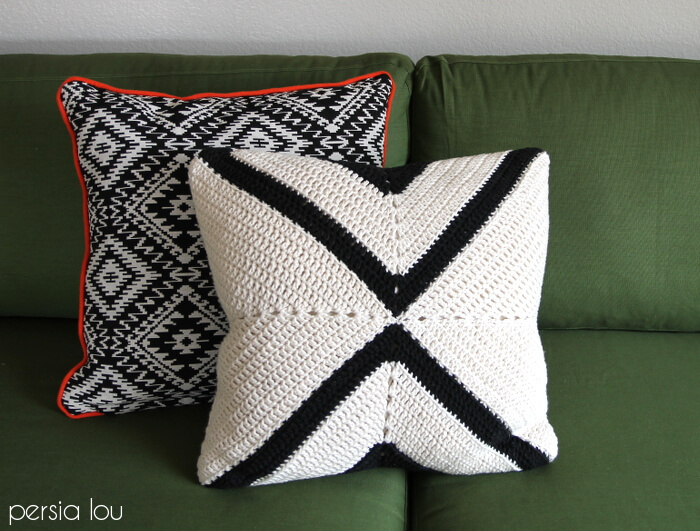
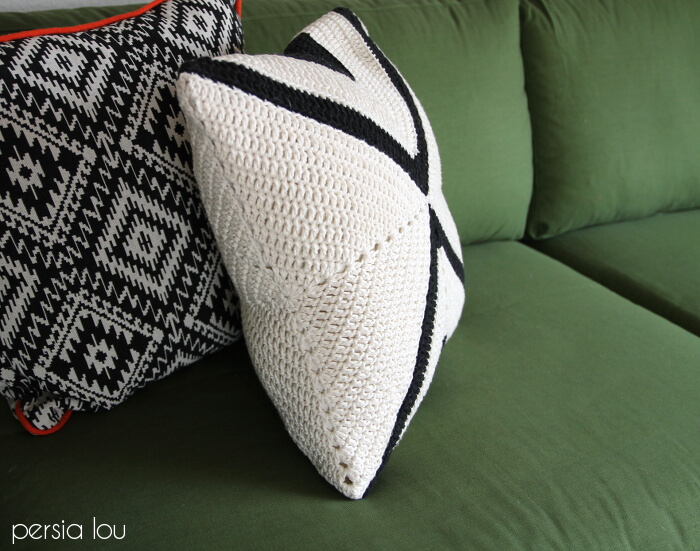
Here’s what it looks like from the side. There’s no seam on the side like a traditional pillow case, but the corner spaces still give it a line and definition on the side.
I love this little pillow! It is seriously my favorite on the couch. I hope you like this crochet pillow pattern too. 🙂
Until next time, Happy Making!

While you are here, why not check out some of my other free crochet patterns?


Comments + Project Love
Kali Dahle says
Wonderful! I love how you assembled it– Brilliant! it does look expensive;) I need to fin some cotton yarn in my stash…
Heather Painchaud says
Love this so much! The assembling shots are awesome too – thanks for joining us!! xo
Rachel // Maybe Matilda says
Love this Alexis! I think it would look great on my couch . . . which means I guess I need to pick up my crochet hooks, or have you make one for me 😉 Thanks for sharing the pattern!
seven thirty three says
You're patterns always amaze me! I love the style of this pillow. Thanks for sharing!
Amy W says
Honestly. This pillow is blowing my mind and I don't even know how to crochet.
Krista Cagle says
Love it!! 🙂
Jennifer Menteer says
I love all of your crochet stuff!! I really need to get my butt in gear and learn so I can make all this stuff!
Kadie Arrington says
What a clever idea! I love the way you put this together!
Ursula Rosien says
Wow. This is beautiful and all the work you have put into! Amazing. Love it. I have a good friend that loves crocheting. I'm going to sent her the pin once I pin your modern pillow 😉
Jessica P. says
I love when I see crochet that is modern and beautiful like your pillow. Nice!
xmydearambellina says
Love the pattern, AND your Jamberry nail wraps! 🙂