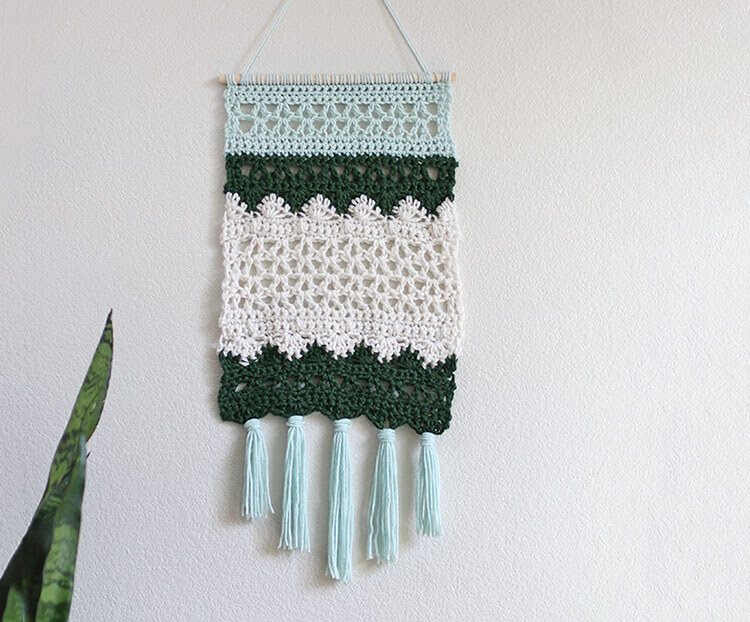
Looking to jump on the tapestry and wall hanging trend? Why not try a crochet wall hanging? Practice a variety of crochet stitches and end up with a beautiful piece of home decor at the same time! I originally shared this post at Crafts Unleashed, and it contains affiliate links, which help to support this blog. Thanks! 🙂

Woven tapestries, macrame, and other types of fiber art have definitely been coming back into style in a big way recently. While I have done a few weaving and macrame projects and absolutely loved them, crochet has always been my first love. So when I decided I wanted to try my hand at the wall hanging trend, I really wanted to try to use crochet.
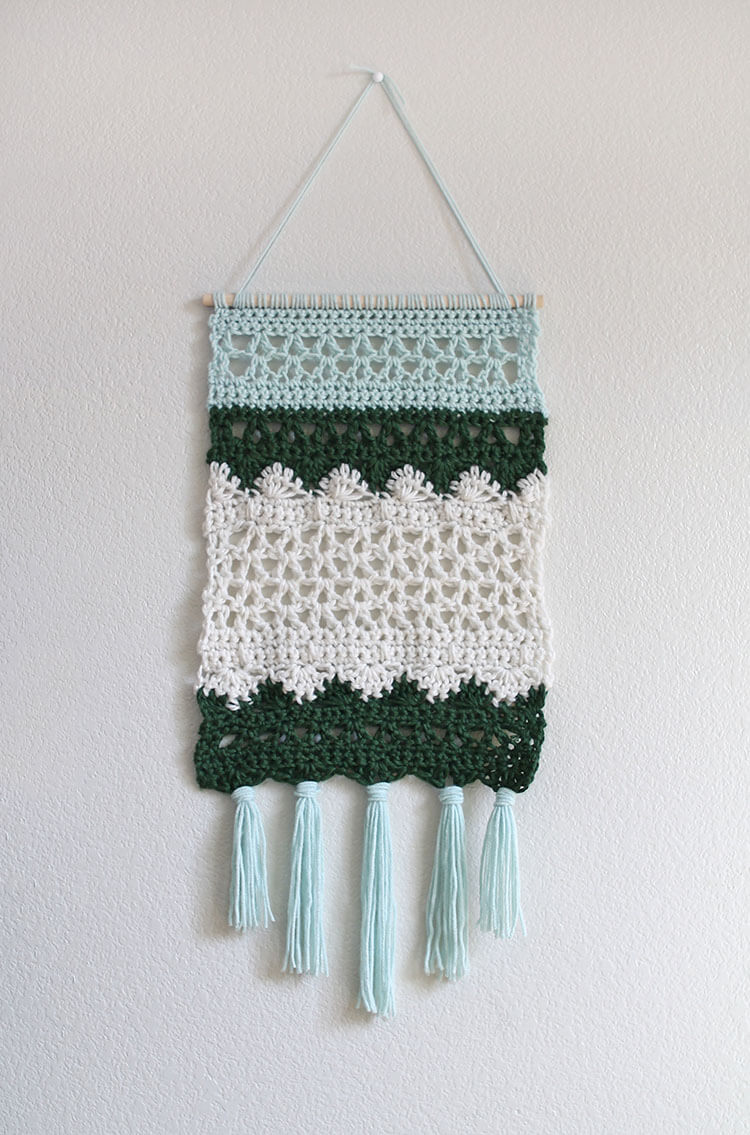
I had a couple of false starts, but I really like the piece I ended up with, and I hope you all will too! It was really pretty easy to make and it works up fairly quickly since it’s small and uses a large hook.
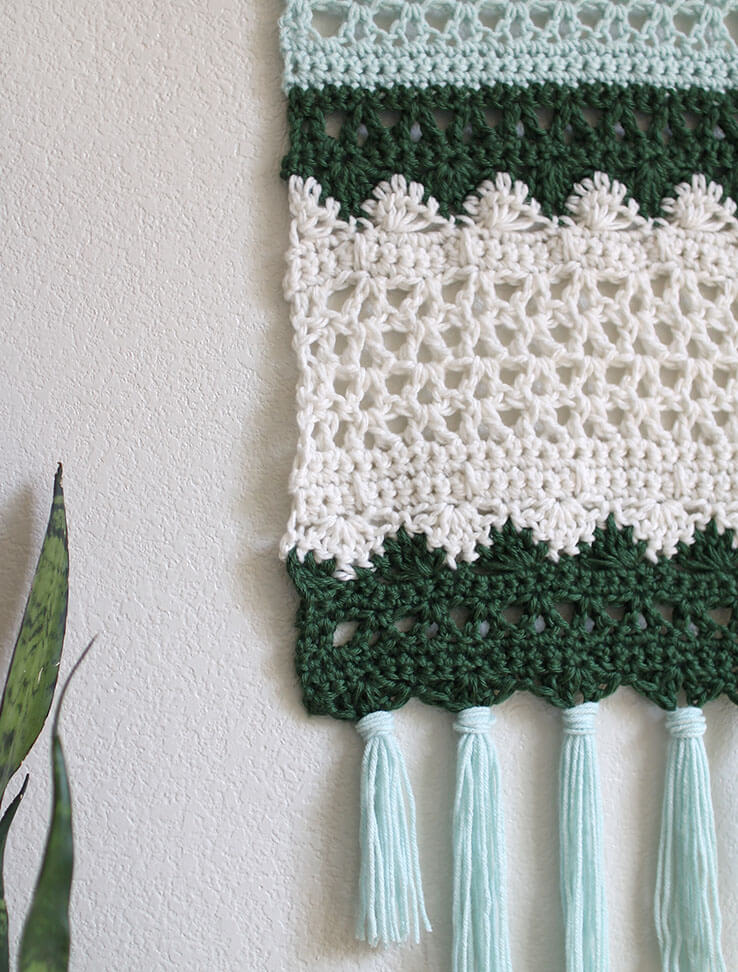
I really love that it incorporates so many different types of stitches that it’s almost like a crochet sampler, which makes it a good project for an experienced beginner that wants to stretch their skills a bit. Plus it’s just pretty to look at! Love how all the different stitches work together to create the shapes and texture in the piece. Want to make one? Let’s do this!

Crochet Wall Hanging Supplies
- 12″ Wooden Dowel
- Size M (9.00 mm) Crochet Hook
- Heavy Worsted or Light Bulky Yarn in three colors
- Yarn Needle
- Scissors
Crochet Wall Hanging Pattern
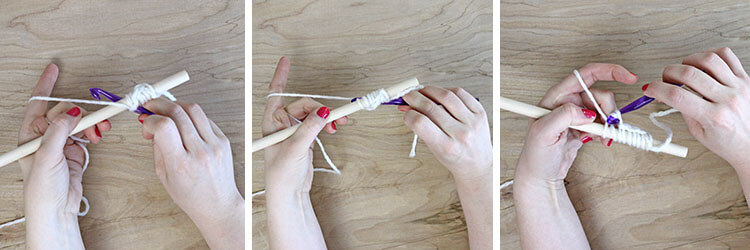
This piece is crocheted from top down in rows. I started by crocheting the first row around the dowel, so the crocheted piece is already attached to the rod and ready to hang when you are done.
Note: The three yarns I used weren’t all exactly the same weight, so I had to make some adjustments. To keep my stitches about the same size, I held two pieces of the dark green yarn together as I worked those stitches. If you use yarn that is all the same weight, you shouldn’t have to do this, so I definitely recommend it. I also used a larger hook to accommodate the thicker yarn and keep my piece from being too stiff, but you may need to adjust your hook size based on the yarn you use.
This pattern uses American crochet terms.
Special Stitches
V Stitch – Work double crochet, chain one, and double crochet all in the same stitch.
5 DC Shell – Work 5 dc stitches all in the same stitch.
Beginning 3 DC Cluster – Ch 2. Yarn over, insert hook in next stitch and draw up a loop. Yarn over, insert hook in next stitch and draw up a loop a second time. You should have three loops on your hook, Yarn over, and draw loop through all six loops.
5 DC Cluster – Yarn over, insert hook in next stitch and draw up a loop. Repeat this four times until you have six loops on your hook. Yarn over, and draw loop through all six loops.
3 DC Cluster – Yarn over, insert hook in next stitch and draw up a loop. Repeat this twice until you have four loops on your hook. Yarn over, and draw loop through all four loops.
Spike Stitch – When working single crochet, insert your hook two rows below the working row, and then work a single crochet stitch as normal. This forms a spike of yarn below the stitch.
Row 1: Working with Color A, begin by crocheting 30 sc stitches around the wooden dowel (see the image below).
Rows 2-4: Ch 1, sc in same st, sc in each stitch across (30 sc).
Rows 5-6: Ch 2 (counts as dc), dc in the next stitch, ch 1, *skip two stitches, v stitch in next stitch, repeat from * seven times, ch 1, skip two stitches, dc in each of the remaining two stitches.
Row 7: Ch 1, sc in same stitch, sc in each dc and ch 1 sp across (30 sc).
Rows 8-10: Ch 1, sc in same stitch, sc in each stitch across (30 sc).
Finish off and weave in ends.
Row 11: Join yarn Color B to the last stitch of the previous row. Ch 1, sc in same stitch, sc in each stitch across (30 sc).
Row 12: Ch 2 (counts as dc), dc in the next stitch, ch 1, *skip two stitches, v stitch in next stitch, repeat from * seven times, ch 1, skip two stitches, dc in each of the remaining two stitches.
Row 13: Ch 1, sc in same stitch, sc in each dc and ch 1 sp across (30 sc).
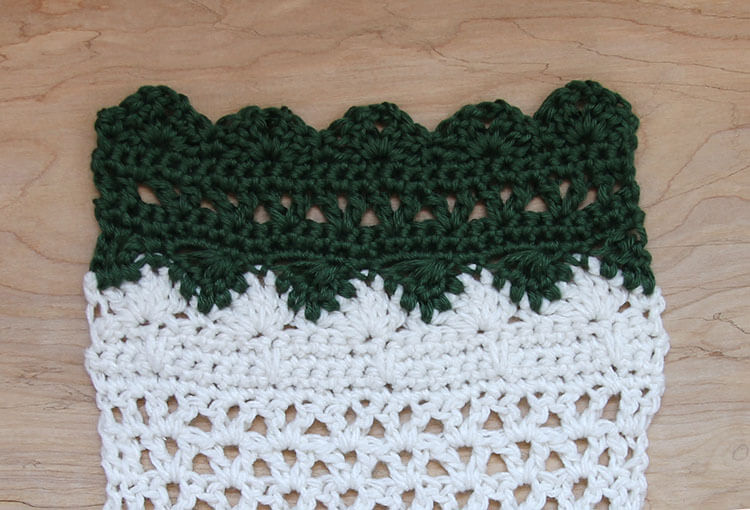
Row 14: Ch 1, sc in same stitch, *skip two stitches, 5 dc shell in next stitch, skip two stitches, sc, repeat from * four times, skip two stitches, sc in last stitch.
Finish off and weave in ends.
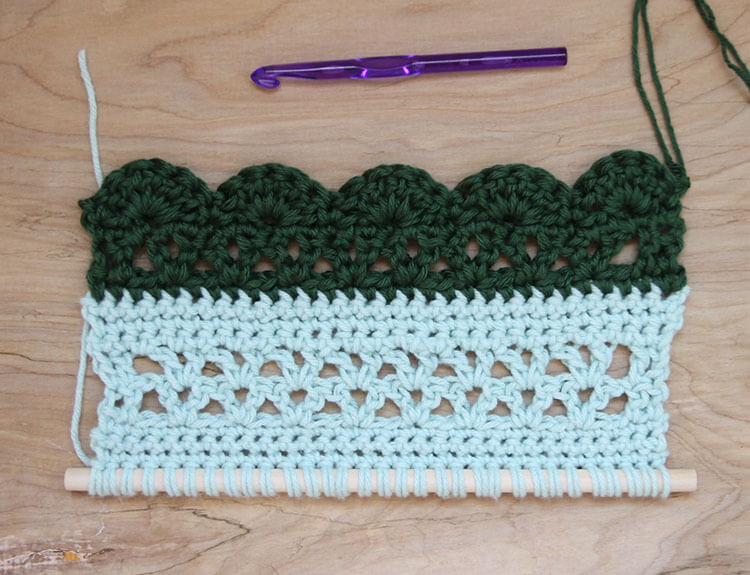
Row 15: Join yarn Color C to the last stitch of the previous row. Beginning 3 dc cluster, *ch 1, sc in next stitch, 5 dc cluster, repeat from * three times, ch 1, sc in next stitch, 3 dc cluster, ch 1.
Row 16: Ch 1, 2 sc in top of 3 dc cluster, sc in ch 1 sp, *sc in next sc, 4 sc across top of 5 dc cluster, sc in chain 1 sp, repeat from * four times, sc in next sc, 2 sc in top of 3 dc cluster (30 sc).
Row 17: Ch 1, sc in same st, sc in each stitch across (30 sc).
Row 18: Ch 1, sc in same st, sc in next st, spike stitch over next st, *sc in each of the next 5 sts, spike stitch over next st, repeat from * three times, sc in each of three remaining sts.
Row 19: Ch 1, sc in each sc and spike st across (30 sc).
Rows 20-23: Ch 2 (counts as dc), dc in the next stitch, ch 1, *skip two stitches, v stitch in next stitch, repeat from * seven times, ch 1, skip two stitches, dc in each of the remaining two stitches.
Row 24: Ch 1, sc in same stitch, sc in each dc and ch 1 sp across (30 sc).
Rows 25-26: Ch 1, sc in same st, sc in each stitch across (30 sc).
Row 27: Ch 1, sc in same st, sc in next st, spike stitch over next st, *sc in each of the next 5 sts, spike stitch over next st, repeat from * three times, sc in each of three remaining sts.
Row 28: Ch 1, sc in same stitch, *skip two stitches, 5 dc shell in next stitch, skip two stitches, sc, repeat from * four times, skip two stitches, sc in last stitch.
Finish off and weave in ends.
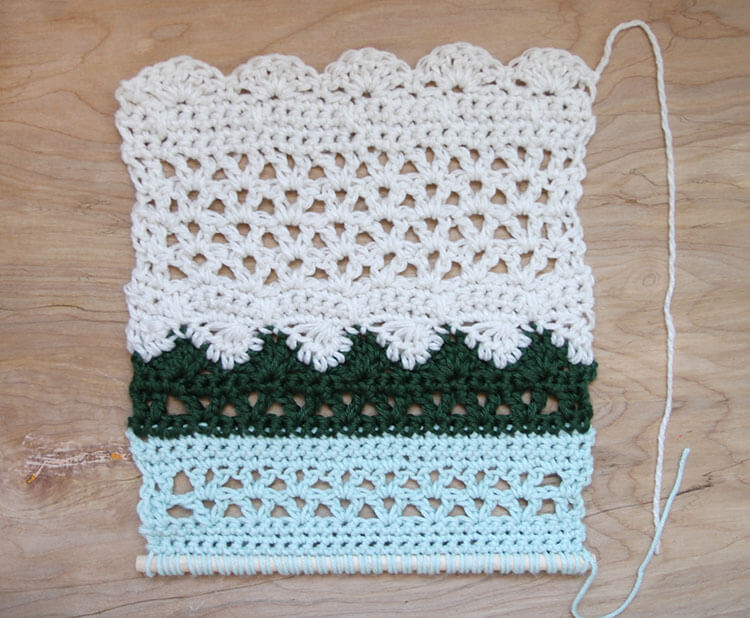
Row 29: Join yarn Color B to the last stitch of the previous row. Beginning 3 dc cluster, *ch 1, sc in next stitch, 5 dc cluster, repeat from * three times, ch 1, sc in next stitch, 3 dc cluster, ch 1.
Row 30: Ch 1, 2 sc in top of 3 dc cluster, sc in ch 1 sp, *sc in next sc, 4 sc across top of 5 dc cluster, sc in chain 1 sp, repeat from * four times, sc in next sc, 2 sc in top of 3 dc cluster (30 sc).
Row 31: Ch 1, sc in same st, sc in each stitch across (30 sc).
Row 32: Ch 2 (counts as dc), dc in the next stitch, ch 1, *skip two stitches, v stitch in next stitch, repeat from * seven times, ch 1, skip two stitches, dc in each of the remaining two stitches.
Row 33: Ch 1, sc in same stitch, sc in each dc and ch 1 sp across (30 sc).
Row 34: Ch 1, sc in same st, sc in each stitch across (30 sc).
Row 35: Ch 1, sc in same st, *skip two stitches, work (2 dc, ch 2, 2 dc) all in next st, skip two stitches, sc, repeat from * four times, skip two stitches, sc in last stitch.
Finish off and weave in ends.
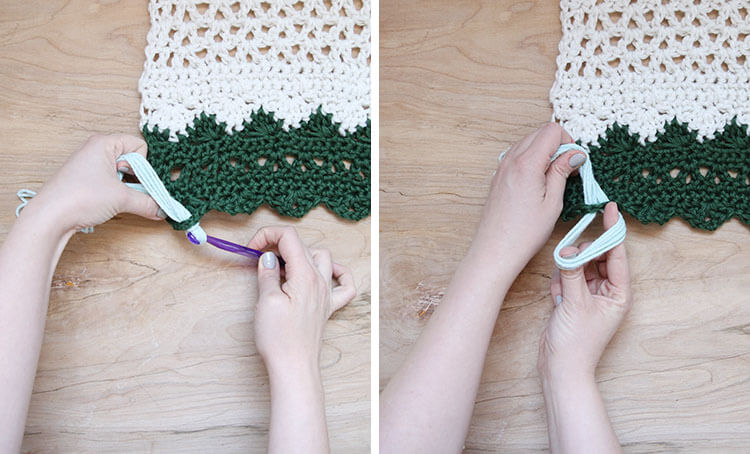
Woot! Your crochet wall hanging is all done and it’s time to add tassels! Pick which color you want to use for the tassels. I chose the soft green color (Color A). Then, cut off nine lengths of yarn double the length of your desired tassel. Loop all nine strands through one of the chain 2 spaces on the last row and pull them tight to make your tassel.
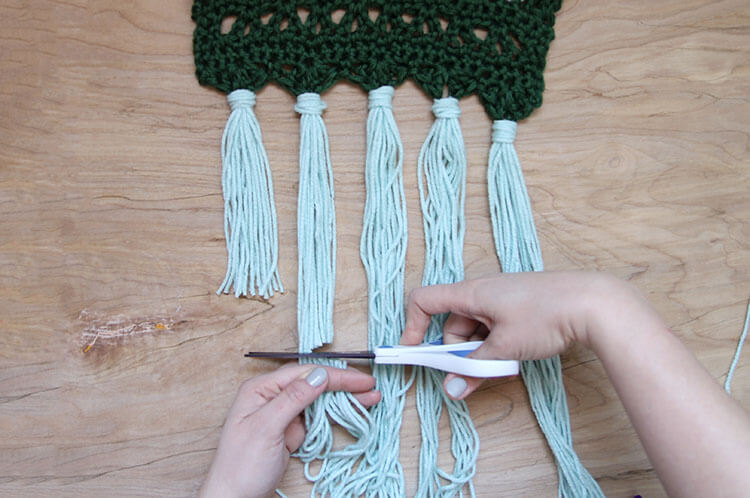
The last step is to trim up your tassels to give them a nice, clean edge. I decided to cut them at different lengths to form a tiered triangle shape, but feel free to cut yours however you like.
Once the tassels are trimmed, your piece is all done! Time to hang it up and enjoy.
If you make your own crochet wall hanging, I would love to see it! Share your photos to my facebook page or tag me on instagram or twitter (@persialou), and don’t forget to use the hashtag #persialou for a chance to be featured.
Happy Making!

More Free Crochet Patterns:


Comments + Project Love
Melissa says
That’s really pretty, Love It! It reminds me of those macreme’ hangers from the 70s my mom had. Yes, I was alive then 🙂
Haeley @ Design Improvised says
Such a fun spin on woven wall hangings. I love all your crochet projects!
Maria Lina says
Gostei muito.
Kate says
What a great idea! It looks so fun!
naziya says
Lovely. ..thank u so much for sharing dis pattern. ..love to c more patterns like dis..
Alexis says
Thank you! I will see if I can come up with more ideas similar to this one. 🙂
Charlene says
1st time to this site and I really like it. Will be back again and I love doing different with crochet. So thank you for your ideas and I am going to try the wall hanging.
Megan says
Hi…Mia from these comments and Lisa from the other blog are correct. When you get to row 14-15, things get wonky. In row 14 for example, the instructions only account for 19 stitches. The 2 skipped on each end plus the sc on each end are 6, the 5 shells are in 5 stiches, that’s 11. Then the skip 2 in between each shell are 8. 11+8 =19. There is nothing to account for the 11 extra spaces from row 13. Unless there is supposed to be a different type stitch in row 14 besides the 5dc shell? It may be a typo? I’m right in the middle of row 14 now looking at it really confused because I’ve followed the pattern exactly and now it just doesn’t make sense. There’s no way only 5 shells will fit across. In fact, it would be 9.
Uma Gaffney says
For row 14, I did: Ch 1, sc in same stitch, *skip two stitches, 5 dc shell in next stitch, skip two stitches, sc in next stitch, repeat from * four times, skip two stitches, sc in last stitch. And the numbers worked out that way, plus it looks pretty much like the picture.
Alexis says
Hi Uma! Thank you! That was an error in the pattern and I have updated it now. 🙂
Alicia says
Yeah I’m just going to repeat what already has been said. In Row 14, or perhaps before that, something goes wrong and there’s no way to do 5DC shell and end up with only 5 of them. I skipped 4 stitches instead of 2 and that helped a little, but I still ended up with 4 and 3 stitches on either end. I haven’t attempted anything beyond that yet, so I’m not entirely sure how it’ll turn out, but yeah. I mean otherwise it’s a nice pattern, I just wish what was posted was correct.
Zoe says
In row five I have three extra stitches not two, can I just put a double crochet in the last three instead of the last two?
Arlene says
Hi, How is the spike stitch made, I am having a hard time with it.
Katia says
I do not understand how your supposed to change colours like row 29 and the row before when your required to do the same transition… you begin a three double crochet cluster and then a five and then only skip one stitch??? you end up with way too many stitches im really confused please clarify this as i’ve started the pattern and am really loving it !! thanks
Eva Head says
I love this, if I were to make it wider than it is, what would the number of stiches need to be a multiple of? TIA x