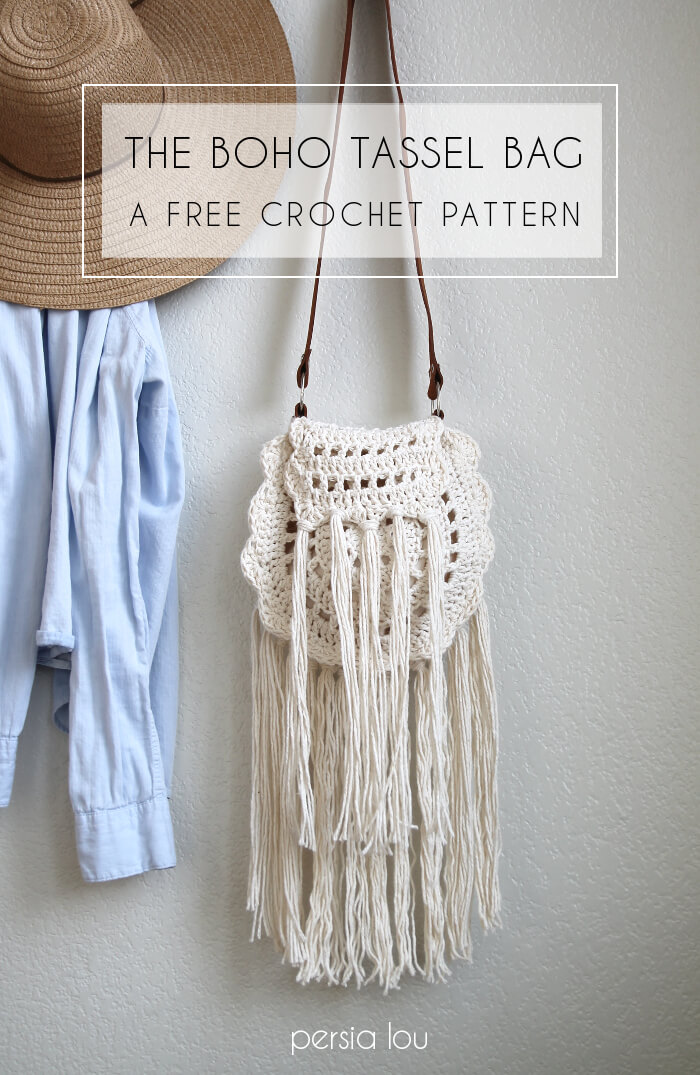
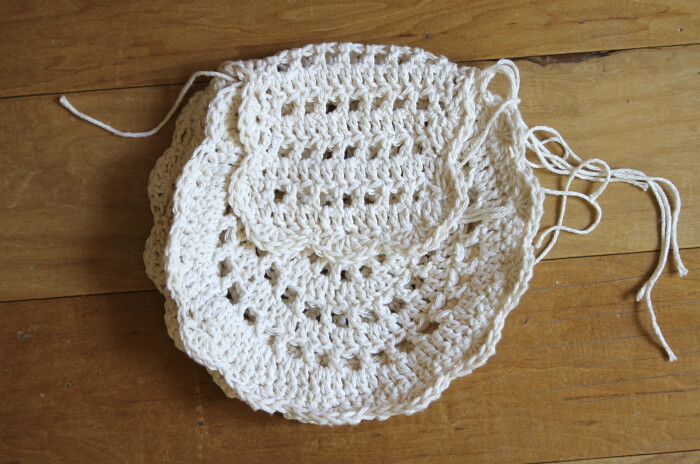
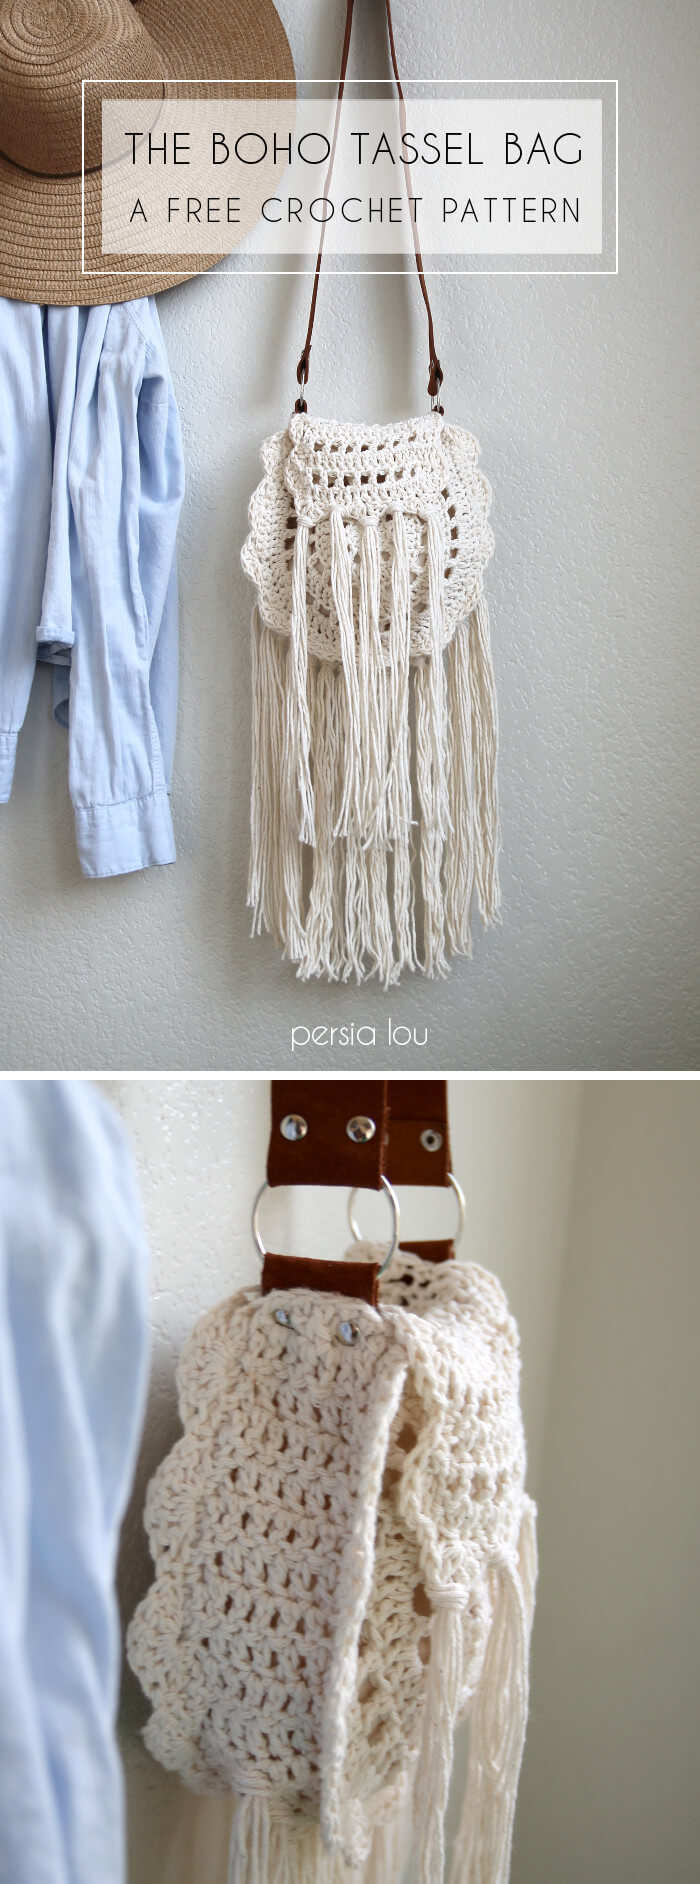
Is it warming up in your part of the world yet? It’s definitely been feeling summery here in the desert for a while now, and I was ready to bust out my cotton for some warm weather crochet. I was at Target recently (when is that statement ever NOT true?), and I saw this cute little crocheted bag and decided to try to recreate it at home.
Sure, you could totally just buy the Target bag for 30 bucks. Sure, I probably spent half that in supplies plus at least three hours making this bag. Sure, sure. But that’s not really the point, is it? The point is that I MADE this thing, and I am dang proud of that. I mean, it’s so cute, right?
Here’s what you need to make your own Boho Tassel Bag:
- Worsted Weight Cotton Yarn (I used about 8 ounces of Lily Sugar N Cream in Ecru)
- Size I (5.5 mm) Crochet Hook
- Half a Yard of Unbleached Muslin
- 2 Steel Rings
- Rivets and Rivet Setter
- Leather Strip or an old belt would work great too.
- Leather Punch
Boho Tassel Bag Pattern
This pattern is written using American crochet terms.
Special Stitches
Half Treble Crochet (htrc) – Yarn over twice, insert hook into work, yarn over (four loops on hook), yarn over and draw through two loops (three loops on hook), yarn over and draw through all loops.
Bag Front
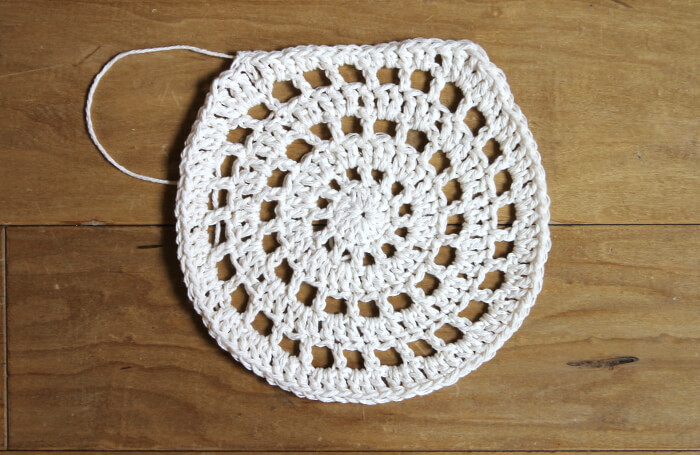
Round 1: Starting with a magic loop, ch 2 (counts as first dc), work 11 dc in magic loop, pull to tighten, sl st to join (12 dc).
Round 2: Ch 3 (counts as first dc and ch 1), dc , ch 1 in each stitch around, sl st to join (12 dc, 12 ch 1 sps).
Round 3: Ch 2 (counts as first dc), 2 dc in next ch 1 sp, *dc in next dc, 2 dc in next ch 1 sp, repeat from * around, sl st to top of first ch 2 to join (36 dc).
Round 4: Ch 4 (counts as first dc and ch 2), skip 1 dc, dc in next st, *ch 2, skip 1 dc, dc in next st, repeat from * around, sl st to 2nd ch of beginning ch 4 (18 dc, 18 ch 2 spaces).
Round 5: Ch 2 (counts as first dc), 2 dc in ch 2 sp, *dc in next st, 2 dc in next ch 2 sp, repeat from * around sl st to first ch 2 (54 dc).
Round 6: Ch 4 (counts as first dc and ch 2), skip 1 dc, dc in next st, *ch 2, skip 1 dc, dc in next st, repeat from * around sl st to 2 ch of beginning (27 dc, 27 ch 2 spaces).
Round 7: Ch 3 (counts as first htrc), (trc, htrc, htrc) all in next ch 2 sp, *dc in next dc, 2 dc in next ch 2 sp, repeat from * 18 times, dc in next st, (dc, htrc) in next ch 2 sp, htrc in next st, (trc, htrc, htrc) all in next ch 2 sp, dc in next dc, 2 dc in next ch 2 sp, hdc in next st, 2 hdc in next ch 2 sp, sc in next st, 2 sc in next ch 2 sp, sc in next st, 2 hdc in next ch 2 sp, hdc in next st, 2 dc in next ch 2 sp, sl st to beginning ch 3 to join. Weave off, finish in ends.
Bag Back
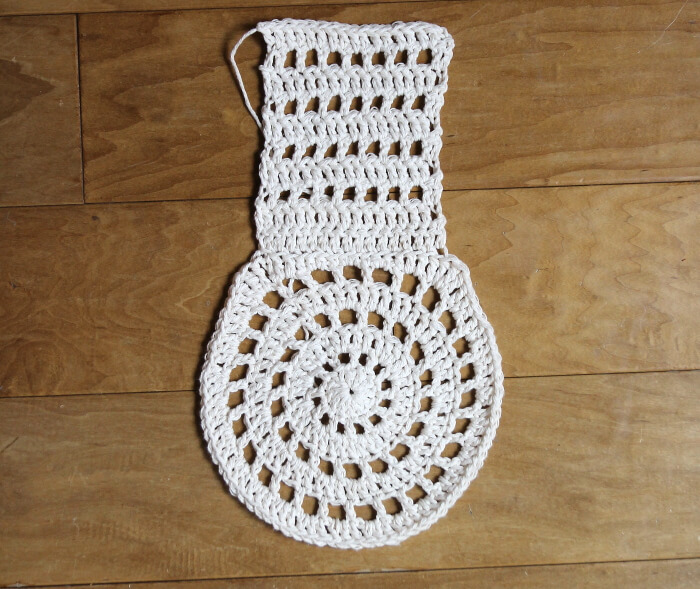
The back of the bag is worked the same as the front but with a flap added to the top.
Round 1: Starting with a magic loop, ch 2 (counts as first dc), work 11 dc in magic loop, pull to tighten, sl st to join (12 dc).
Round 2: Ch 3 (counts as first dc and ch 1), dc , ch 1 in each stitch around, sl st to join (12 dc, 12 ch 1 sps).
Round 3: Ch 2 (counts as first dc), 2 dc in next ch 1 sp, *dc in next dc, 2 dc in next ch 1 sp, repeat from * around, sl st to top of first ch 2 to join (36 dc).
Round 4: Ch 4 (counts as first dc and ch 2), skip 1 dc, dc in next st, *ch 2, skip 1 dc, dc in next st, repeat from * around, sl st to 2nd ch of beginning ch 4 (18 dc, 18 ch 2 spaces).
Round 5: Ch 2 (counts as first dc), 2 dc in ch 2 sp, *dc in next st, 2 dc in next ch 2 sp, repeat from * around sl st to first ch 2 (54 dc).
Round 6: Ch 4 (counts as first dc and ch 2), skip 1 dc, dc in next st, *ch 2, skip 1 dc, dc in next st, repeat from * around sl st to 2 ch of beginning (27 dc, 27 ch 2 spaces).
Round 7: Ch 3 (counts as first htrc), (trc, htrc, htrc) all in next ch 2 sp, *dc in next dc, 2 dc in next ch 2 sp, repeat from * 18 times, dc in next st, (dc, htrc) in next ch 2 sp, htrc in next st, (trc, htrc, htrc) all in next ch 2 sp, dc in next dc, 2 dc in next ch 2 sp, hdc in next st, 2 hdc in next ch 2 sp, sc in next st, 2 sc in next ch 2 sp, sc in next st, 2 hdc in next ch 2 sp, hdc in next st, 2 dc in next ch 2 sp, sl st to beginning ch 3 to join. Ch 2 (counts as first dc), TURN.
Now the pattern will switch from rounds to rows.
Row 1: Ch 2 (counts as first dc), working in back loops only, dc in each of next 16 sts (17 dc total). Turn.
Row 2: Ch 2 (counts as first dc), dc in next st and each st across (17 dc). Turn.
Row 3: Ch 2 (counts as first dc), dc in next st, *ch 1, dc in next st, repeat from * six times, dc in next st (10 dcs, 7 ch 1 sps). Turn.
Row 4: Ch 2 (counts as first dc), dc in next st and each st across (17 dc). Turn.
Row 5: Ch 2 (counts as first dc), dc in next st, *ch 1, dc in next st, repeat from * six times, dc in next st (10 dcs, 7 ch 1 sps). Turn.
Row 6: Ch 2 (counts as first dc), dc in next st and each st across (17 dc). Turn.
Row 7: Ch 2 (counts as first dc), dc in next st, *ch 1, dc in next st, repeat from * six times, dc in next st (10 dcs, 7 ch 1 sps). Turn.
Row 8: Ch 2 (counts as first dc), dc in next st and each st across (17 dc). Turn.
Row 9: Ch 2 (counts as first dc), Turn dc in next st, *ch 1, dc in next st, repeat from * six times, dc in next st (10 dcs, 7 ch 1 sps). Turn.
Row 10: Ch 2 (counts as first dc), dc in next st and each st across (17 dc). Finish off, weave in ends.
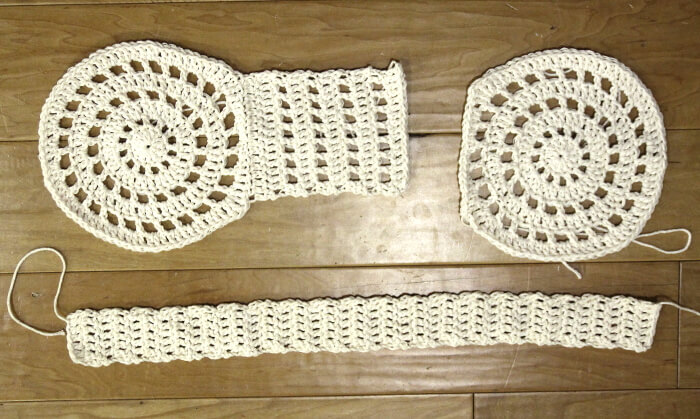
Bag Side Panel
Row 1: Ch 8, dc in 3rd ch from hook, dc in remaining 5 chs (6 dc total). Turn.
Row 2: Ch 2 (counts as first dc), dc in each of next 5 sts (6 dc total). Turn.
Repeat Row 2 until the piece is long enough to wrap around the outside of the bag front – about 37 rows.
To join the front of the bag to the side panel, hold the wrong sides together and work single crochets through both layers.
 Repeat this process by joining the back of the bag to the other side of the side panel.
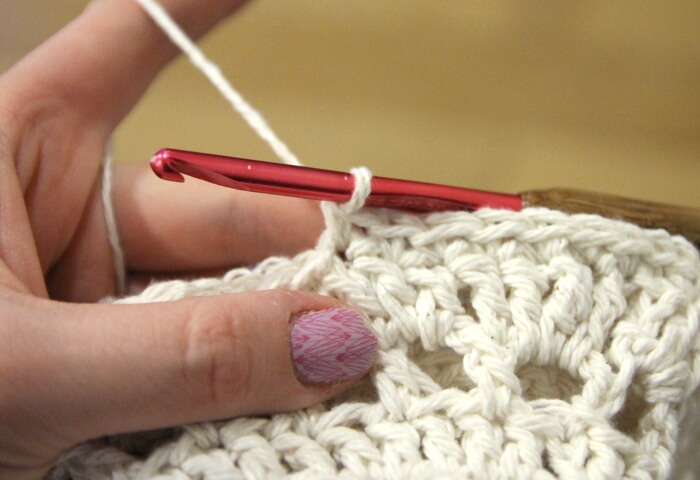
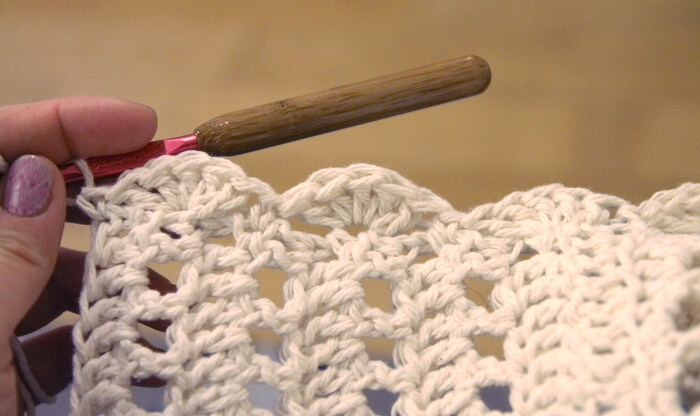
When the pieces are all joined together, work a shell stitch edge around the outside seam you just made. Starting in the corner of sc seam of the front of the bag, ch 1 and single crochet in the same stitch. Skip two stitches and then work 5 dc into the next stitch. Skip two stitches and single crochet in the next stitch. Repeat this pattern (sc, skip 2 sts, 5 dc, skip w sts, sc) to form shells all around the outside of the front.
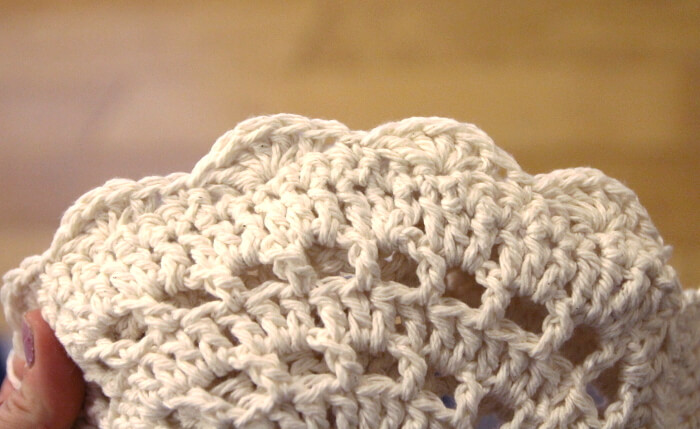
Work the shell stitch edge around the seam of the back of the bag as well, but continue to work the shell pattern around the flap as well. I worked three shells on each side of the flap.
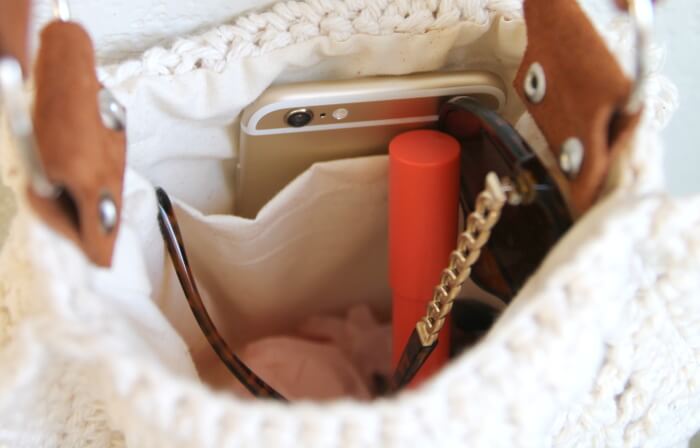
Your bag is all crocheted at this point! All that is left to do is add lining and straps.
To make the lining of the bag, use the bag as a guide and cut pattern pieces. You will need a front and back piece (you do not need to line the flap, so they should be the same shape and size) as well as a side panel piece.
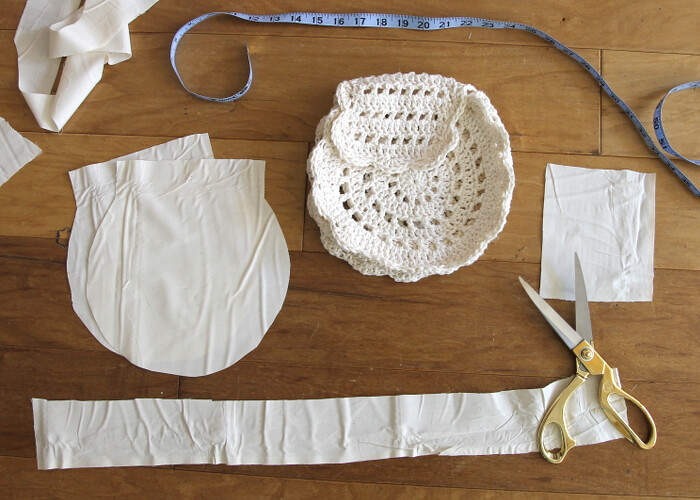
I added an extra inch or so to the top of the front and back piece patterns so I could turn it under to finish that opening. I also added a pocket to one of the pieces.
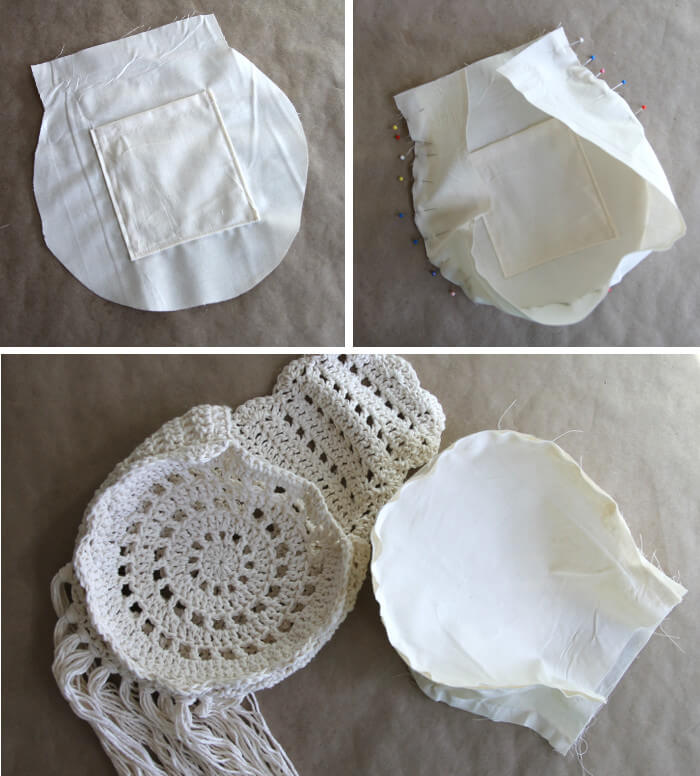
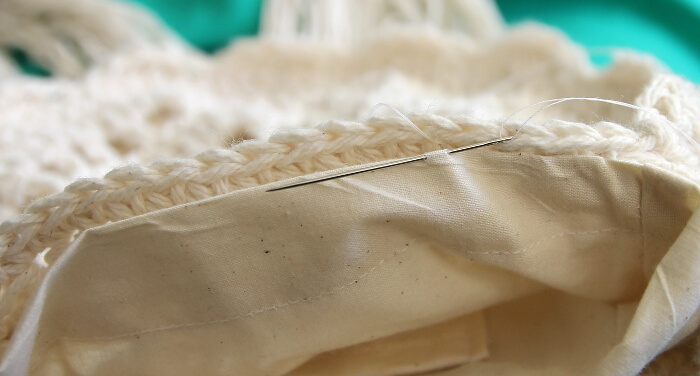
Pin the back or front piece to the side panel piece, and sew around the seam. Then repeat on the other side. Finally, stuff the lining into your crocheted bag and hand sew the lining into the bag.
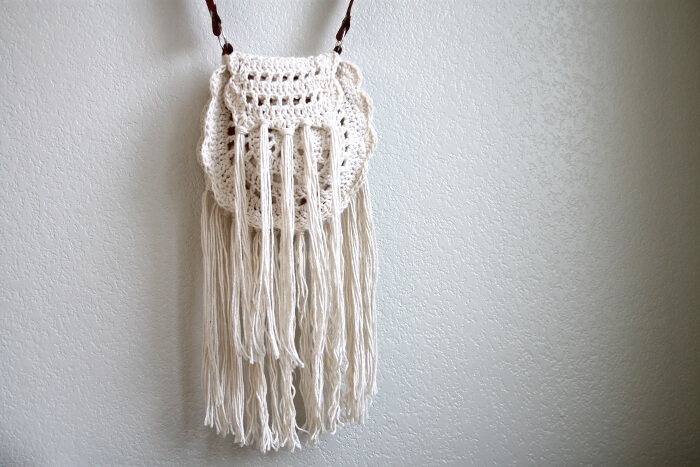
When the lining is sewn in, it’s time to add the tassels! Cut five lengths of yarn, then fold them in half and use a large crochet hook to loop it around stitches along the bottom of the bag as well as the bottom of the flap.
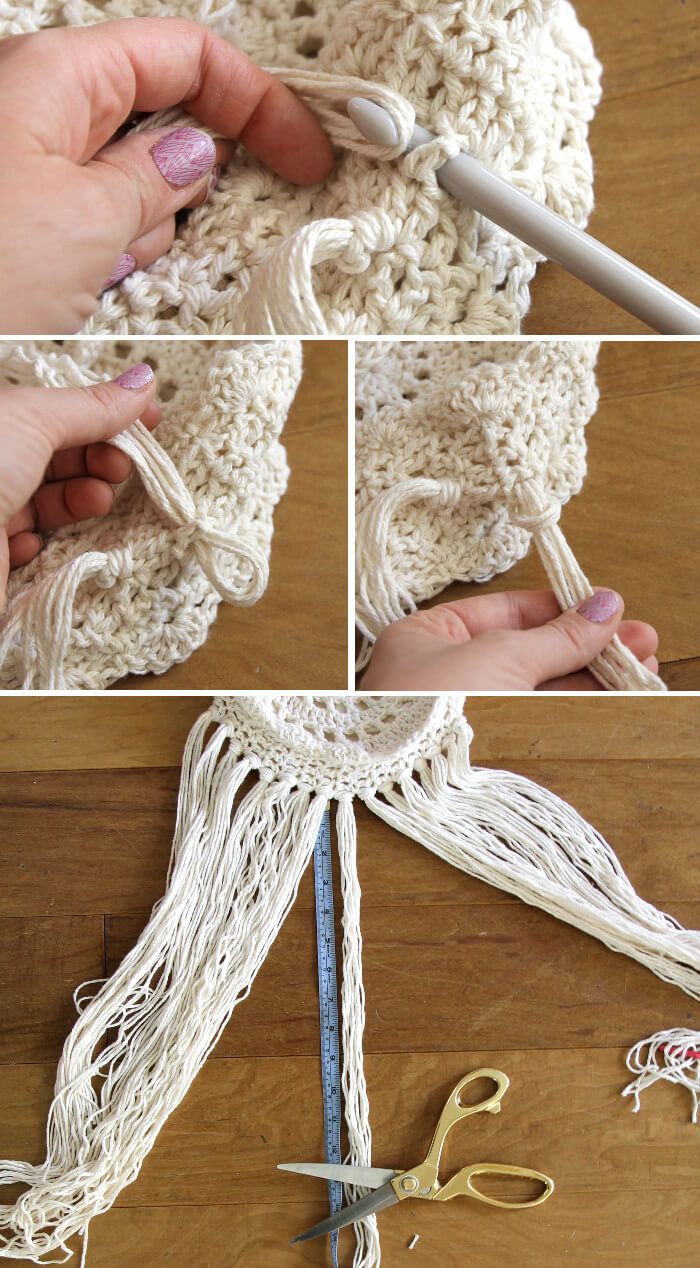
Finally, trim all of the tassels to the same length. I cut mine to 11 inches each.
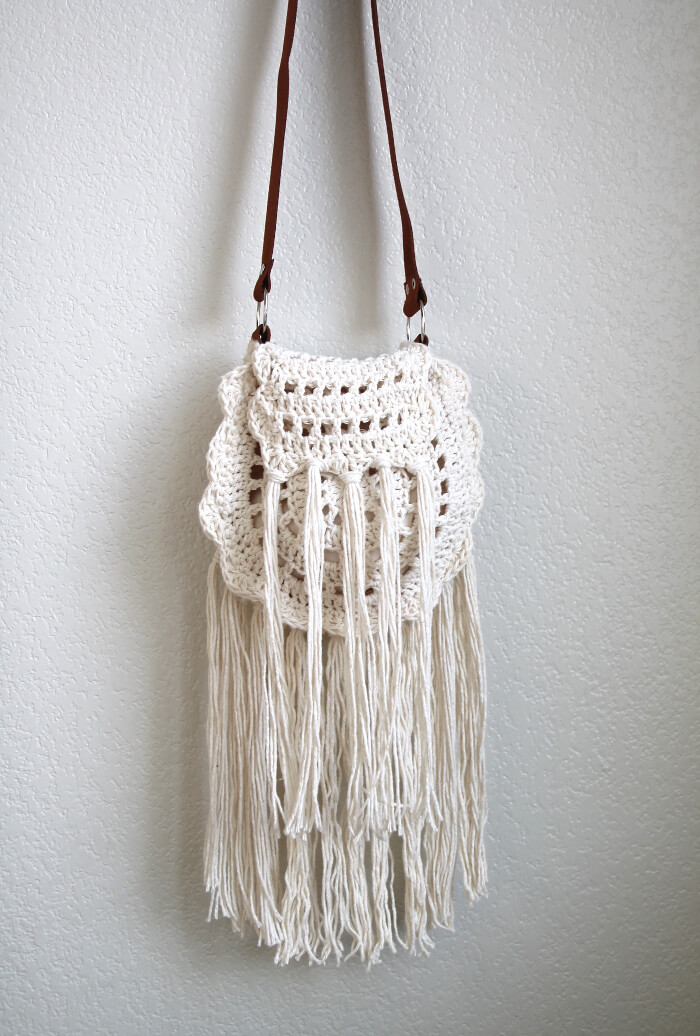
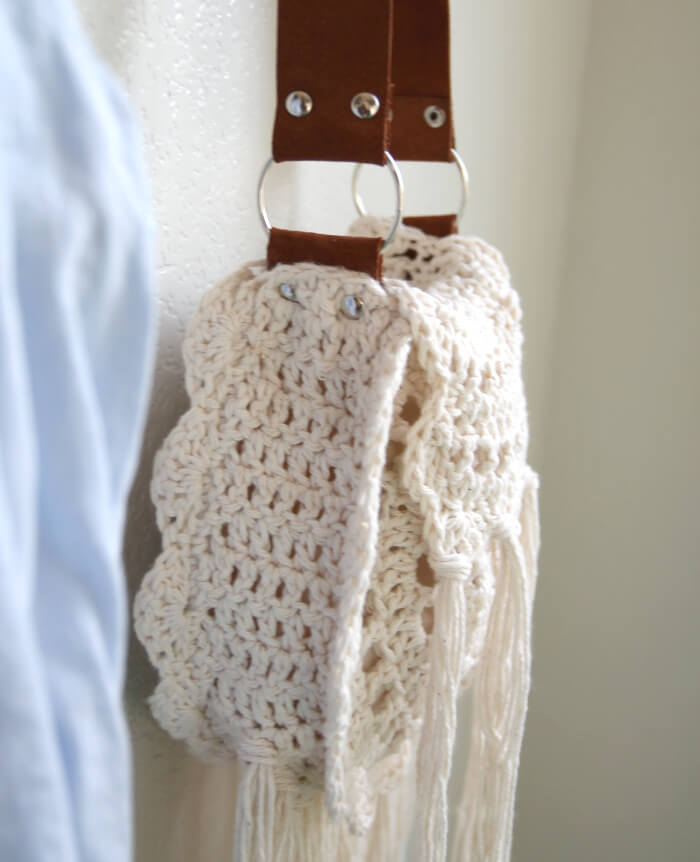
Last but not least, it’s time to add a strap. You could crochet a strap, but I liked the contrast of the leather, and it was a good opportunity to work with a material I don’t use all that often.
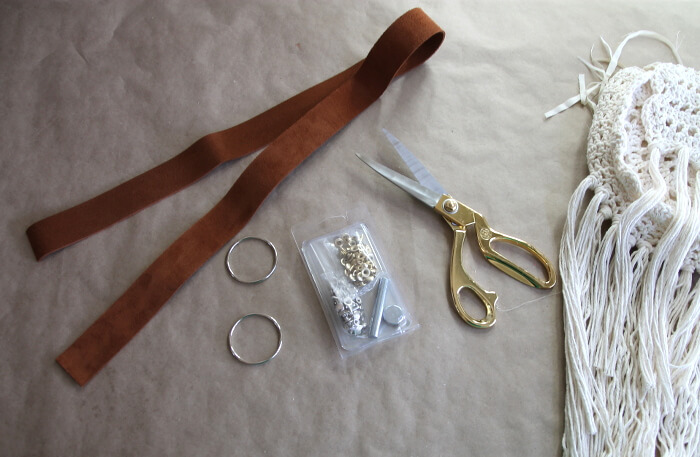
I started by cutting small pieces about an inch and a half long that I looped around the steel ring and attached to the bag using rivets.
To set the rivets, first punch a hole the right diameter for your rivets through the leather, then push the rivet through all layers, push the end on with your fingers, and then set the rivet with the setter and a hammer.
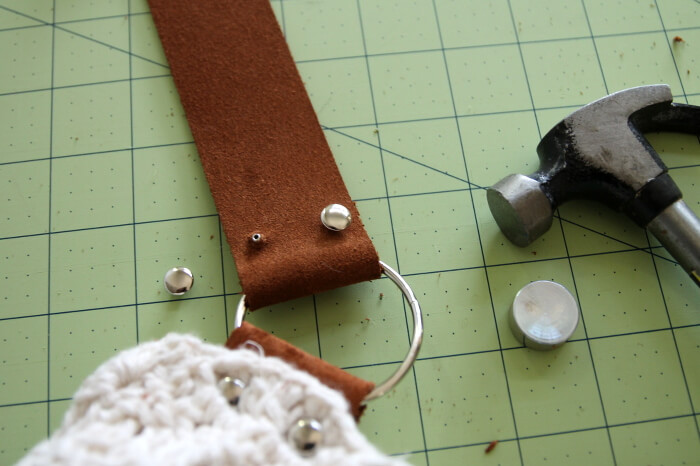
I repeated the process to join the strap to the rings. And that’s it! My fun new summery bag was all done!
If you have any questions, please leave them in the comments and I will be happy to try to help. If you make your own bag, I would love to see it! Please share it to my facebook page or tag me on instagram.
Happy Making!

Looking for more free crochet patterns? Check these out!


Comments + Project Love
Sandy says
I looked at it, loved it and want to make it! Thanks you sooo much!
Amy @ Homey Oh My! says
Oh my gosh, Alexis- it’s gorgeous!!! I totally feel you on the maker’s sentiment- sure you can analyze cost/value systems but did you make it yourself?? There’s no other satisfaction like it <3
persialou says
I totally agree! And thanks so much!
gracias kollo says
how to make htrc?
Alexis says
Hello! I’m sorry I should have had the instructions for that stitch in the pattern. I’ve just added them now. Htrc is half treble crochet, which is between a double crochet and treble crochet in height. To work the htrc, yarn over twice, insert hook into work, yarn over (four loops on hook), yarn over and draw through two loops (three loops on hook), yarn over and draw through all loops. Hope that helps!
Emma Peake says
This is gorgeous Alexis! Perfect for festival season… if only I knew how to crochet! One day!…Emma x
Deniece says
I love this little bag! I am going to try to do it – thanks for sharing.
T'onna @ USS Crafty says
I love this boho bag! Thanks for sharing how you made it. I really like those tassels! I pinned it!
Kate says
Wowza, that is gorgeous. Nice work!
Eveline says
This is true DIY perfection! Cannot wait to get started 🙂 And promise to share the result on instagram with you. xx
persialou says
Thank you!! Can’t wait to see it!
Erica says
So super cute! You are seriously a crochet genius. Love how boho chic this is! Would be perfect for carrying around only the necessities at summer festivals!
gigi says
This is so lovely! It is my new favorite crochet pattern. I can’t wait to make it!
persialou says
Thank you so much!
Alicia Lee says
What a way to find your site! Luckily I have almost everything I need to make this gorgeous bag. Rejoice you have a new follower.
persialou says
Thank you, Alicia!! 🙂
Melissa says
Love this! Makes me want to push past my VERY basic blanket crocheting skills and learn how to read patterns!
SusansSoulShines says
This bag is awesome, thx so much for the pics and the detailed explanation! This is the ultimate cool bag for any age person to carry!
Kathy says
Found her site from fb. loved the bag so much I started on it right away. Can you help me with r7. what is a htrc? thanks so much for your help! I will pin when I am done.
persialou says
Hi Kathy! HTRC is a half treble crochet. It looks like maybe I got the abbreviation wrong and I should have written it as “htr.” You wrap the yarn around the hook twice before drawing up a new loop, then YO, and draw through the first two loops. YO again, and draw through the remaining three loops on the hook. It is in between a dc and a tr stitch in height. I will be sure to add this info to the pattern. Thank you!
Steven Pascalli says
Hi, I am working on your pattern and I just finished the second circle and working on the rows that are attached to that circle. However from the picture posted and what you have written is incorrect. I am not sure how to get it like it looks in picture without extra stitches being made. An you please clarify this for me. This is such a beautiful piece and I’m at this hiccup
Jan Fugman says
Steven, I don’t see a reply to your question and i encountered the same situation. The pattern should read to dc, ch 1, skip next stitch, repeat across…just like we did in the body of the purse.
Anne says
Hi. Same here. We should skip a stitch I think. Or Maybe we can just freehand this to make it look like the flap in the photo
Poornima says
I started making this today….but I too feel there is some mistake in the written pattern…☹
jasmine says
i am a beginner so this may be a ‘duh’ question, but… how many chains should the magic loop be to begin with?
persialou says
Hi Jasmine! The magic loop doesn’t actually use any chains. Here’s a video tutorial to help: https://www.youtube.com/watch?v=3PmaQJbyVt0 Good luck! (You could also replace it with a loop of three or four chains if you like!)
Cristina Madinabeitia Briñas says
Hola Me encanta el trabajo de este bolso.
Pero la traducción al español es algo confusa.
Las hilaturas que quiere decir?
Y el punto alto retorcido como se hace?
Tienes algún tu torcal?
Bueno iré probando a ver que me sale
Gracias por las explicaciones
Cristina
Cecile says
I love this bag! I tried it out and just wrote a blog post about it – I’d love it if you checked it out!
cissyartcafe.com
persialou says
Awesome! I will definitely check it out! Thanks!
Desiree Naranjo says
Hi Persia Im crocheting this bag a saw in Target too..but I didn’t understand de abbreviations trc, htrc.please if you cant help me with that, I really appreciate…
Thans Desiree
persialou says
Hi Desiree! I’m sorry I should add explanations of the abbreviations to the instructions. Trc is American treble crochet, which is worked like a double crochet, except you wrap the yarn around the hook twice before beginning instead of just once. Htrc is half treble crochet. You begin like a treble crochet, but instead of working all the loops off two and at a time, you work two off and then the remaining three all together. It is in between a double and treble crochet in height. I hope that helps! I would love to see your bag when you are done!
eggers says
Love this bag♡
Made a similar one inspirated by you♡
Please come to see it on my page♡ https://m.facebook.com/haekelliebe
Belinda says
*****Yep made one for my daughter **********
Gorgeous pattern******** Wish I could upload to show you****
Belinda
Alexis says
Yay! I’m so glad you liked it!
Chantel Cothron says
This is wonderful. I saw it on Pinterest, stopped making dinner, ran to the yarn closet, grabbed my Sugar N Cream and went to work. Then got stuck on Round 4. I cannot get 18 DC by skipping two DC, so I just skipped 1. Is this a mis-print or typo or am I going nuts?
Misty says
I’m with Chantel on this one – Round 4 should be chain 2, skip 1 or else you’re going to wind up with only twelve ch2 spaces. Skipping one stitch will give you the right number of spaces.
Bella says
Hi! I love this pattern and bag! I am having trouble making the pattern for the lining. Is there any way to make it easier or could you post the pattern you made on here?
Taylor says
A video would be great and so helpful for this!!! 😀
persialou says
Thanks, Taylor! It is on my list to get some videos going soon. I will try to get one up. Thanks again!
shaylynn says
I think there might be some mistakes in the back section in the back and fourth rows, particularly 3 and 4 the pattern does not match the picture.
persialou says
Thanks, Shaylynn. I will try too look at it and see what the problem may be.
persialou says
Thank you, Shaylynn! I will look at it and see if I can figure out what the problem may be.
Katie Lyon says
Hi thank you so so so much for sharing this pattern, I love the style of boho, and I really needed a new bag so this was perfect! Thanks, I’m 13 years old, don’t have to much experience with crocheting, but I understood this very easily, thanks again!
persialou says
Thank so much for your comment, Katie! I am so glad you found the pattern helpful! I love that you are crocheting at 13! Good luck!
Stephanee says
I loved this bag in Target, too! I was hoping to catch it on clearance…now I don’t have too! Thanks so much! I can’t wait to go get the yarn!
Kathryn says
thanks so much for sharing this pattern!! I found this link on Pinterest while searching for something new to crochet, and decided to give it a try when I realized I had the exact yarn you used laying around. 😛 I’m currently working on it, and I love it already. I did realize there is a tiny typo, on round four it should be one space instead of two. 😉
but anyway, this is a beautiful bag and I can’t wait to finish it!! 🙂
persialou says
Thank you so much! I will fix it. 🙂
sally williams says
So nice thanks for all the instructions. Very generous to share.
Donna Blissett says
Thank you for making a written pattern, you made things a little easier for me.Now there is a 20% off the bag at Targets, but I prefer my version. Sort of hippy looking.
Mizukana says
Please help me… i’ve been working on bag front pattern, row 7. What’s the difference between htrc and hdc? Because i’ve search it on Google and it has the same purpose.. and is it true on row 7, it has 80 sts? Thank you.. 🙂
Deirdre says
Hi, I just started this bag and wanted to say let you know that if you do round 4 as written: Round 4: Ch 4 (counts as first dc and ch 2), skip two dc, dc in next st, *ch 2, skip 2 dc, dc in next st, repeat from * around, sl st to 2nd ch of beginning ch 4 (18 dc, 18 ch 2 spaces) Than you will not have 18 dc, I changed mine to skip 1 dc and it worked out perfectly! Thanks 🙂
persialou says
I updated the pattern. Thank you for catching that!
Lilly Vanda says
I love soooooooo Muuuuuuuuch !!!
it’s so beautiful!
aouatef says
thank you very beautiful ,
Daria says
So cool! it’s beautiful and I’ll try to do this! Thank you for pattern!
Debbie says
Does the ends of the fringe fray with use?? Or do you treat them with something so they don’t fray????
persialou says
Hi Debbie. No I didn’t use any fray check or anything. I haven’t had any problem with fraying. 🙂
Shelby says
Hi! I am having an issue and I have no idea how it happened! When I did row 7 I only ended up halfway around my circle with only 2 corners. Should I mirror row 7 to get all the way around?
persialou says
Hi Shelby! Hmm… I’m not sure on that… I would reference the photo to see if that helps. There should only be two corners, but they should both be kind of at the top. Make sure you did enough repeats of the “dc in dc, 2 dc in ch 2 sp” repeats. Sometimes it is helpful for me to just frog that round and start over. Good luck!
M says
This step could be clearer.
There are also still errors in written pattern.
A beautiful bag once finished but took WAAY to long to figure out why it wouldn’t work as per your pattern.
This pattern is still relevant today…..maybe its time to correct it or perhaps a video tutorial??
M says
Shelby the same thing happened to me as i only repeated 18 dc stitches……you have to repeat the ” dc in next dc, 2 dc in next ch 2 sp” group 18 times, it then works.
Robin Sanchez says
Love this pattern and Im making one for my daughter in law right now. Thanks for sharing!
persialou says
Oh good! I would love to see it if you make one. Thanks for stopping by. 🙂
Evelyn Aker says
I totally Love this handbag, I will be making this when I’m done with all the Christmas gifts and charity projects… I love crocheting and creating Beautiful things… Thanks so much and Blessings to you!
Trisha says
Thanks for sharing this wonderful bag. Will be on my project list.
Helen says
This sure is a keeper!! I am most impressed with your creative being What wonderful gifts these make Thanks so much for sharing this morsel of delight with us SMILE Helen
Autumn says
Hello. Love this and working on it as a Christmas gift.
Can you tell me if row 2-9 on the back of the bag rows are all in the back loop only or just the first row?
Thank you.
Alexis says
Hi Autumn! Just the first row of the flap should be worked in the back loops. 🙂 Good luck!
marie says
Please can someone help me with ow 7 I cant figure it out
Alexis says
Can you give me a bit more information about the problem you are having?
alicia says
OK so in row seven where you say sc hdc an then dc the last… dc ch 2 spot didn’t have any thing there please help me thanks … lovely pattern though
Kayla says
Hello! Love this bag. If I were to make some would I be able to sell them on Etsy?
Alexis says
Hi Kayla! That’s fine. I would appreciate a link back to the pattern on your listing, and you may not use my photos in your listings. Thanks! 🙂
Lisa Komprs says
Thank you Alexis sooooo much!!! I’m making it right now, literally. I’m working on the shells and already in love with it!
Carrie says
Wish this pattern could be downloaded or printed
heidi says
love this bag. i am not sure what i am doing wrong. after round 2 it starts looking like a bowl, like when you are making a hat. i have gone up 2 hook sizes. i know i crochet tight , so i will keep playing around with it.
Alexis says
Are you possibly leaving out a stitch or not doing enough repeats? Usually when it starts turning bowl-shaped there aren’t enough stitches… Good luck!
Lola says
Hi, I’m a beginner and dont know how to chain into a stitch as in row three. I know how to chain but not into a stitch,
Alexis says
You don’t really chain into the stitch. In row 3 (of the flap?) you just work a chain before you do the dc stitch. It creates a little gap in the work. I hope that helps!
Amber says
How did you put a lining in the purse?
Alexis says
Hi Amber! I just used the bag itself to help me make a pattern for the lining, and then hand sewed it into the bag.
Ashley says
Could someone explain round 5? I just started a few weeks ago and I not really sure what * means.
Alexis says
Hi Ashley! Later in the instructions it says repeat from * x number of times. So you repeat the stitches after the * and before “repeat” however many times it says. I hope that helps. Good luck!
Ashley says
Thank you so much for replying now I understand and by the way I love the black cat slouch hat. All your projects are so cute I hope you gain more subscribers in YouTube. And again thank you.
Amber Zumbrun says
Am I allowed to sell a finished item as long as I give full credit for the pattern to you? I am working on the boho tassel bag for myself but I have a few friends that have been asking me about making it for them and I do not want to sell something I made from a patten that is not my own without permission.
Alexis says
Hi Amber! Thanks for asking. 🙂 Yes, you are welcome to sell any items you make from my patterns. I just ask that you don’t sell or redistribute the pattern itself in any way. Thanks again! 🙂
Melissa A. Compton says
Crocheting the purse and love it! What stitch would you suggest for the strap?
Alexis says
I would probably do a double crochet – I’m thinking about three long rows. It might be cute to add the scalloped edging to it too. 🙂 I would love to see it when you are finished!
Melissa A. Compton says
I was going to continue the sides all the way up and adding the scallop. Don’t know if it would be too wide. I will send you a pic. Ummm how do I do that? I finished the cat hat too. Would love to show you.
Melissa A. Compton says
Nevermind, I will send pics to your facebook page.
Prajakta Khanvilkar says
Hi Alexis,
I love this bag..the moment i saw this i had to make it…..so gave it a try and it turned out so good..Your instructions are spot on….I only changed the strap and crocheted it instead of the leather strap….I would like to show u how it is.. but don’t know how to post a pic here. I showed it to my friends and they want made for them too…..so starting second one now….. Thank you so much for this pattern….. 🙂
Alexis says
Thank you so much! I’m so glad you liked the pattern! If you use facebook, instagram, or twitter, you can share your photo with me there. (Facebook – https://www.facebook.com/persialou Instagram – https://instagram.com/persialou Twitter – https://twitter.com/persialou – Tag me (@persialou) and use the hashtag #persialou ) OR you can email me at alexis@persialou.com 🙂 Have a great day!
Tyree says
I love this bag but want to make mine bigger. How do I go about doing that? do I increase the rows I crochet?
Alexis says
Hi Tyree. 🙂 To make a bigger back, Repeat a few more rounds on the front and back pieces making sure to increase the stitches as you go (this keeps the piece from curling in on itself). Then you will need to make the side panel longer so that it’s the same length as the outside of you finished front and back pieces. Good luck! I would love to see it when you finish.
Tyree says
Thank you for responding to my question last time, but I’ve ran into some trouble and I need some help. I finally finished the front with 121 stitches and 60 spaces and the last part on the insturctions is when I have to do the treble crochets. I did the repetitive part 40 times and tried to finish the rest, but I still have a lot of chains left. Do I slip stitch my way around the project or repeat the rest of the pattern after it says 18 times?
Ivona says
Hi! You can check out my version of this pretty bag at https://whyidiy.wordpress.com/showcase/
Thank you for sharing, I really enjoyed making it 🙂
Jocelyn says
I absolutely LOVE this! You did such an amazing job. I can’t wait to make one of my own!
Alexis says
Thanks so much, Jocelyn! So glad you like it! 🙂
Stephanie says
I browsed through this and plan to make it, so I am not positive, but this seems like a very detailed and easy to follow tutorial. Thank you so much for taking time to make and share this. I’d be happy to share pictures with you once I’m finished if you let me know an email or site to share them on. Once again thank you, this is so pretty!
Alexis says
Hi Stephanie! I would absolutely love to see your bag when you finish! If you are on instagram or facebook, that’s an easy way to share with me. Just tag me in your photo on instagram (@persialou) or you can share it to my facebook page (https://www.facebook.com/persialou) or you can email me a photo too at persialou@gmail.com 🙂 Hope you like the bag!
Ashleigh says
beautiful! Cant wait to make!! 🙂 Thanks for the pattern
Lily says
So pretty! ✨
Rufina says
Superrrr love this Boho bag 🙂 🙂
How many sugar n lily yarn did you use?
Alexis says
I used 8 ounces, which is about 3 of the small balls. Good luck! 🙂
Zoie Weiss says
Do you allow people to sell items that have been made using your patterns?
Alexis says
Yes! I appreciate a link to the pattern if you are selling online. Thanks! 🙂
Stephanie Jevyak says
It’s almost 2017 and this boho bag is still just amazing!! I haven’t made it yet but as soon as I get all my Christmas crocheting done it is NEXT no matter the request I get, lol. Thank you so much for your time making this pattern and the pictures…also I very much appreciate you updating it as people brought attention to “tiffs” in the pattern. So many times I’ll crochet a pattern of the internet and some part won’t work out, then I’ll go through the comments and it’s been addressed but the pattern doesn’t reflect it. So again thank you for all you do!! God bless you and have a Merry Christmas!!
Alexis says
Thanks so much for your kind comment! I really appreciate it. And Merry Christmas to you too! 🙂
Cynthia says
Hola me encanto el bolso pero podrían pasarlo a español porque no entiendo el inglés gracias. Cynthia
Alexis says
Hola lo siento, Cynthia. Tal vez intentar un traductor? Lo siento pero no tengo una versión en español disponible ahora mismo.
Danielle says
How did u do the straps ? Did u like put it in between the lining and the bag ? That’s the only part I’m not really sure how to do and I’m trying to look at the picture but it’s not helping too much pls let me know how u did it 🙂 I really love the bag
Alexis says
Hello! I just used rivets to attach the straps to the bag. If you look at the last photo of things inside the bag, you can see that I did not put them in between the lining and the crocheted portion of the bag (although that is a great idea! I just folded that loop of leather over, and hammered the rivets through the leather and the bag. It has worked well. Good luck!!
michele says
hi persia! do you ever have an issue with the rivets coming right through the crochet? i love all your stuff by the way, thanks in advance!!!
michele says
oops! i meant “hi alexis”!!!
Alexis says
Hi Michele! Thanks so much! 🙂 I haven’t had that problem, but I can definitely see how it could happen. I think lining the bag definitely helps, and also try to put the rivet through a stitch instead of in between stitches. Another option would be to sew the leather directly to the bag, just make sure to use a heavy duty needle and thread. Hope that helps!
Sadiyah says
Hi! I’m currently making this bag for my friend who is DYING to get her hands on the finished product, but I’m confused with Row 5….do I do exactly what was done in Row 3 (2 dc in one ch and then one dc in the next ch)? I did that for Row 5 and I have way too many dcs for this row.
Thanks for your help and this amazing pattern!
Amber says
Where did you get your material for your strap? I have my whole bag done and ready to sew but stuck on my strap. Went to Joann but they didn’t have anything to use.
Alexis says
Hi Amber! I believe I picked it up at Hobby Lobby, but you can get it through Amazon here: http://amzn.to/2mGojSZ (that’s an affiliate link). I think the price was a bit better at Hobby Lobby. You could also absolutely us a thrifted or old belt. Good luck!
Amber Bolton says
Oh thank you so much! I will check out Hobby Lobby! That was going to be my next stop! 🙂 I am so excited to get this finished!
Steven Pascalli says
Okay so I am working the flap and row 3-10 doesn’t match what your picture shows and there is gaps. Is there any clarification on this thanks so much. Love this bag and had to make it for a friend. Thank you for your help
Amy Bolay says
I’m having the same issue lol glad it’s not just me
Amy Bolay says
Hi! I am in the process of making this and so far I’m loving it! I am having some trouble when it switches from the rounds to the rows. I may be reading or doing it wrong but when I go from Row 3 to Row 4 they aren’t lining up. Not sure what I’m missing lol
Jessi says
Hi!! I LOVE this bag!! I am creating it as we speak. However, I am just going to crochet a strap to save the time and money of going to the store. Any recommendations on how to do this? Where to attach it? How wide to make it? Thank you so much!!
Alexis says
Hi Jessi! I would probably do just do a short row of double crochet stitches – maybe like 5-6? I would think I would want the strap about 1.5″ wide. Hope that helps!
Jan Fugman says
Alexis, I am crazy for this bag. Just too sassy! I made the front, but I think it is too large even though I went down a hook size. Can you give me a measurement of the overall width, maybe before scalloped edging? I may need to go down to a G hook.
I so love this bag and want to make many in lots of fun colors. Thanks again for sharing your creativity.
Jan
Jan Fugman says
Not sure what ‘your comment is awaiting moderation’ means. Do i have to do something more to send this message to you?
Candi says
I am having trouble with round 2. Pattern says dc chain 1 but when I do this it turns out like a bowl. If I do dc chain 2 it lays flat. what else could i be doing wrong or is the pattern incorrect?
Candi says
Also I have tried this many times already and had to rip it out even though I am following the pattern EXACTLY how it is written. Any comments would be greatly appreciated
Ruthie says
Thank Goodness for genius creative people like you. This is adorable! I want to make it for one of my granddaughters. I don’t sew, so the lining will be a challenge for me; and, I’ll have to crochet straps. Thank you, thank you, thank you!!!!!!!
Lynne Coomans says
I love this pattern, but I cannot print past the first page. Any tips?
Savannah says
Hi Ms. Alexis, I’m interested in a few of your crochet items and would like to list them on Etsy. Would that be okay? I will give you credit and link your patterns in the descriptions. Thank you for your time.
Carol Gonzales says
I’m not sure if I ever commented on this purse or not but I love the purse so so SO much! It’s 2021 and I’ve made several and sold them on my Etsy store. And Yes, I did post it with a link to this pattern to give Persia Lou credit. Only problem I have is that when I make one for myself, I usually get an order and have to give it up! I added a few things to the purse like some beads and a bit of jewelry which is different each time I make it. Check it out here https://www.etsy.com/listing/544018389/crochet-boho-purse-cotton-liner?ref=shop_home_active_27&frs=1
Lisa says
I showed it to my daughter, and she loved it. I am going to try my best to make it. As soon as my other daughter sees it, she’ll want one, too. Send me some good vibes. Please?!
Sissy says
I absolutely love the purse pattern.i use belts for the strap. All my girls have loved their gifts. Thank you so much for this beautiful patter.