Learn how to make a quick and easy high chair cover for your baby’s first birthday photos! This post may contain affiliate links, which help to support this site at no extra cost to you if you make a purchase through one of our links.

In my mind, first birthday parties are mostly about watching a one year make a huge mess out of some cake.
I’m talking a cake-on-the-walls, frosting-in-the-ear, finding-crumbs-for-weeks kind of mess. That’s the good stuff. My little bug did not disappoint.
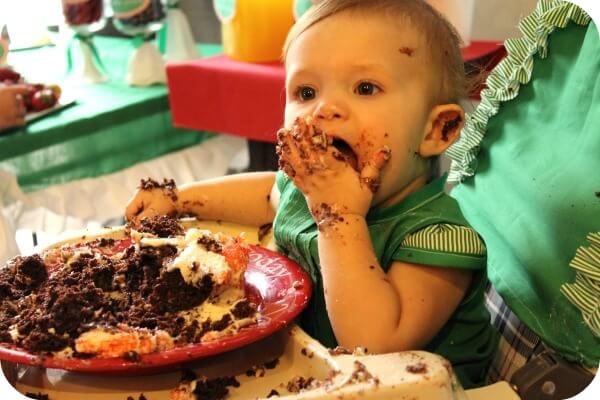
Well played, baby girl. Well played.
Since I consider the cake-smash to be the main event of the first birthday party, I wanted to make sure I had a cute background for all the photos I would be snapping of the beautiful mess.
Here’s how to make a twenty-minute high chair cover for your favorite baby’s first handful of cake.
How to Make a Quick High Chair Cover for Birthday Smash Cake Photos
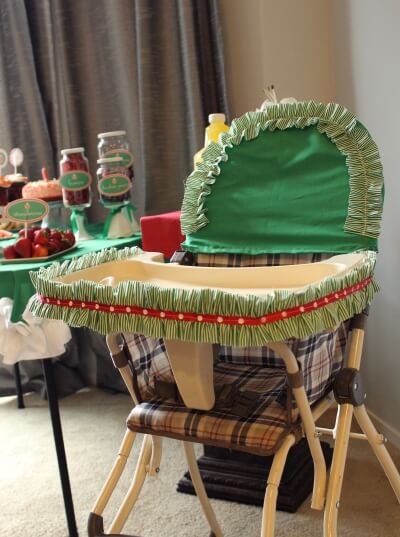
Sew a quick and easy high chair cover!
Materials
- Fabric (one yard for the seat cover and another half yard for ruffles)
- Thread
- Ribbon
- Tape
Tools
- Sewing Machine
- Iron
Instructions
- Start out by pinning a folded piece of fabric with right sides together over the back of the high chair along the shape of the seat back.
- Next, carefully remove the pinned fabric.
- Sew along the line created by your pins removing each pin before you get to it. Leave a few inches unsewn at the bottom to create a hem and side slit.
- To hem the bottom, roll up the edge twice, use your iron to press the fold, and then sew it down.
- You can add embellishments as you like. I added a ruffled piece of fabric around the seat cover and the edge of the high chair tray. I used this technique to create a ruffled strips of fabric. I sewed one ruffle around the outside of the cover, and made another long ruffle for the edge of the tray. I sewed a red polka-dot ribbon over the center of the tray ruffle and used tape to stick it on.


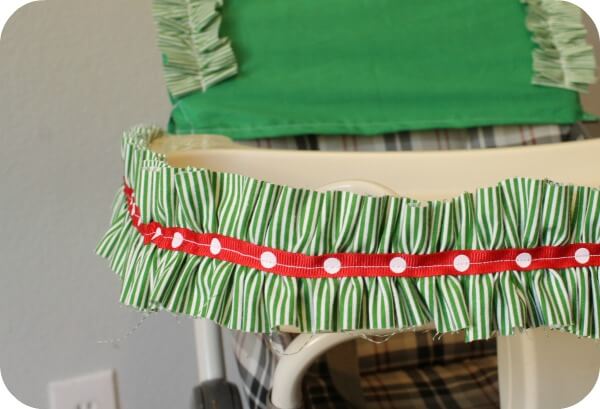
I love that ruffle and ribbon combo! It’s definitely my favorite part.
(Also, I just want to mention that this is a project I would recommend not worrying too much about. You can see from the photos that my stitches are are definitely not neat and pretty, but I just decided I didn’t care. It’s just going to be covered in cake, right??)
So, there you go! A quick and cute high chair cover for your baby’s big moment.

Happy Birthday Cake Smashing and Happy Making!


Comments + Project Love
Stephanie @ henry happened says
You are so smart! This makes such a difference in the photos, I love it! You little one did a smashing job with the cake too!! 🙂
ruthhill74 says
Oh, this brings back memories of my little one who is now 8. How sweet!
christaquilts says
Simply adorable! You make me want to scrap my cleaning plans for the day and just sew all day long!!
maemakes says
SO cute!! This brought back a lot of memories for me as well (my little is now 7). But seriously, what a great idea!
Vicky says
That is perfect! Especially if you have a chair pattern you don't really care for that was gift. :-)<br /><br />I am a new follower from the Show and Tell linking party on Blue Cricket Design. If you have a chance come by http://messforless.blogspot.com<br />and say hi!<br /><br />Thanks!
Victoria Mische @ Your Chair Covers says
You are brilliant Alex! These kind of post is always inspiring. It is easy to observe that you're enthusiastic about making this stuff and that's what I want in every blogger!
Chin Sink says
It took me a couple of hours before I came across your site.Well, this post would be of great help to anyone who would come to read this one. Thanks a lot for sharing your thoughts.<a href="http://legalsniff.com" rel="nofollow">party pills</a>