Learn how to make your own DIY printable treat bags! You can customize these simple treat bags for any party, holiday, or special occasion. This post was originally shared on Crafts Unleashed and contains affiliate links, which help to support this site. Thank you!

Sometimes I see fun new little crafting tools, and I just have to give them a try. Today’s post started when I saw this fun little goodie bag guide. It’s a little ruler tool that allows you to really quickly create custom treat bags for your next party or holiday celebration. I’m all about custom designs and simple little gifts, so I definitely wanted to give it a try!

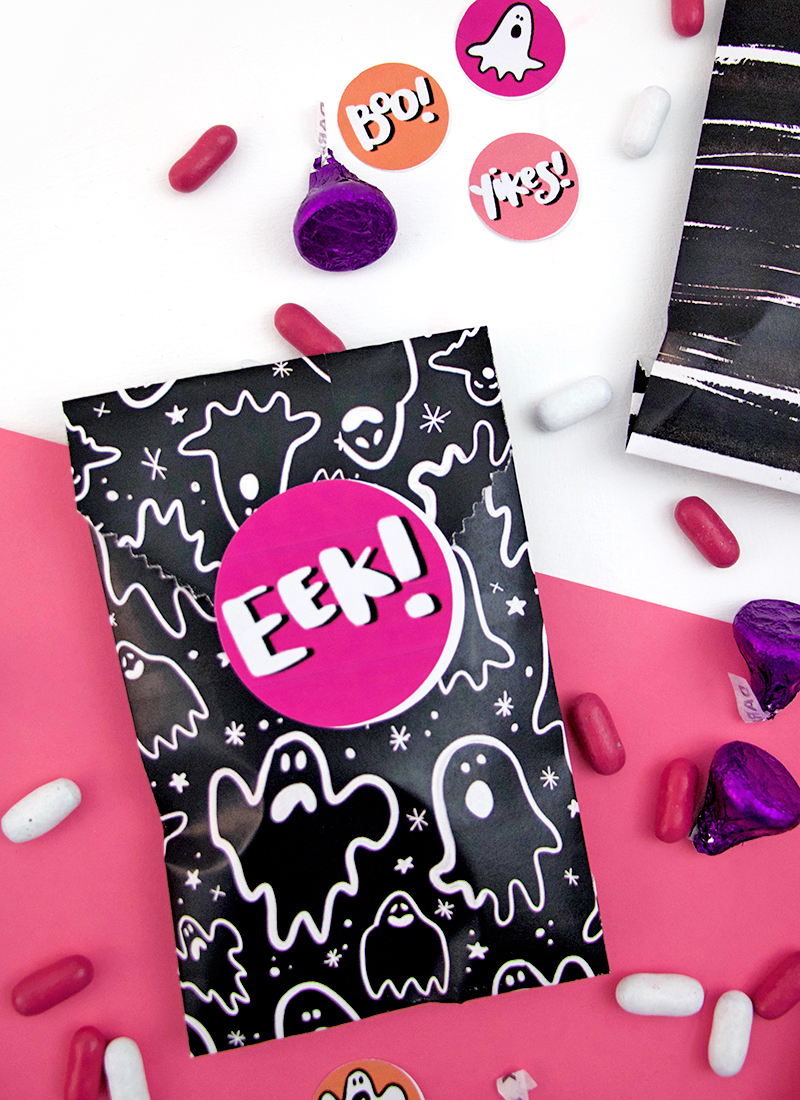
I created some bright and colorful watercolor designs perfect for a sunny get together or birthday party. I loved the watercolor designs so much that I decided to whip up some Halloween designs too, and I love the way those cute little bags came out too!

I’m not sure this tool is something that everyone needs to have in their craft cabinet, but it is a fun and simple way to quickly make a bunch of cute goodie bags. I will show you how it works below, but you could always use the printable papers and stickers and just cut them in the same general shape to make the treat bags without the guide.
Ready to make some cute goodie bags?
DIY Printable Treat Bag Supplies
- Printable Vellum Paper or Copy Paper
- Printable Sticker Paper
- We R Memory Keepers Goodie Bag Guide
- Permanent Tape Runner
- 1 inch circle punch or Silhouette Cameo
- Design Downloads – Watercolor (Papers PDF and Stickers PDF) or Halloween (Papers PDF and Stickers PDF) Designs
DIY Printable Treat Bags
Step One. Print Designs on Your Paper.
Start by printing off either the watercolor or Halloween designs (linked in the supply list above) on sheets of printable vellum paper or regular copy paper. The goodie bag guide works better with thinner paper since you just tear the paper, so I wouldn’t recommend thicker papers like cardstock. If you use the printable vellum, be sure to print in an inkjet printer. I tried it in my laser printer, and did not have good results. You can also use printed scrapbook paper or print your own custom designs to match your party theme.

Step Two. Trim and Tear with Goodie Bag Guide.
The goodie bag guide is designed to work with paper that is 6, 8, 10, or 12 inches wide. I trimmed my paper down to 8 inches. The finished bags are 3.5 inches wide.
Once the paper is trimmed down to the right size, it’s time to tear according to the goodie bag guide instructions. Start by lining up the edges of the paper with 8 inch lines. Then, while holding the guide in place tear along the guide. Tear the paper up towards the guide to get a clean tear with that pretty pinked edge. Don’t tear all the way across, but start on one side, tear to the middle, then tear from the other side. When the first line is torn, slide the guide down to the desired bag height and repeat the process.

Step Three. Fold and Glue Goodie Bags.
Next, line the straight edge of the goodie bag guide up with the inside corners of each side of the bag and fold over the top of the guide. Use the edge of the guide as a bone folder to score along the fold. Fold up the bottom of the bag using the guide in the same manner. Finally, use a permanent tape runner or other adhesive to seal the bag.

Step Four. Print and Cut Stickers.
Your goodie bags are all ready to be filled up with yummy treats! And the perfect way to finish them off and keep the closed is with cute matching stickers. I designed stickers to match with both the watercolor and Halloween designs. Just print the designs on white sticker paper and cut them out with scissors, a circle punch, or your Silhouette or Cricut. Finally, peel and stick to seal the bags.

And that’s it! Your own totally custom, totally adorable DIY printable treat bags!


I love the watercolor designs for any bright, sunny celebration. They could definitely be used for a lot of different events and occasions. Since Halloween is coming up, I couldn’t help but do a couple little Halloween designs too. These paper designs are all black and white and the stickers are in pink, purple, and orange. I love that combo!

So what do you guys think of this little DIY goodie bag tool? Would you give it a try? If you make your own DIY printable treat bags, I want to see them! I love it when you share your projects to my facebook page or tag me on instagram. Seriously, it makes my day!
Happy Making!

More Printables You May Like:
 Printable Halloween Tattoos
 Printable Fruit Straw Flags


Comments + Project Love
Hannah says
Alexis hands down to your creativity, treat bags looks too cool, I am planing to make these for Halloween party, this will save my money and i am sure everybody will like it. Thanks for sharing your creativity. I will be subscribing to your blog for beautiful ideas like this.