A big thanks to American Crafts for sponsoring this post!

Hey guys! I’m back with another Halloween/Dia de los Muertos project for you all today. I’m busting out my favorite crafting tool again for more metallic, shiny goodness to make these pretty Foiled Sugar Skull Prints.
Here’s everything you will need to make your own:

Supplies (I have included affiliate links below, and I may make a small commission if you make a purchase. Thanks for supporting Persia Lou!):
- Black Cardstock
- Sugar Skull Download (Photoshop File or PDF – for personal use only please!)
- Scissors
- Heidi Swapp Minc
- Reactive Foil
- Laser Printer (this is an affordable model recommended by American Crafts)
As you guys know, the Heidi Swapp Minc is my favorite tool for adding amazing metallic foil to my craft projects. I especially love doing my foiling projects on dark paper for a couple of reasons. First, the foil really pops against the dark background, and second, if you have any little spots of toner peeking through, you hardly notice against the black paper!
Since we are heading into Halloween time, and I am a HUGE fan of everything Dia de los Muertos, I decided to create a sugar skull design, and I knew it would look awesome foiled onto black paper.

I really love the affect of using multiple colors of foil on one project, and I’ve shared my tutorial for perfect multi-color foiled prints before. The trick is break up your image up into different layers using photo editing software before you print (I have already done the hard work for you in the photoshop file). I used photoshop, but gimp is a good free alternative.
My sugar skull design is broken up into three layers: the skull, the floral crown, and decorative details. To get the multi-colored look, you simple print and foil each layer one at a time. Click on the little eyeball next to the layer so that only the layer you are currently printing is visible.

After printing the first layer (and oohing and aahing over the black ink on black cardstock – that always gets me!), place the foil of your choice shiny side up on top of the printed image and place them both inside the transfer folder. Then insert into the Minc. I used the level 3 heat setting.

When it is all done peel off the foil and – ah! – this is really the best thing ever. I used the holographic foil on this print, and it is kind of amazing.
Next, insert the paper back into your printer, making sure to put it in facing the right way. I recommend you figure out the direction your paper needs to face before you do any foiling so you don’t accidentally print on your foil and find yourself cursing the crafting gods (not that I have any personal experience with that). Then just repeat the foiling and gasp-inducing peeling back process.
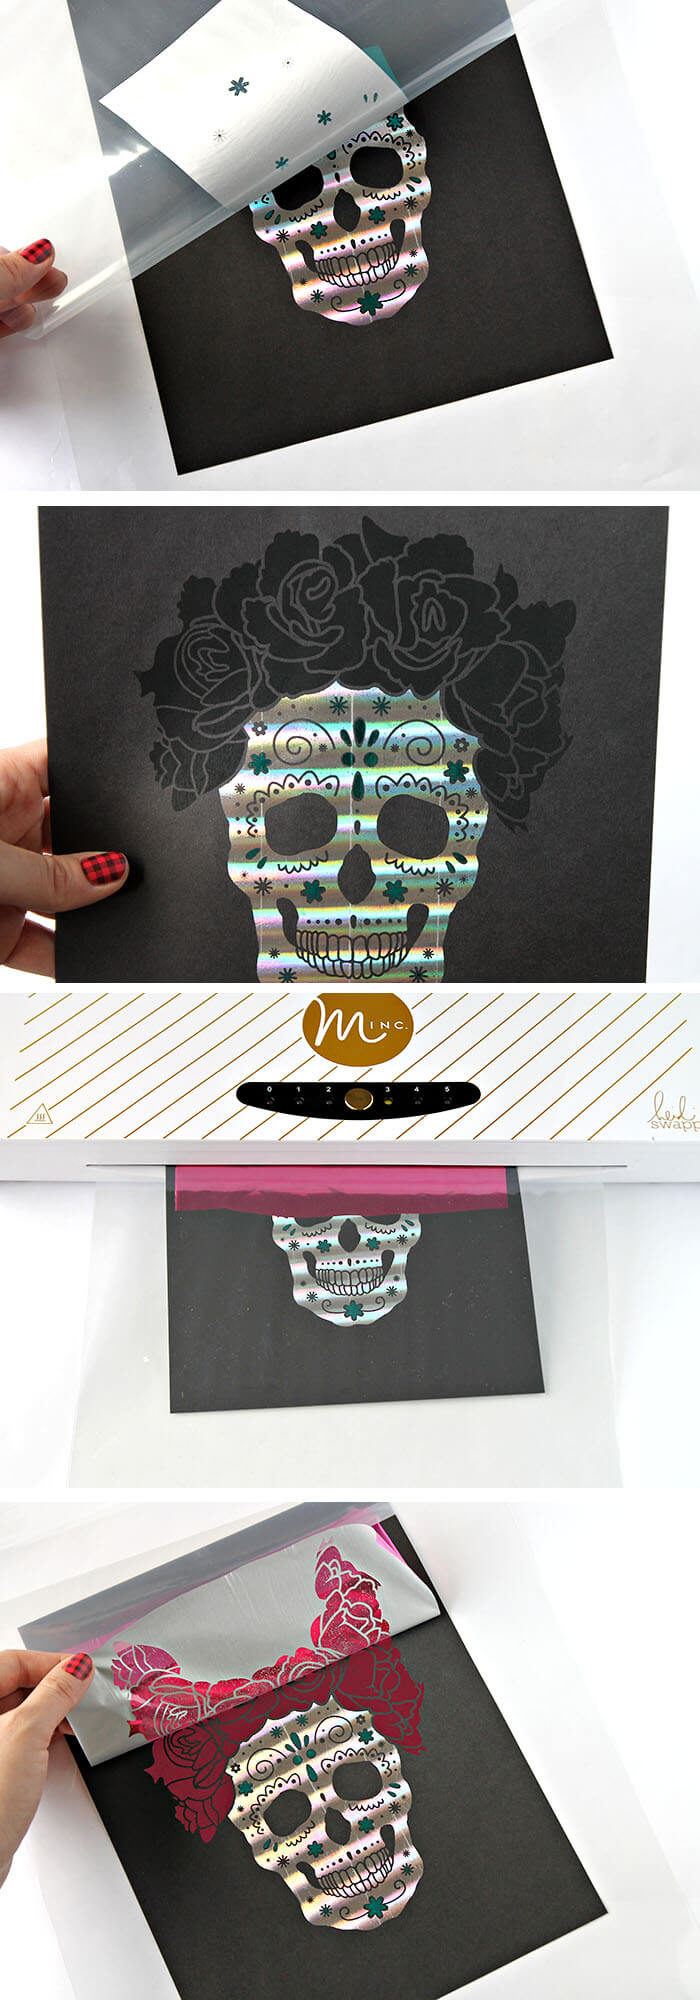
Gasp! It’s gorgeous. Friends, you’ve got yourself some pretty foiled sugar skull prints.

If you don’t have a laser printer at home, you can opt to print off the PDF version and go get a copy made at your local copy shop. Most copiers work perfectly for foiling because they use toner, which is what reacts with the foil. You can cut and place different colors of foil to get the multi-color look, or you can just do it all one color, which looks pretty rad too.


I’m not sure if the pink and silver is my favorite (did I tell you guys I’m making pink a Halloween color this year?) or the gold. There’s just something about black and gold, am I right?
I framed one of these guys up and stuck it my entryway to add a little seasonal flair to the decor. I think if you shrunk it down a bit these would also make great cards – or what about foiled treat bags!? So many possibilities, guys.
Just a reminder that my design is free for personal use only and cannot be sold or redistributed in any way. If you make your own print or other craft with it, I would LOVE to see it! Share it with me on my facebook page or tag me on instagram. 🙂
Happy Making!


Comments + Project Love
Laura Z says
Hi this is a great printout but im trying to download the photoshop one and it says invalid page. Thanks