My free Twist Front Crochet Headband pattern will teach you how to make an adorable and trendy chunky headband to keep your ears warm this winter. This post includes both a free written pattern and a video tutorial, so keep scrolling and start crocheting! This project was originally shared on the Darice blog, and contains affiliate links, which help to support this site at no extra cost to you. Thanks!

I’m super excited to share a new crochet pattern and tutorial with you all today! This simple headband/earwarmer pattern has a nice chunky texture and fun twist front look that is really trendy these days. Plus – good news! – this headband is super easy to crochet. No tricky stitches or techniques required!
I have shared a few crochet headbands here in the past (like the Sailor Knot Crochet Headband and the Tie Front Crochet Heaband), but this one might be my favorite yet.
You only need to know how to do a chain stitch and half double crochet stitch to make your own twist front crochet headband. Make one for yourself or gift one to a friend! I have also made a video for you, so you can see all the stitching in action!
Ready to get crocheting?
Twist Front Crochet Headband Tutorial
This little pattern only requires a few supplies. So grab your yarn and your hook, and let’s get making!

Twist Front Crochet Headband Supplies:
- 90 yards No. 6 Super Bulky Yarn (I used one ball of All Things You Wool Blend Yarn in the Moss color.)
- Size M (9.00 m) Crochet Hook
- Yarn Needle
- Scissors
Twist Front Crochet Headband Pattern
Please Note: This pattern uses American crochet terms and is free for personal use only. If you would like to share the pattern, please share the link. Visits to my website allow me to make income through ads and to continue to offer my patterns for free.
Twist Front Crochet Headband Video Tutorial
My video tutorial for the headband is below. If you don’t see the video below, you may need to turn off an ad blocker.
For the written pattern, just keep scrolling. 🙂
Crochet Stitches Used:
- Chain (ch)
- Half Double Crochet (hdc)
Twist Front Crochet Headband Piece Pattern (Make Two)

Row 1: Ch 46. Work hdc into 3rd ch from hook, hdc in each remaining ch (44 hdc).
Row 2: Ch 2, Turn. Working in back loops only, hdc in each st (44 hdc).
Rows 3-5: Repeat Row 2. Finish off, weave in ends.
Twist Front Headband Assembly
When you have crocheted two of the headband pieces, you are ready to assemble your headband! First, wrap the two pieces around each other as shown in the image below. You want the two ends to line up on either side of the center twist.
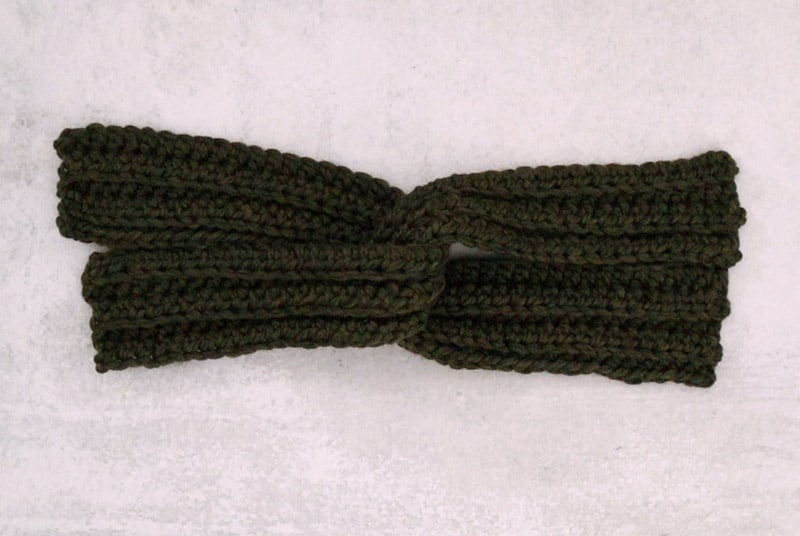
To keep the ribbed look consistent, you want to slightly over lap the ends on either side of the twist. You may have to try twisting your pieces in a different direction to get that consistent ribbed look. When you have your pieces positioned as you like, it’s time to use your yarn needle and a length of yarn to stitch the two pieces together.

After stitching the overlapped ends together, your headband should look something like this:

Now, all that’s left to do is sew your rectangular piece into a tube. Bring the edges together and use your needle and a length of yarn to sew the headband closed.

Finally, weave in any remaining ends, and your chunky knot-front headband is all done! Ta-Da! So easy, right?

Just look how happy I am about my new headband! 😂
Well, that’s it, folks! I hope you like this pattern, and if you make one, I would love to see it! When you guys share your photos with me of things you have made using my patterns, tutorials, or cut files, it just makes me SO happy! You can share your photos to my facebook page or tag me on instagram or just email me at alexis[at]persialou.com. 🙂
Until next time, Happy Making!

Check out more free crochet patterns:
[the_grid name=”Crochet Patterns Footer”]


Comments + Project Love
Ros says
Great, many thanks. Could you give idea of the length so I can judge whether 46 stitches is right fri my head!
Many thanks. Ros
Thomas says
Yes, please! What length should the pieces be? I’m using a very chunky yarn, so don’t want it to be too long.
Thomas says
Each piece should be at least 10″ long when folded in half. Longer for a larger head.
Pauline McClain says
Remember the 30 minute hat? We made them for everyone and then kept going. My daughter made them for women at a cancer infusion center in RIC, VA. Thank you❤️
Alexis says
Aw thank you so much! You made my day! 🙂